
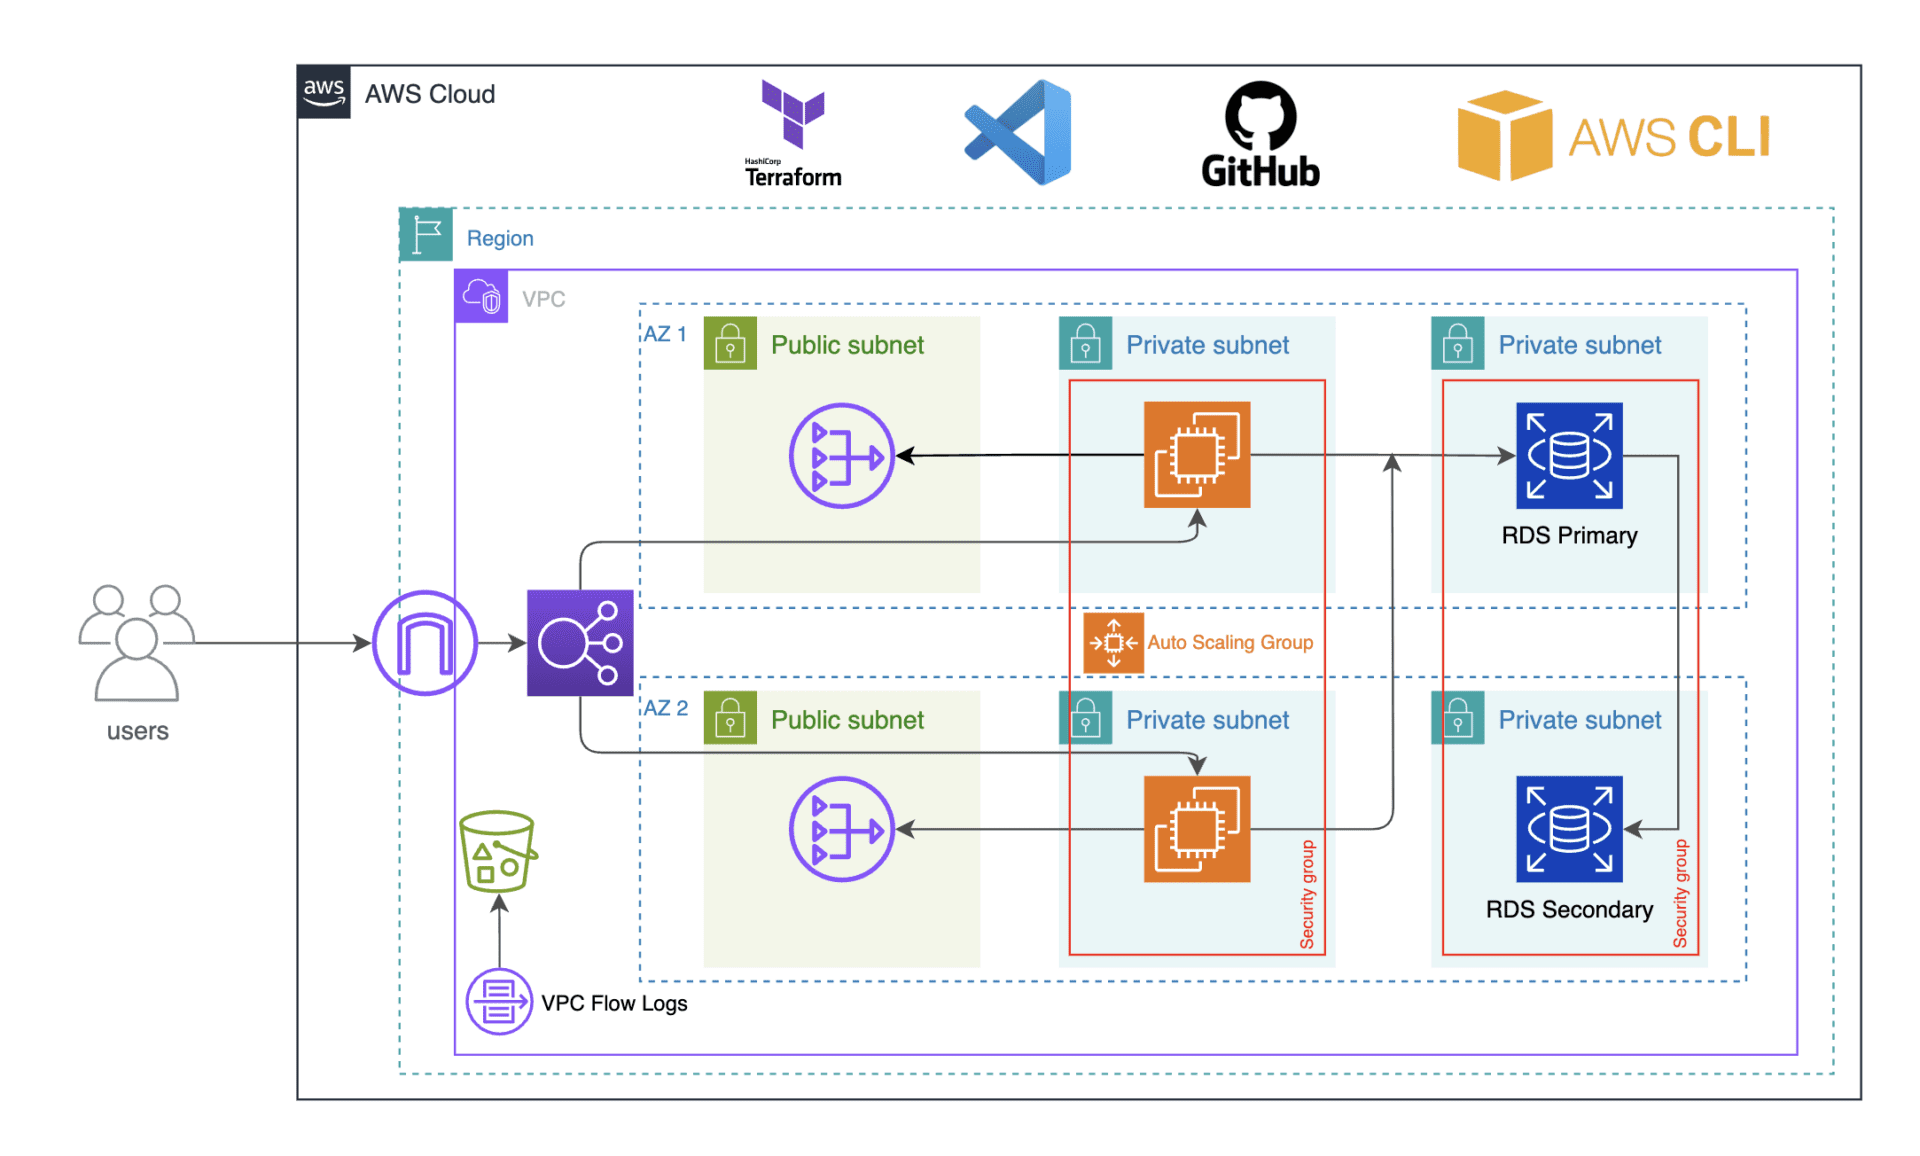
Deploy a three-tier architecture in AWS using Terraform
Install the AWS CLI on our computer to manage your AWS services. Afterwards, terraform will use it to create resources in our AWS account.
Go to https://aws.amazon.com/cli/ and click getting started.
Under Getting Started, click install/update
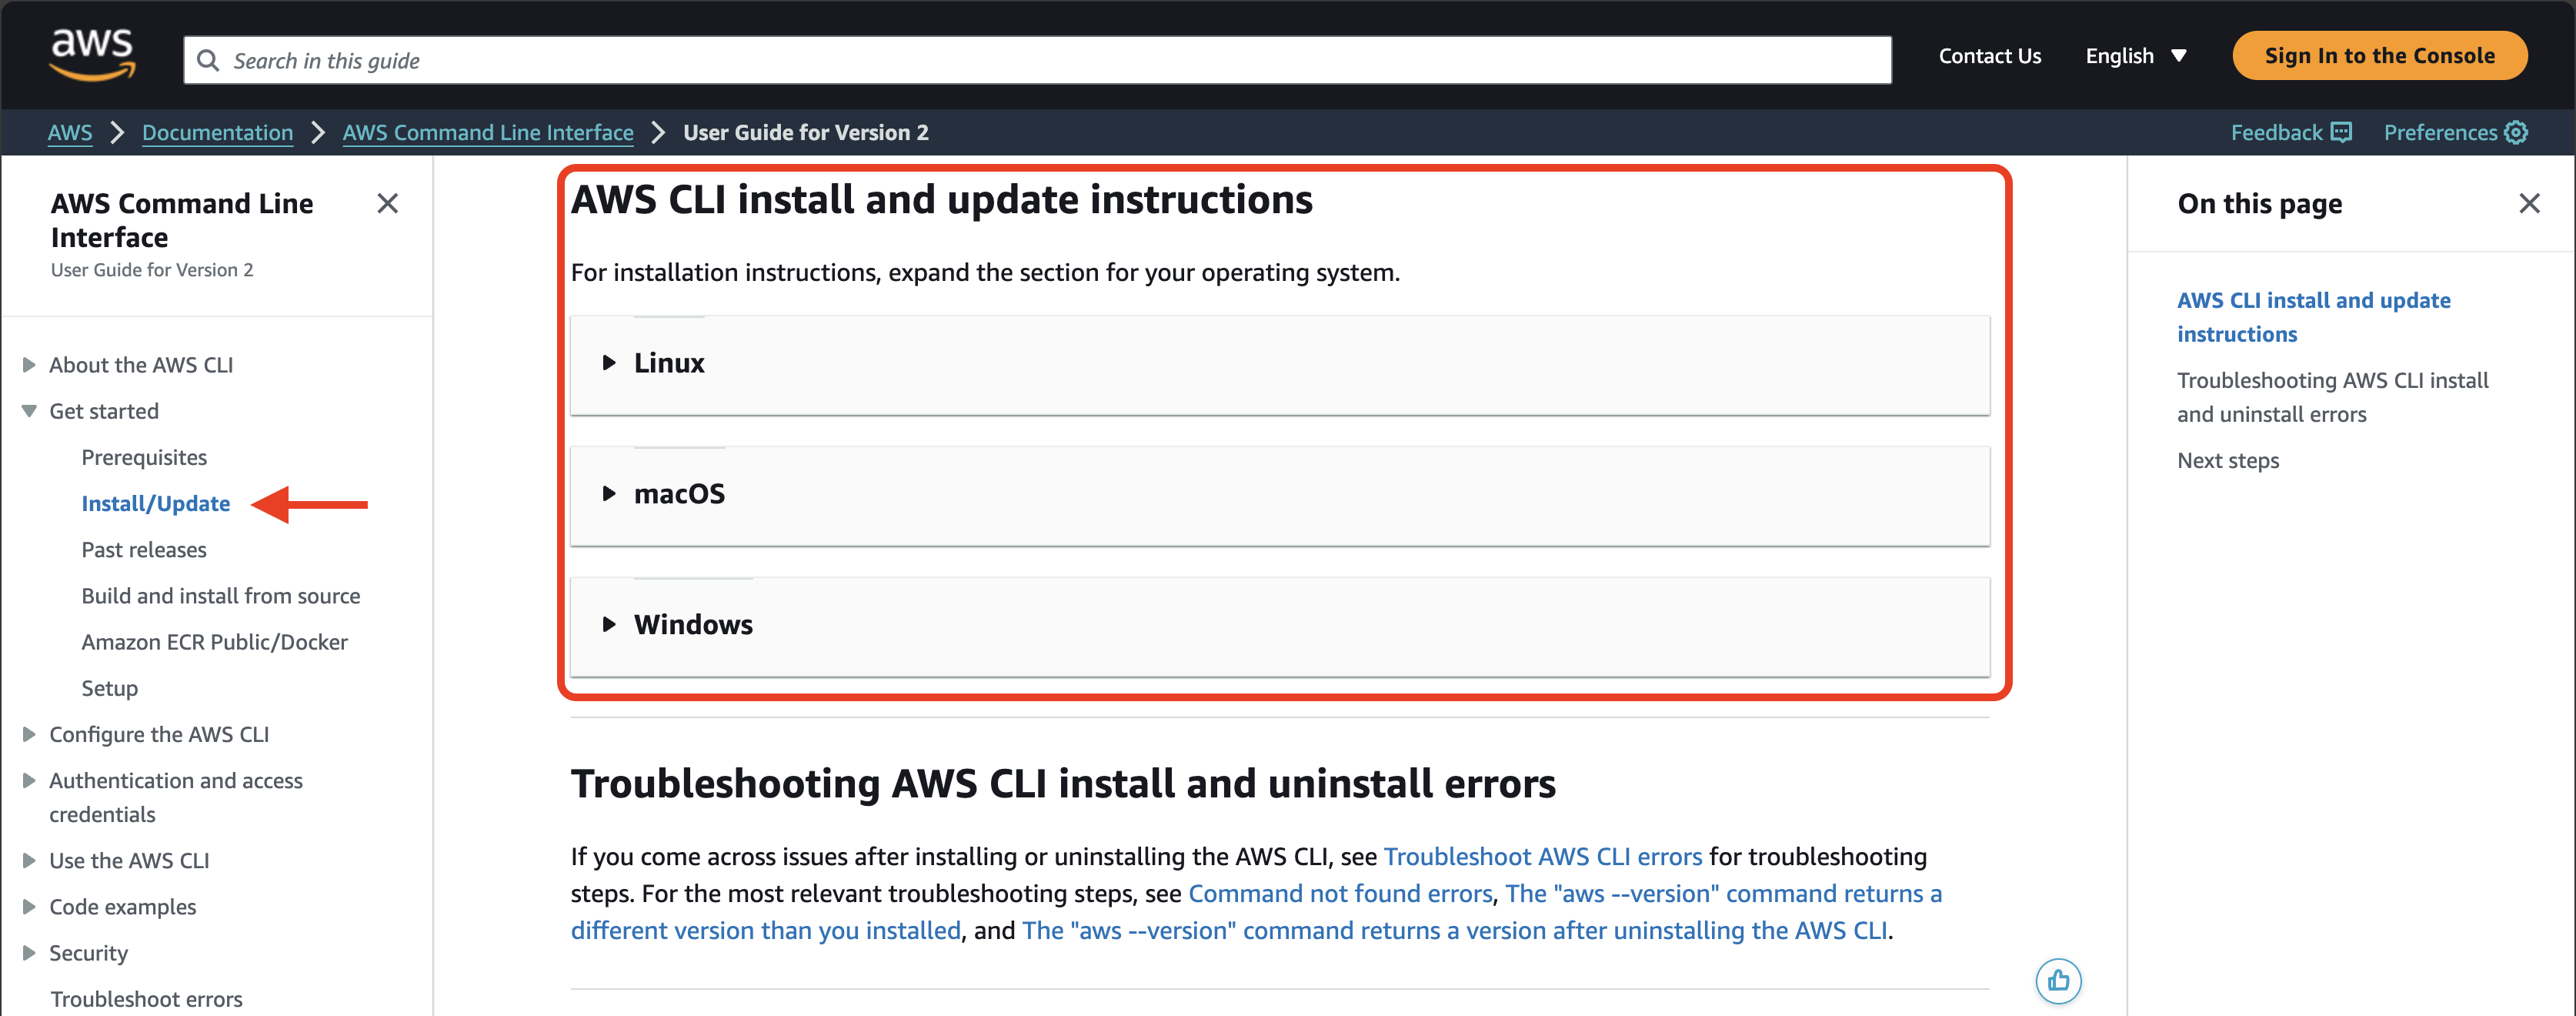
Scroll down to windows and click the executable file to begin the installation. Follow all installation prompts by clicking next and install. Let’s verify if its installed.

Run aws --version There you go, AWS CLI is installed on our computer. This is how we install the AWS command line.
Create IAM User
We are going to create an IAM user with programmatic access. Terraform will use this IAM user’s credentials to create resources in our AWS environment.
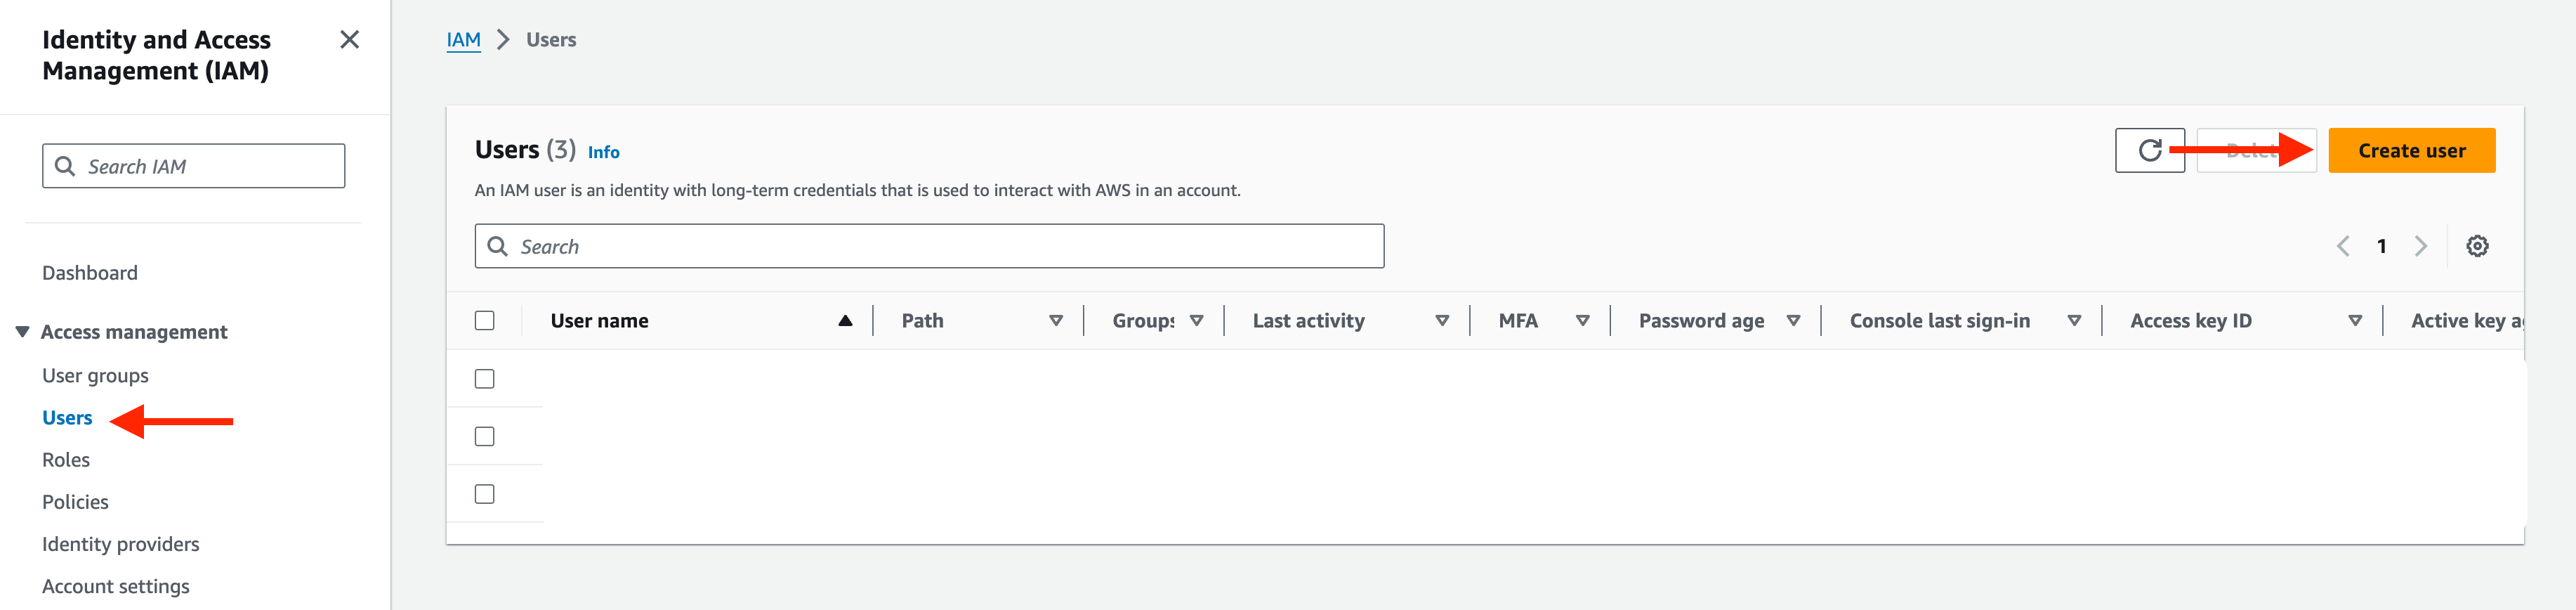
On the IAM dashboard, go to users then add users.
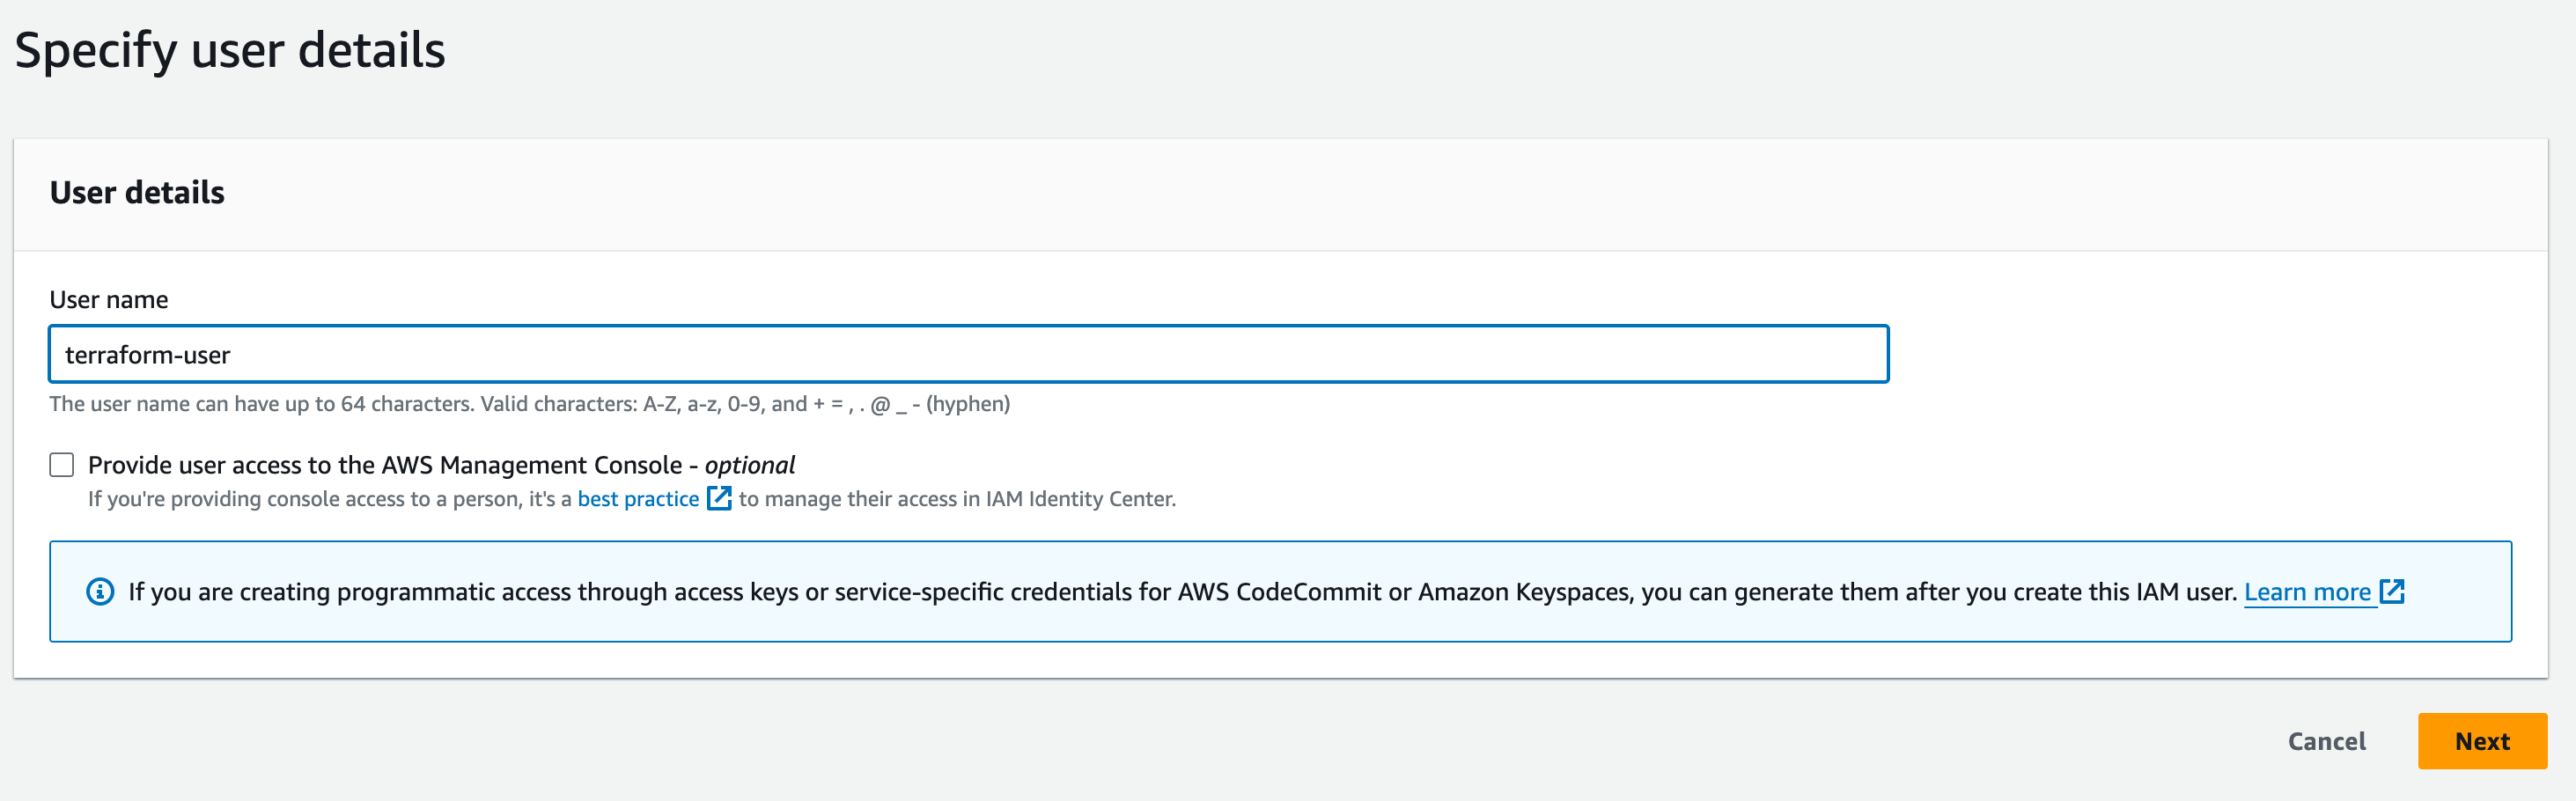
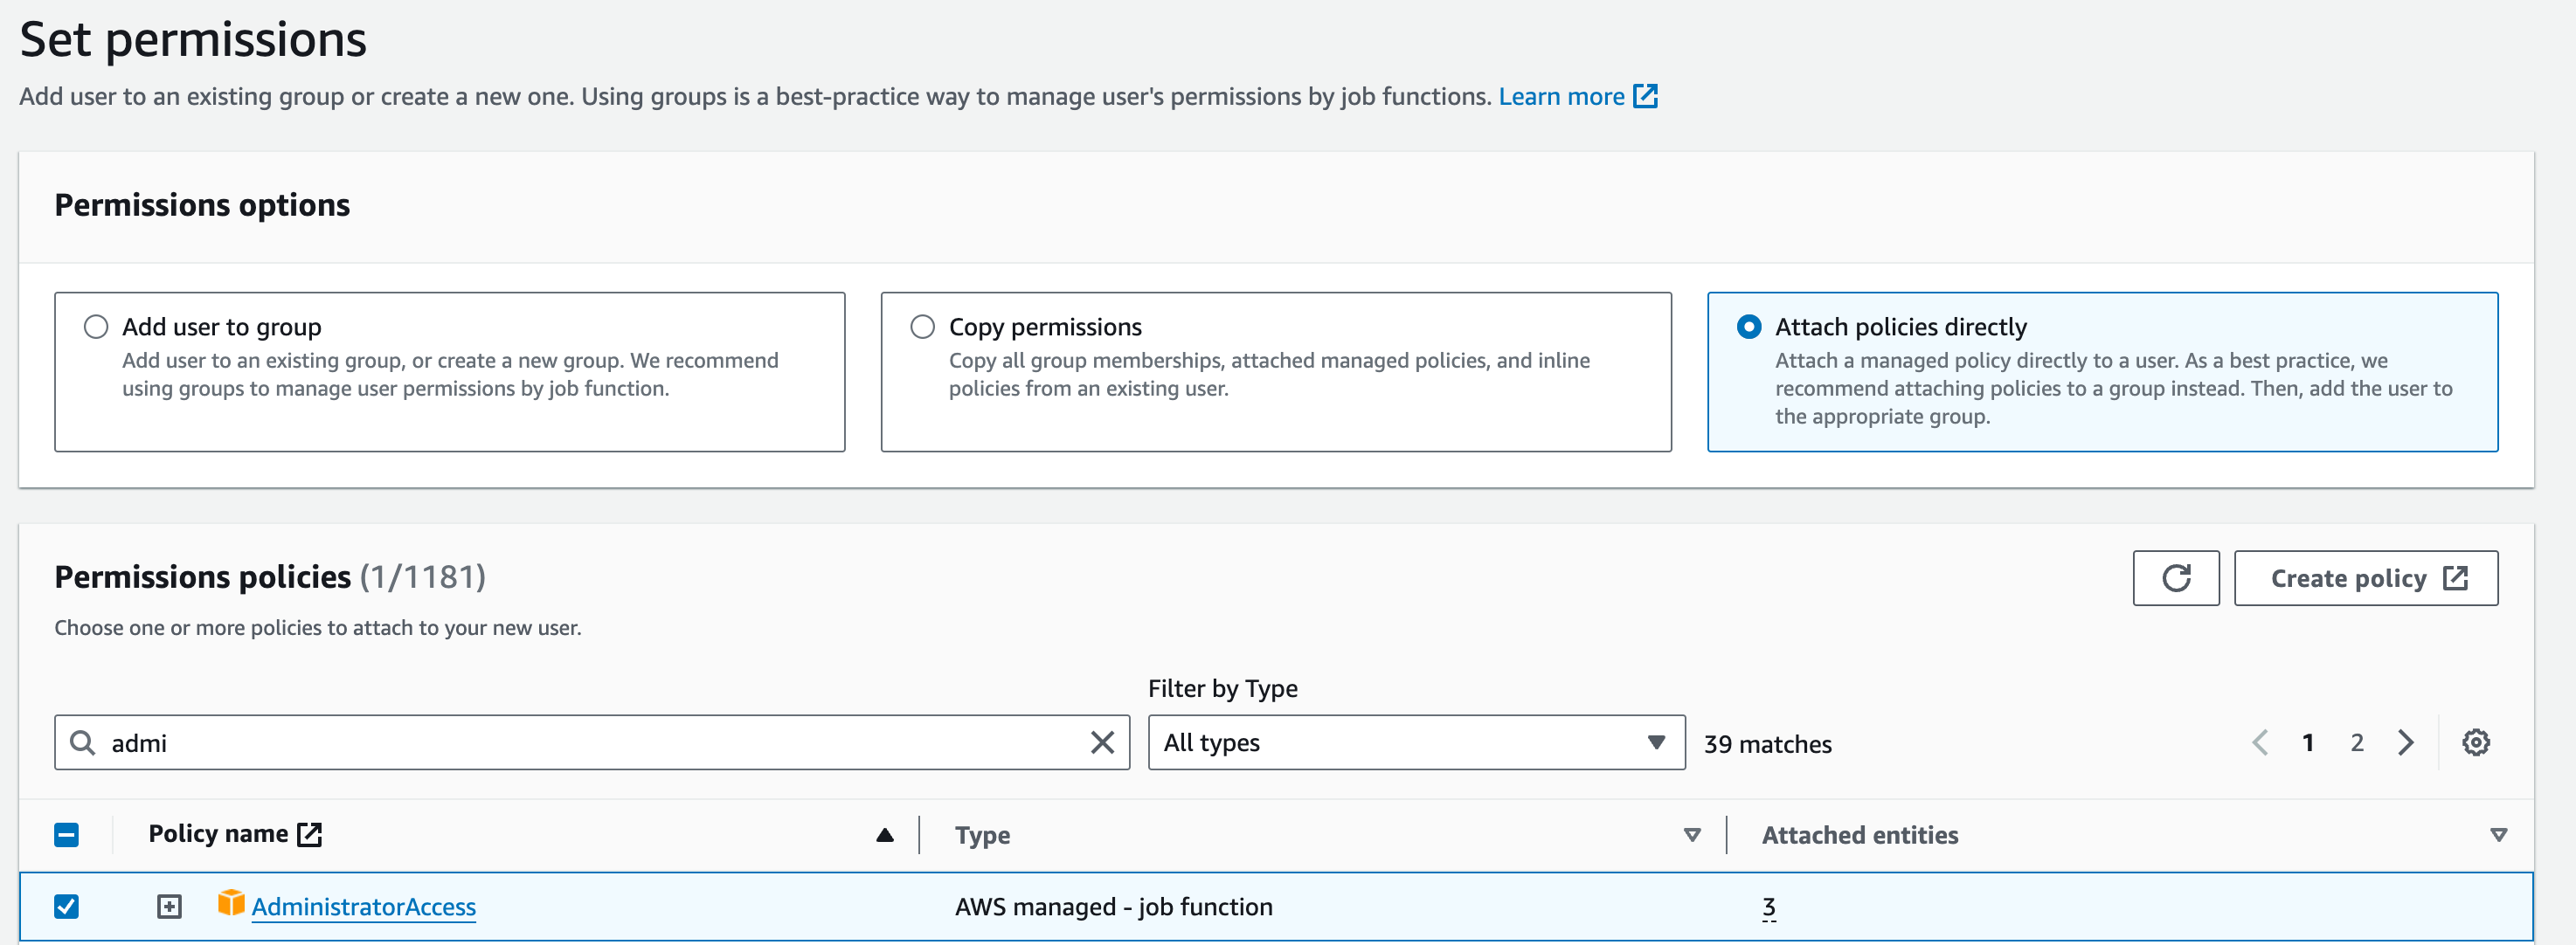
Select Attach policies directly. Search and select administrator access in permissions policies and hit next. You can review the Summary before Creating user.
After you create the user we need to create access key for the user.
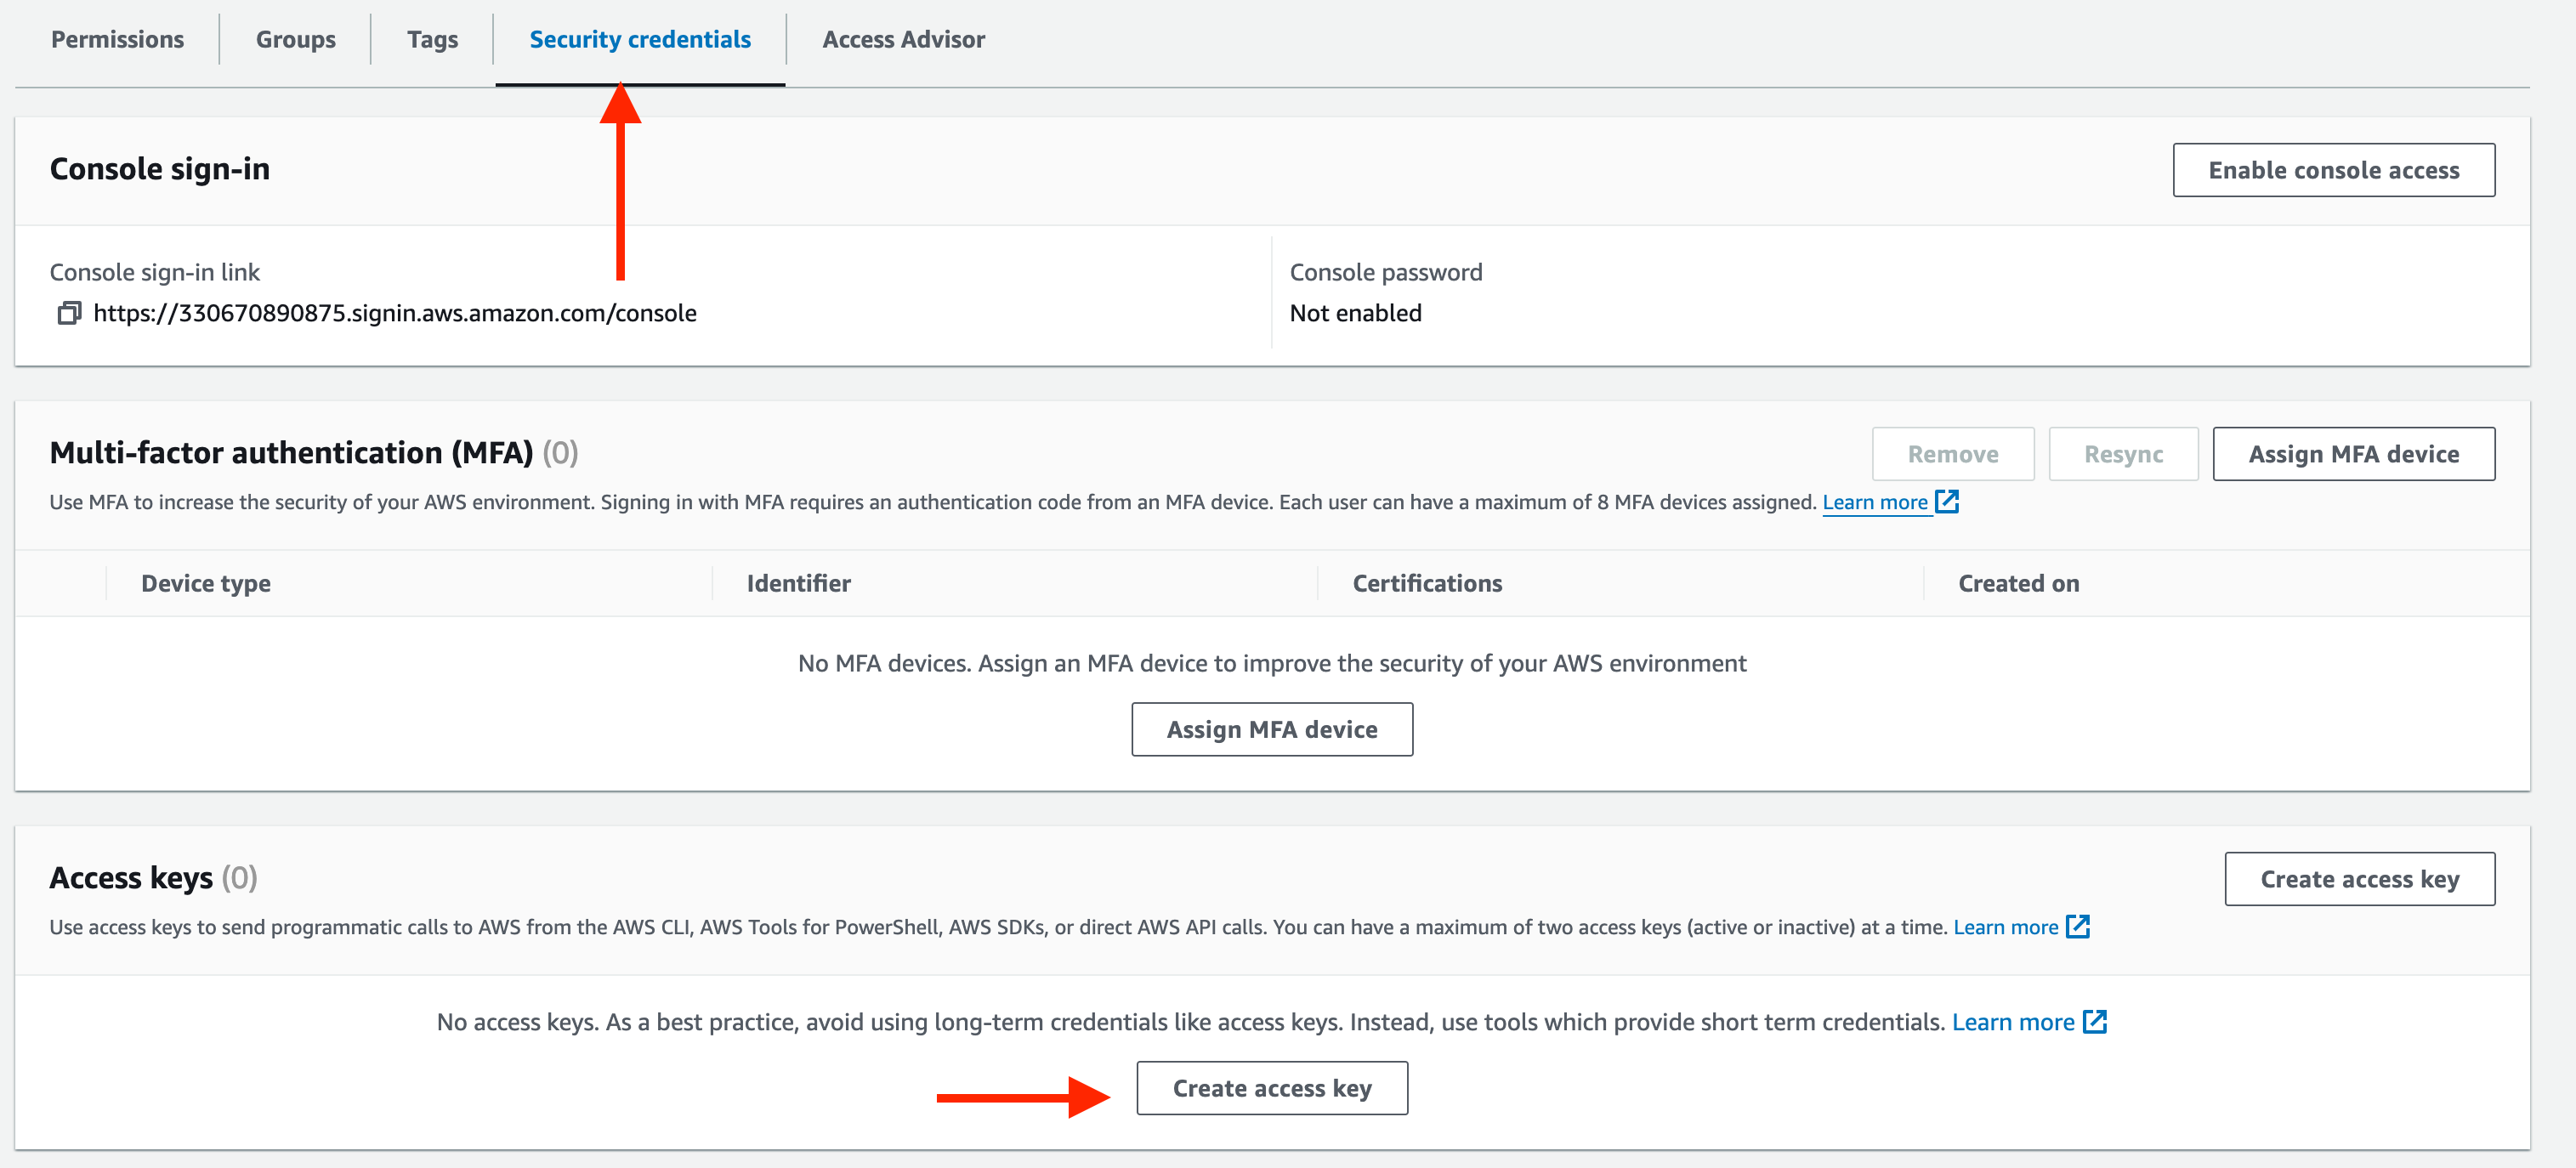
Select Command Line Interface (CLI) and click next and Create access key
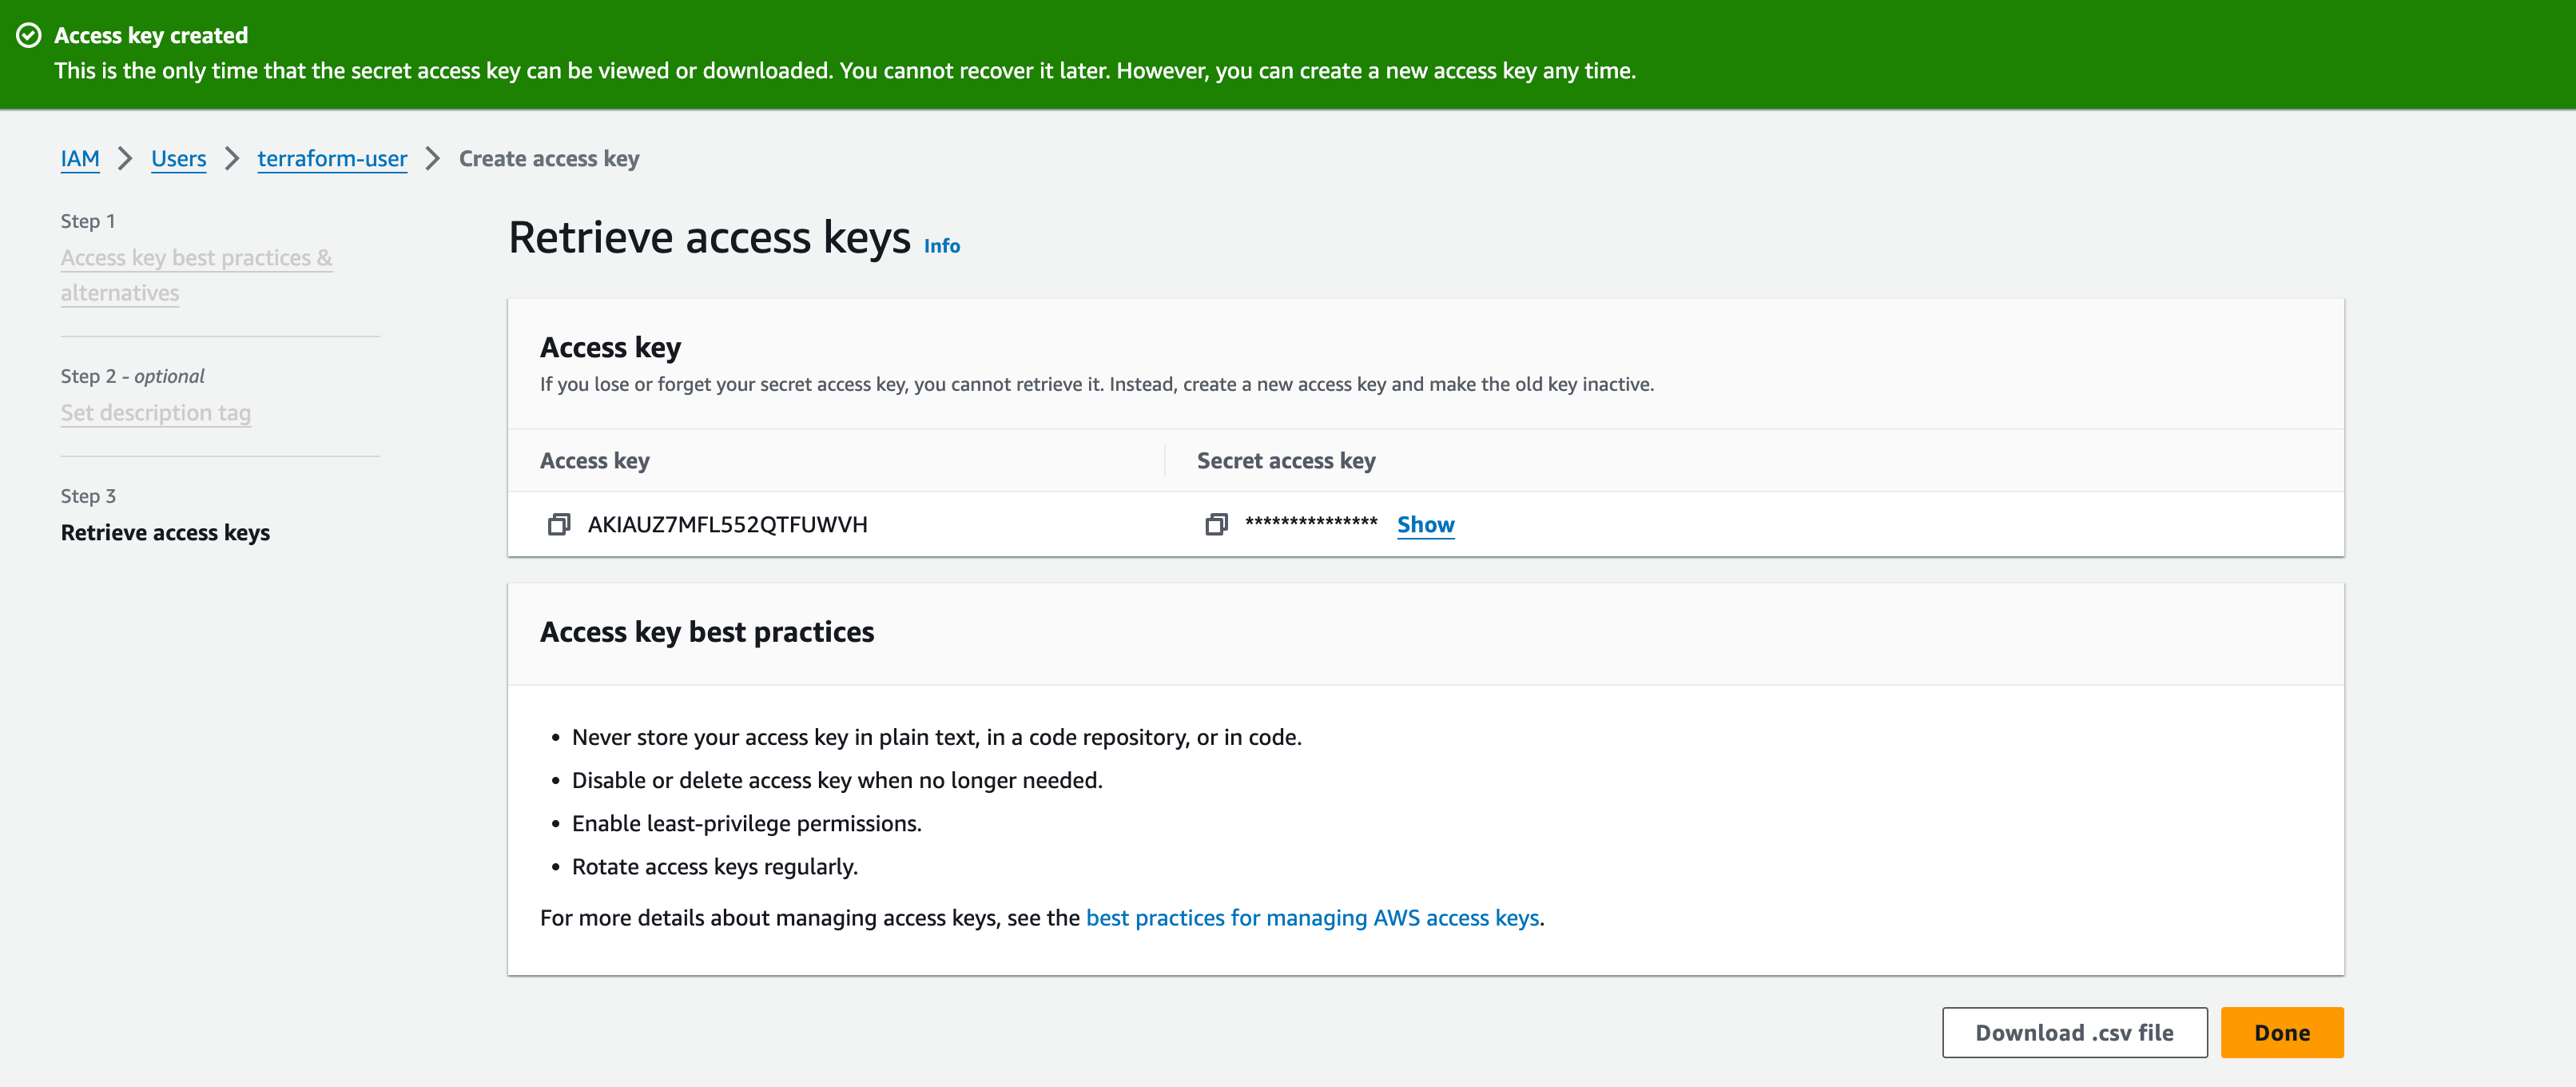
After you created your user, download the csv file. This is the only time that your credentials can be viewed or downloaded. You cannot recover it later. Please keep them private and in a safe place
Create a Named Profile
We will create a named profile for the IAM user we created previously. This will allow terraform to use the user’s credentials to authenticate with our AWS environment.

Open the command prompt and run aws configure --profile terraform-user is my profile name. You can create any profile name you want but I always like to match my profile name to the IAM user’s name. Press enter.
Enter your access key ID, secret access key, and default region name. We have successfully created a named profile for our IAM user and the user’s credentials are stored on our computer.
When you use terraform to create resources in AWS, it will recall the information about the resources it created in a terraform state file. The next time you go to update those resources, terraform will use the state file to find those resources and update them accordingly.
The state file is crucial to our terraform works. In this part, we will create an S3 bucket to store our state file. Most companies store their state files in the S3 bucket and they may ask you this question during your interview.

In the S3 management console, click create bucket. Provide a unique name to your bucket, select us-east-1 for the region, and enable bucket versioning. Click create bucket.
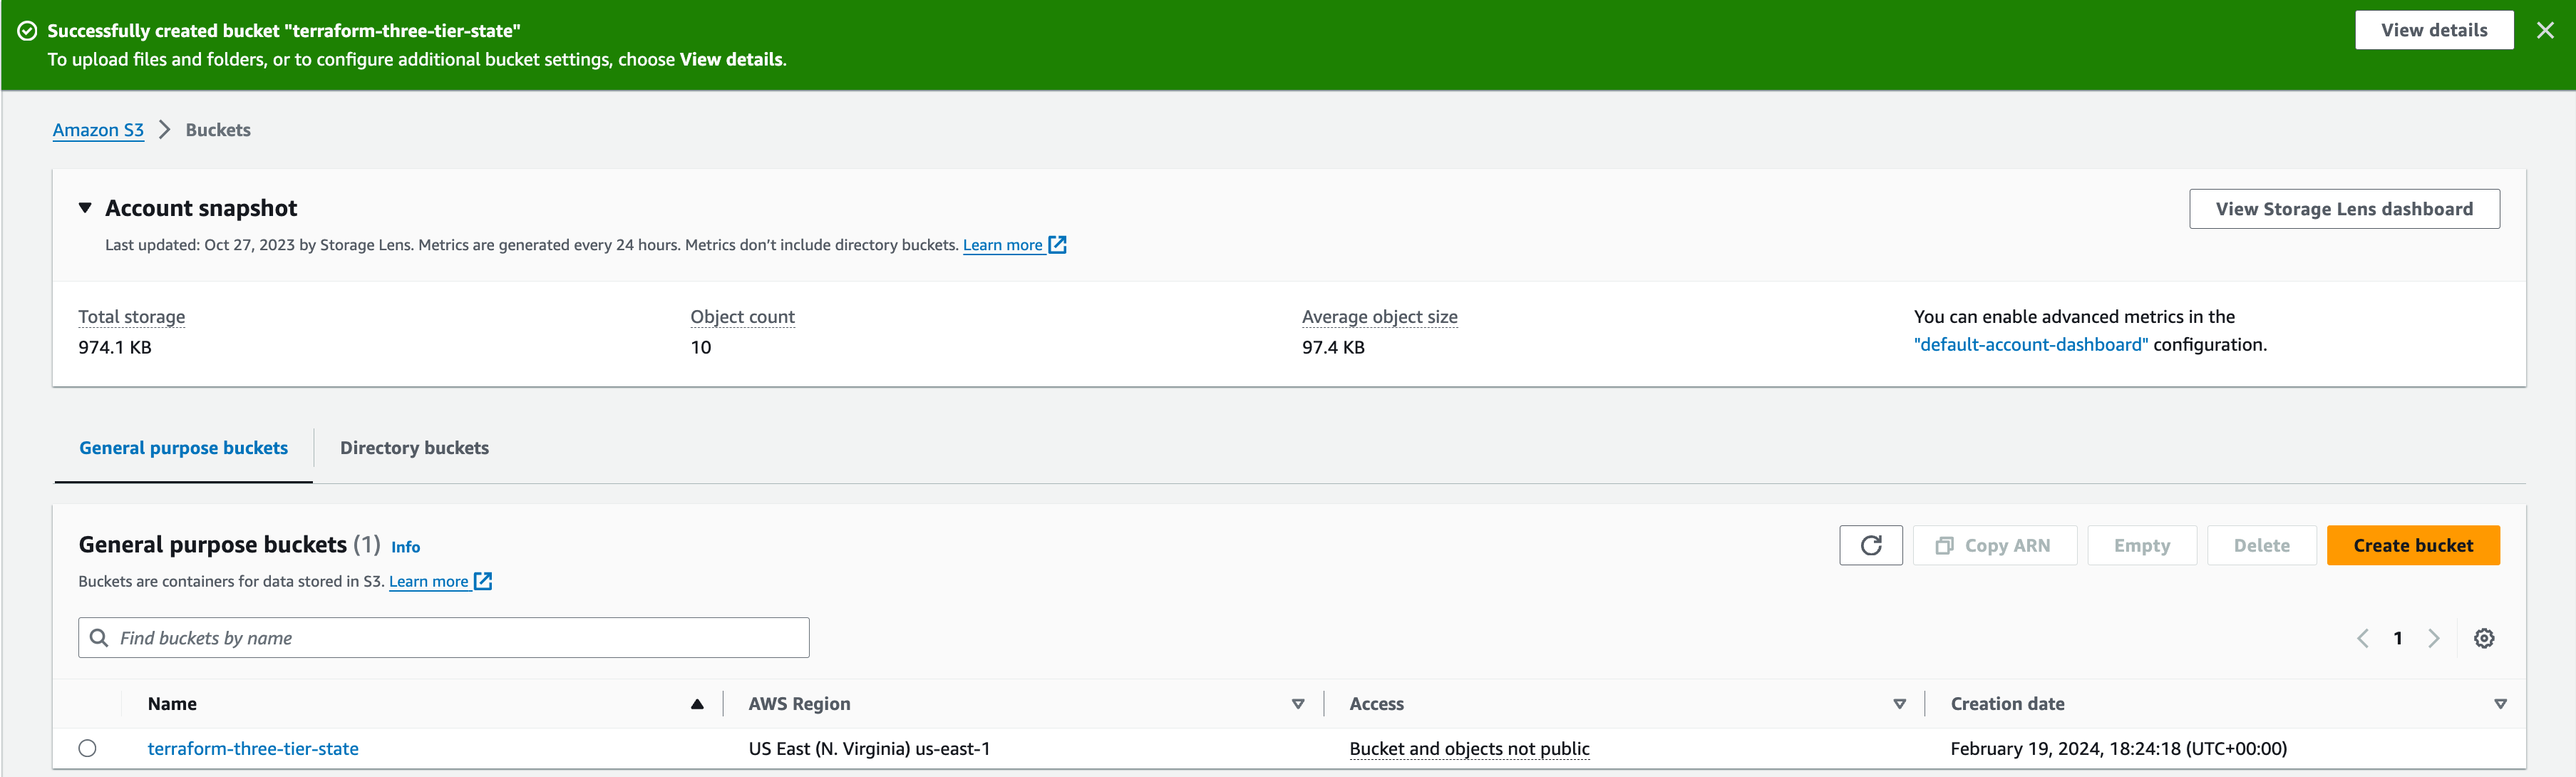
We have successfully created the S3 bucket where we will store our state file in.
Installing the terraform is easy – simply follow the instructions provided on the official website that are tailored to your operating system. https://developer.hashicorp.com/terraform/install
To check that terraform was successful open the command prompt, type terraform -v and press enter, you should see the terraform version.

- Sign up for a free GitHub account to work on your projects from anywhere.
We will create a GitHub account to store all the code’s file project. Open your browser and go to github.com and click sign up. Complete all the information and security verification needed for the free version.

This is how you sign up for free GitHub account. Moving forward, we will store all the codes for our project in the GitHub account.
Create a GitHub Repository
3. Create a GitHub repository to store your codes
We will create a repository for our terraform projects. On the GitHub homepage, click Create repository.

Provide your repository name and description.
Select Private — this means this repository won’t be available to the public. This is also the type of repository you will use at work.
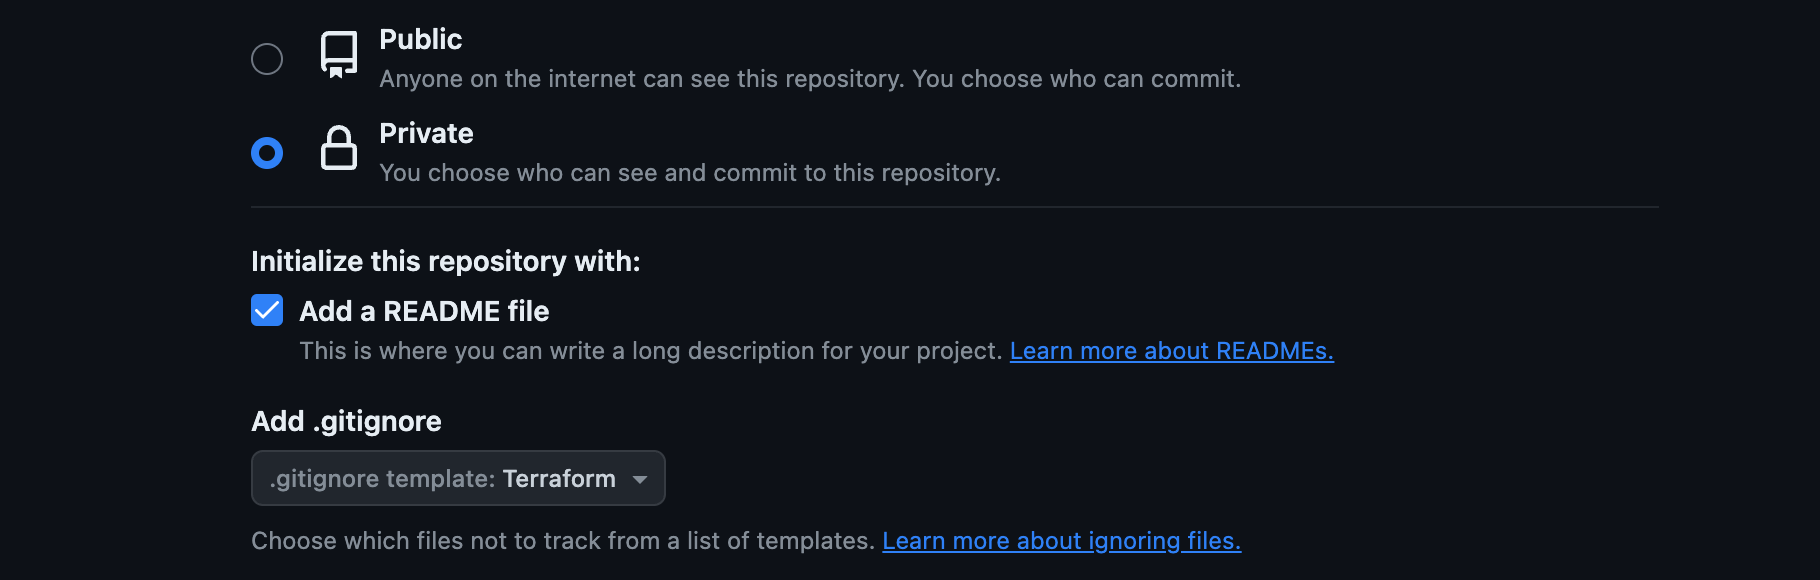
Check Add a README file. Under Add .gitignore, search for terraform and select it. Click create repository.
Adding .ignore file for terraform means that there are some terraform files that shouldn’t be committed into our repository. GitHub already knows what those files are. So by adding .ignore for terraform GitHub will automatically ignore the terraform files that shouldn’t be committed into our repository.

We have successfully created the repository where we will store all our terraform projects, and I’m already in that terraform-projects repository. The files that we have in this repository are the .ignore README files.
Clone Your Private Repository
Clone your GitHub repository to your computer to easily create and edit your terraform files.
To do this, open your terminal. CD into the directory that you want to clone the terraform projects repository in.
Go to GitHub homepage. We’re going to select the repository that we want to clone to our computer.
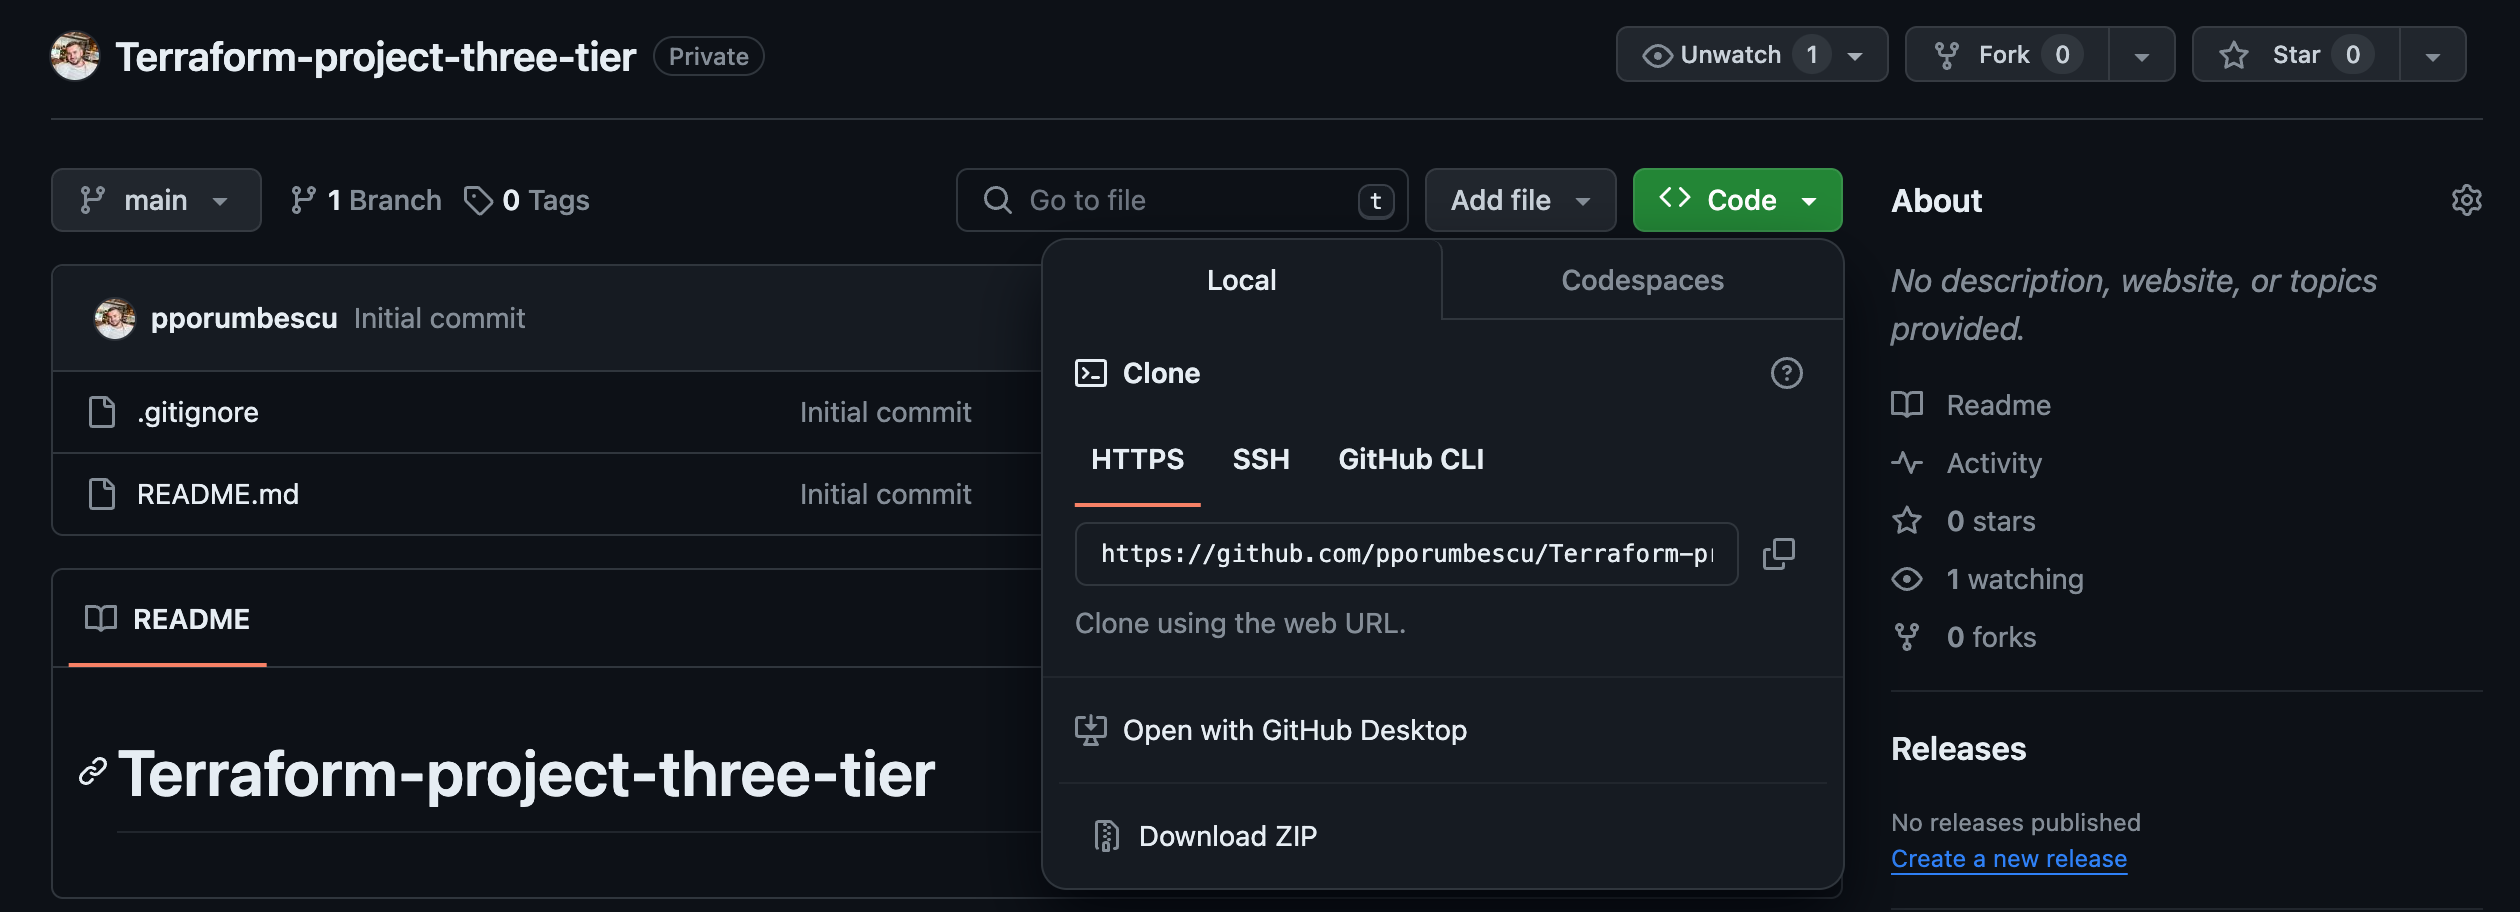
Click Code, select HTTPS, and copy it.
Go back to your terminal/command prompt and paste it in. Its git clone followed by the address of your GitHub repository. Press enter.
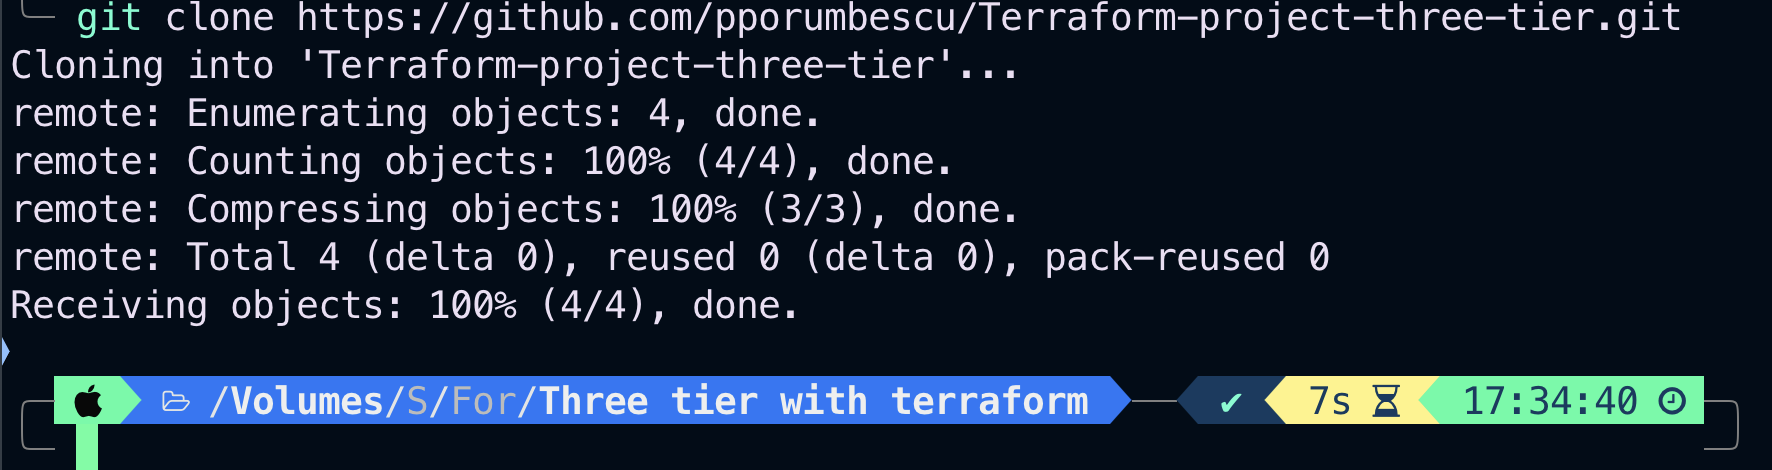
Notice that the Terraform projects repository in my GitHub account was successfully cloned to my computer. This is how cloning and repositories work.
Now we can edit any of the README file and we can push the changes back to our GitHub repository.
Push Changes from the Local Repository to the Remote Repository
Previously, we cloned the terraform project repository to our computer. We can now work with this folder the same way you work with any folder on your computer.
Currently, I have 2 files in this folder. I can add new files to this folder or edit the files inside this folder. Then, I can push those changes I made back to GitHub to sync it.
Once we have made any changes, the next command that we need to run is git add -A This is going to stage all the changes we made.
Next, run git commit -m This is going to commit all the changes in our staging area. The -m stands for message followed by my message. You can type any message you want, then press enter. This will let other users know the changes you made in this commit.
Run git push to push all the changes we made from our local computer into our GitHub repository. Let’s verify on our GitHub repository if these changes are there.
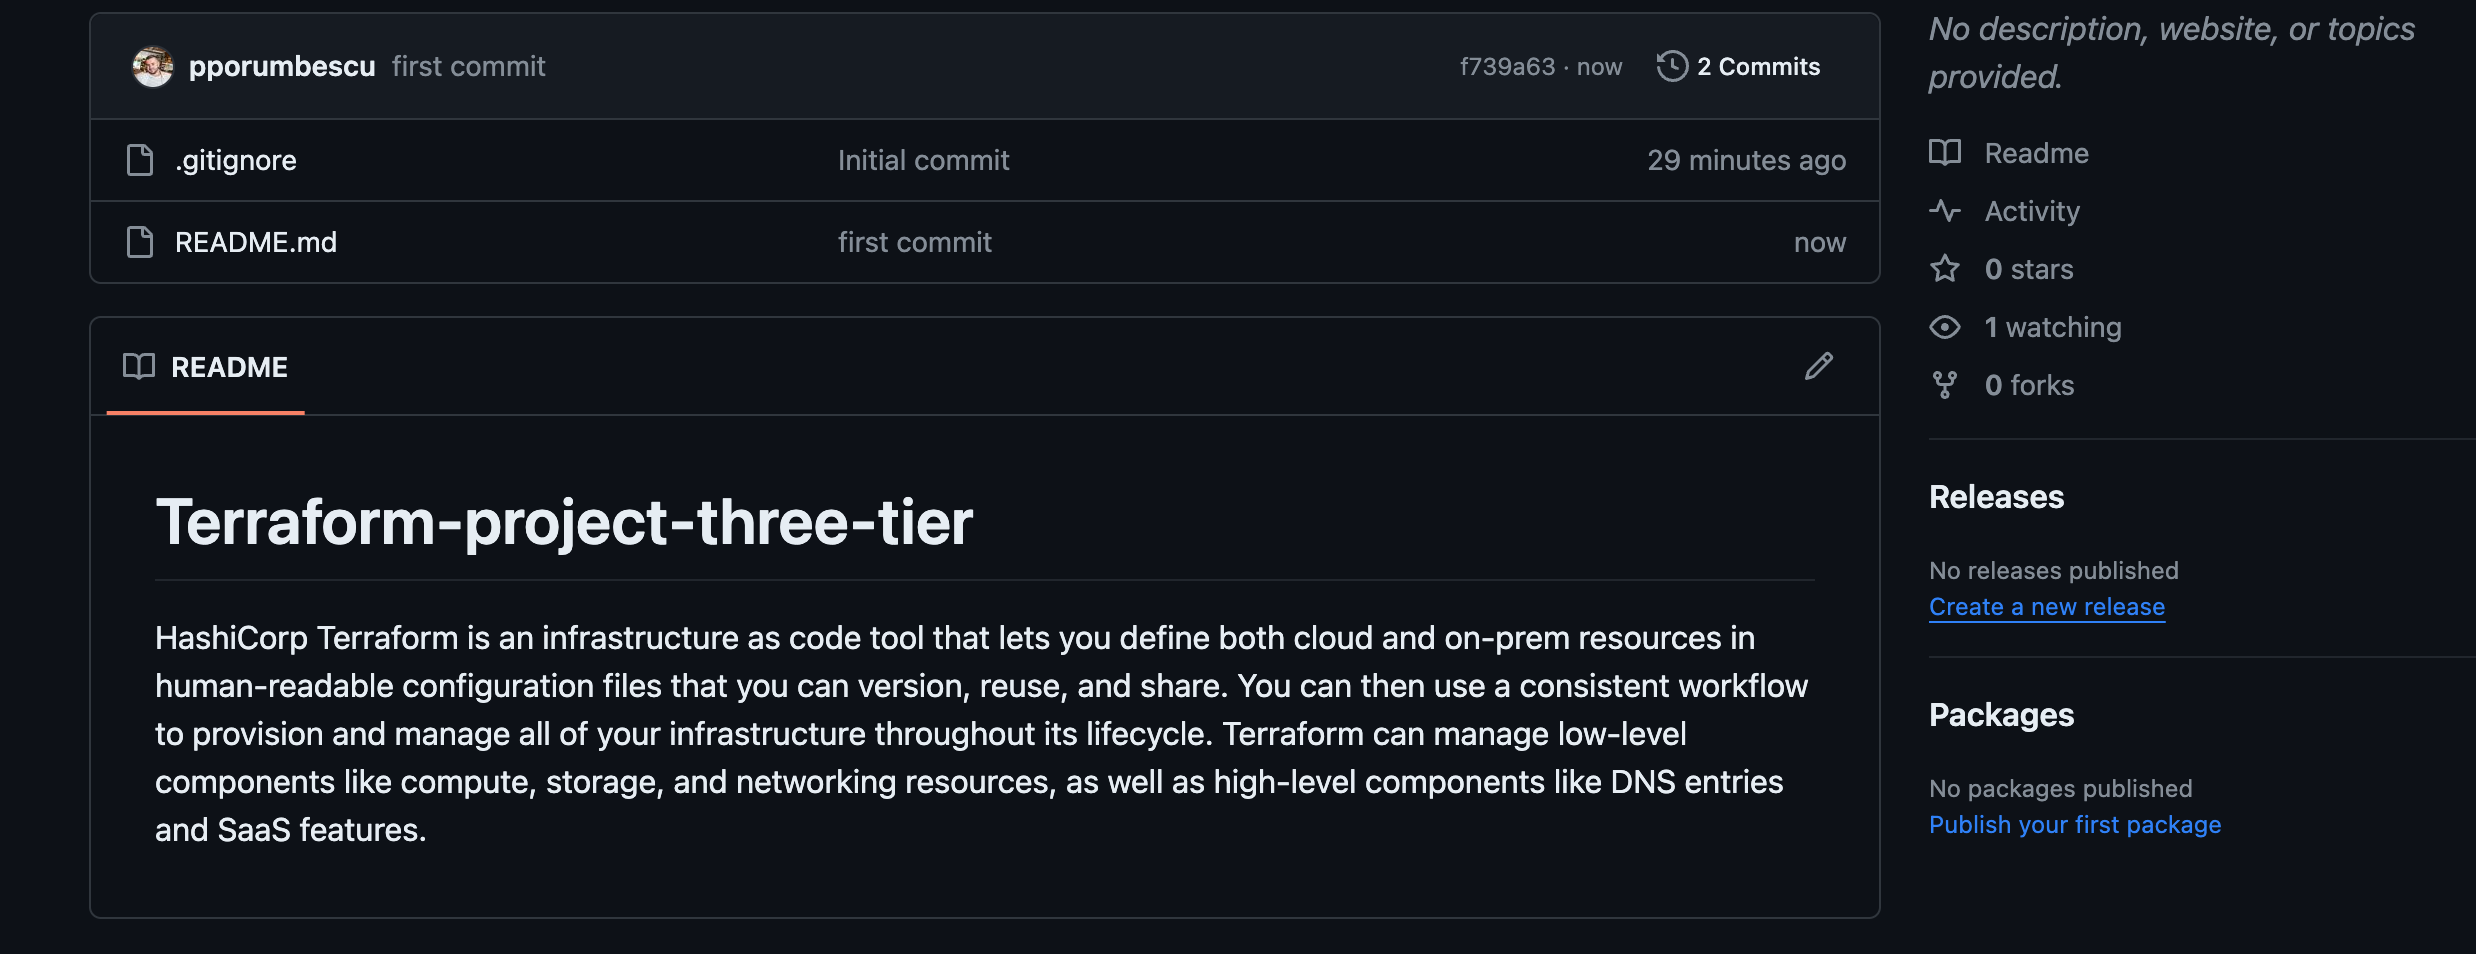
Open the README file in your terraform projects repository. We can now see the sentence that I added o my computer in the README file. This is how we make changes in the repository you cloned on your computer and pushing the changes back to our GitHub repository. Remember these 3 commands git add , git commit -m , and git push
Step 1:- Create a file for the Provider
- Create
provider.tffile and add the below code to it
terraform {
  backend "s3" {
    bucket = "terraform-three-tier-state"
    key    = "project/terraform.tfstate"
    region = "us-east-1"
  }

  required_providers {
    aws = {
      source  = "hashicorp/aws"
      version = "~> 5.37.0"
    }
  }
}

provider "aws" {
  region = "us-east-1"
}
If you wish to change the region that you want to work in, you need to change it in the provider code above. And in the tfvars file later on in this article.
So far, the arguments on our provider.tf file should look like this:
Bucket — this is the bucket we created previously to store our terraform state file. Copy the bucket name in your S3 bucket and update the value.
Key — this is just the name terraform will give to your state file when it installs it to your S3 bucket.
Region — since we are creating our project in us-east-1, we will leave the value as it is.
Step 2:- Create a file for the VPC
- Create
vpc.tffile and add the below code to it
# Creating VPC
resource "aws_vpc" "prod-vpc" {
  cidr_block       = var.vpc_cidr
  instance_tenancy = "default"
  tags = {
    Name = "prod"
  }
}
Step 3:- Create a file for the Subnet
- For this project, I will create a total of 6 subnets for the front-end tier, app tier and back-end tier, with a mixture of public & private subnets.
- Create
subnet.tffile and add the below code to it
# Create 1st web subnet
resource "aws_subnet" "public-subnet-1" {
  vpc_id                  = aws_vpc.prod-vpc.id
  cidr_block              = var.subnet_prefix[0].cidr_block
  map_public_ip_on_launch = true
  availability_zone       = "us-east-1a"
  tags = {
    Name = var.subnet_prefix[0].name
  }
}
# Create 2nd web subnet
resource "aws_subnet" "public-subnet-2" {
  vpc_id                  = aws_vpc.prod-vpc.id
  cidr_block              = var.subnet_prefix[1].cidr_block
  map_public_ip_on_launch = true
  availability_zone       = "us-east-1b"
  tags = {
    Name = var.subnet_prefix[1].name
  }
}
#  Creating 1st application subnet
resource "aws_subnet" "application-subnet-1" {
  vpc_id                  = aws_vpc.prod-vpc.id
  cidr_block              = var.subnet_prefix[2].cidr_block
  map_public_ip_on_launch = false
  availability_zone       = "us-east-1a"
  tags = {
    Name = var.subnet_prefix[2].name
  }
}
#  Creating 2nd application subnet
resource "aws_subnet" "application-subnet-2" {
  vpc_id                  = aws_vpc.prod-vpc.id
  cidr_block              = var.subnet_prefix[3].cidr_block
  map_public_ip_on_launch = false
  availability_zone       = "us-east-1b"
  tags = {
    Name = var.subnet_prefix[3].name
  }
}
#  Database Private Subnet
resource "aws_subnet" "database-subnet-1" {
  vpc_id            = aws_vpc.prod-vpc.id
  cidr_block        = var.subnet_prefix[4].cidr_block
  availability_zone = "us-east-1a"
  tags = {
    Name = var.subnet_prefix[4].name
  }
}
#  Database Private Subnet
resource "aws_subnet" "database-subnet2" {
  vpc_id            = aws_vpc.prod-vpc.id
  cidr_block        = var.subnet_prefix[5].cidr_block
  availability_zone = "us-east-1b"
  tags = {
    Name = var.subnet_prefix[5].name
  }
}
If you have changed the region different to the one I have specified you also need to change the Availability zones in the code above.
Step 4:- Create a file for the Internet Gateway
- Create
igw.tffile and add the below code to it
#  Create Internet Gateway
resource "aws_internet_gateway" "web-app-gateway" {
  vpc_id = aws_vpc.prod-vpc.id
  tags = {
    Name = "Web App Gateway"
  }
}
Step 5:- Create a file for the Elastic IP Addresses
- Create
eip.tffile and add the below code to it
resource "aws_eip" "nat1" {
  depends_on = [aws_internet_gateway.web-app-gateway]

}
resource "aws_eip" "nat2" {
  depends_on = [aws_internet_gateway.web-app-gateway]

}
Step 6:- Create a file for the Nat Gateways
- Create
nat-gateways.tffile and add the below code to it
resource "aws_nat_gateway" "gw1" {
  allocation_id = aws_eip.nat1.id
  subnet_id     = aws_subnet.public-subnet-1.id
  depends_on    = [aws_internet_gateway.web-app-gateway]
}
resource "aws_nat_gateway" "gw2" {
  allocation_id = aws_eip.nat2.id
  subnet_id     = aws_subnet.public-subnet-2.id
  depends_on    = [aws_internet_gateway.web-app-gateway]
}
Step 7:- Create a file for the Route table
- Create
route-tables.tffile and add the below code to it
#  Create Route Tables
resource "aws_route_table" "public-route-table" {
  vpc_id = aws_vpc.prod-vpc.id
  route {
    cidr_block = "0.0.0.0/0"
    gateway_id = aws_internet_gateway.web-app-gateway.id
  }
  tags = {
    Name = "Public"
  }
}
resource "aws_route_table" "private1" {
  vpc_id = aws_vpc.prod-vpc.id
  route {
    cidr_block     = "0.0.0.0/0"
    nat_gateway_id = aws_nat_gateway.gw1.id
  }
  tags = {
    Name = "Private1"
  }
}
resource "aws_route_table" "private2" {
  vpc_id = aws_vpc.prod-vpc.id
  route {
    cidr_block     = "0.0.0.0/0"
    nat_gateway_id = aws_nat_gateway.gw2.id
  }
  tags = {
    Name = "Private2"
  }
}
resource "aws_route_table" "private3" {
  vpc_id = aws_vpc.prod-vpc.id
  route {
    cidr_block     = "0.0.0.0/0"
    nat_gateway_id = aws_nat_gateway.gw1.id
  }
  tags = {
    Name = "Private3"
  }
}
resource "aws_route_table" "private4" {
  vpc_id = aws_vpc.prod-vpc.id
  route {
    cidr_block     = "0.0.0.0/0"
    nat_gateway_id = aws_nat_gateway.gw2.id
  }
  tags = {
    Name = "Private4"
  }
}
Step 8:- Create a file for the Route table Associations
- Create a
route-tables-association.tffile and add the below code to it
# Associating Route Table for pub subnet 1
resource "aws_route_table_association" "pub-route1" {
  subnet_id      = aws_subnet.public-subnet-1.id
  route_table_id = aws_route_table.public-route-table.id
}
# Associating Route Table for pub subnet 2
resource "aws_route_table_association" "pub-route2" {
  subnet_id      = aws_subnet.public-subnet-2.id
  route_table_id = aws_route_table.public-route-table.id
}
#Associating Route Table for private subnet 1
resource "aws_route_table_association" "private-route1" {
  subnet_id      = aws_subnet.application-subnet-1.id
  route_table_id = aws_route_table.private1.id
}
#Associating Route Table for private subnet 2
resource "aws_route_table_association" "private-route2" {
  subnet_id      = aws_subnet.application-subnet-2.id
  route_table_id = aws_route_table.private2.id
}
#Associating Route Table for private Database subnet 1
resource "aws_route_table_association" "private-route3" {
  subnet_id      = aws_subnet.database-subnet-1.id
  route_table_id = aws_route_table.private3.id
}
#Associating Route Table for private Database subnet 2
resource "aws_route_table_association" "private-route4" {
  subnet_id      = aws_subnet.database-subnet2.id
  route_table_id = aws_route_table.private4.id
}
Step 9:- Create a file for the EC2 Launch Template
- Create a
ec2-launch-template.tffile and add the below code to it
resource "aws_launch_template" "web-server-ec2" {
  name = "webServerEc2"
  block_device_mappings {
    device_name = "/dev/xvda"
    ebs {
      volume_size = 8
    }
  }
  instance_type = var.instance_type
  image_id      = var.image_id
  user_data     = filebase64("data.sh")
  network_interfaces {
    associate_public_ip_address = false
    security_groups             = [aws_security_group.ec2-sg.id]
  }
}- I have used the
userdatato configure the EC2 instance, I will discuss thedata.shfile later in the article.
If you changed the region from eu-west-2 you need to check you have the correct “image_id” (AMI) to reflect the region you are working in. It’s also good practice to check that it is the right one as AWS do often update AMI ID’s. If so this will need to be changed in the .tfvars file later on in this article.
Step 10:- Create a file for the Security Group for the ALB
- Create a
alb-sg.tffile and add the below code to it
# Create ALB Security Group
resource "aws_security_group" "alb-sg" {
  name        = "vpc_alb_sg"
  description = "Allow web inbound traffic"
  vpc_id      = aws_vpc.prod-vpc.id
  ingress {
    description = "all traffic from VPC"
    from_port   = 0
    to_port     = 0
    protocol    = "-1"
    cidr_blocks = ["0.0.0.0/0"]
  }
  egress {
    from_port   = 0
    to_port     = 0
    protocol    = "-1"
    cidr_blocks = ["0.0.0.0/0"]
  }
  tags = {
    Name = "VPCALBSG"
  }
}
Step 11:- Create a file for Security Group for the EC2’s
- Create
ec2_sg.tffile and add the below code to it
#create Ec2 security group
resource "aws_security_group" "ec2-sg" {
  name        = "ec2sg"
  description = "Allows ALB to access the EC2 instances"
  vpc_id      = aws_vpc.prod-vpc.id
  ingress {
    description     = "TLS from ALB"
    from_port       = 80
    to_port         = 80
    protocol        = "tcp"
    security_groups = [aws_security_group.alb-sg.id]
  }
  ingress {
    description     = "TLS from ALB"
    from_port       = 8443
    to_port         = 8443
    protocol        = "tcp"
    security_groups = [aws_security_group.alb-sg.id]

  }
  egress {
    from_port   = 0
    to_port     = 0
    protocol    = "-1"
    cidr_blocks = ["0.0.0.0/0"]
  }
  tags = {
    Name = "VPCEC2SG"
  }
}- I have opened ports 80 & 8443 for the inbound connection from the ALB and I have opened all the ports for the outbound connection.
Step 12:- Create a file for Security Group for the Database tier
- Create
database_sg.tffile and add the below code to it
# Create Database Security Group
resource "aws_security_group" "rds-sg" {
  name        = "RDSSG"
  description = "Allows application to access the RDS instances"
  vpc_id      = aws_vpc.prod-vpc.id
  ingress {
    description     = "EC2 to MYSQL"
    from_port       = 3306
    to_port         = 3306
    protocol        = "tcp"
    security_groups = [aws_security_group.ec2-sg.id]
  }
  egress {
    from_port   = 0
    to_port     = 0
    protocol    = "-1"
    cidr_blocks = ["0.0.0.0/0"]
  }
  tags = {
    Name = "RDSSG"
  }
}- I have opened port 3306 for the inbound connection and I have opened all the ports for the outbound connection.
Step 13:- Create a file Application Load Balancer
- Create
alb.tffile and add the below code to it
# Create LoadBalancer
resource "aws_lb" "web-alb" {
  name               = "web-alb"
  internal           = false
  load_balancer_type = "application"
  security_groups    = [aws_security_group.alb-sg.id]
  subnets            = [aws_subnet.public-subnet-1.id, aws_subnet.public-subnet-2.id]
}
resource "aws_lb_target_group" "alb-target-group" {
  name     = "alb-target-group"
  port     = 80
  protocol = "HTTP"
  vpc_id   = aws_vpc.prod-vpc.id
}
resource "aws_lb_listener" "alb-listener" {
  load_balancer_arn = aws_lb.web-alb.arn
  port              = "80"
  protocol          = "HTTP"
  default_action {
    type             = "forward"
    target_group_arn = aws_lb_target_group.alb-target-group.arn
  }
}
Step 14:- Create a file for Autoscaling
- Create
autoscaling.tffile and add the below code to it
#Create ASG
resource "aws_autoscaling_group" "ec2-asg" {
  name                      = "Launch-Temp-ASG"
  max_size                  = 2
  min_size                  = 2
  health_check_grace_period = 300
  health_check_type         = "EC2"
  desired_capacity          = 2
  vpc_zone_identifier       = [aws_subnet.application-subnet-1.id, aws_subnet.application-subnet-2.id]
  launch_template {
    id      = aws_launch_template.web-server-ec2.id
    version = "$Latest"
  }

  lifecycle {
    ignore_changes = [load_balancers, target_group_arns]
  }
}
# Create a new ALB Target Group attachment
resource "aws_autoscaling_attachment" "tg_attachment" {
  autoscaling_group_name = aws_autoscaling_group.ec2-asg.id
  lb_target_group_arn    = aws_lb_target_group.alb-target-group.arn
}
Step 15:- Create a file for the RDS instance
- Create
rds.tffile and add the below code to it
# Create RDS Instance
resource "aws_db_subnet_group" "db-subnet-group" {
  name       = "dbsubnetgroup"
  subnet_ids = [aws_subnet.database-subnet-1.id, aws_subnet.database-subnet2.id]
  tags = {
    Name = "My DB subnet group"
  }
}
resource "aws_db_instance" "rds" {
  db_subnet_group_name   = aws_db_subnet_group.db-subnet-group.id
  allocated_storage      = var.allocated_storage
  engine                 = var.engine_type
  engine_version         = var.engine_version
  instance_class         = var.instance_class
  multi_az               = true
  db_name                = "mydb"
  username               = "admin"
  password               = "reallygoodpassword"
  skip_final_snapshot    = true
  vpc_security_group_ids = [aws_security_group.rds-sg.id]
}- In the above code, you can change the value of
username&password multi-azis set to true for the high availability
Step 16:- Create a file for the Outputs
- Create
outputs.tffile and add the below code to it
output "db_instance_endpoint" {
  description = "The connection endpoint"
  value       = aws_db_instance.rds.endpoint
}
output "lb_dns_name" {
  description = "The DNS name of the load balancer"
  value       = aws_lb.web-alb.dns_name
}
From the above code, I will get the DNS of the application load balancer and the Database instance endpoint.
Step 17:- Create a file for the VPC Flow Logs
- Create
vpc-flow-logs.tffile and add the below code to it
resource "aws_flow_log" "flow-log-test" {
  log_destination      = aws_s3_bucket.YOURNAME.arn
  log_destination_type = "s3"
  traffic_type         = "ALL"
  vpc_id               = aws_vpc.prod-vpc.id
}
resource "aws_s3_bucket" "YOURNAME" {
  bucket = "YOURNAME"
}
You need to choose your own name for your bucket. And put the same name in all the fields shown above where I have put (YOURNAME).
Step 18:- Create a file for User Data
- Create
data.shfile and add the below code to it
#!/bin/bash -ex
yum -y update
yum -y install httpd php mysql php-mysql
chkconfig httpd on
service httpd start
cd /var/www/html
wget PUT OBJECT URL HERE
tar xvfz app.tgz
chown apache:root /var/www/html/rds.conf.php
!!! For this to work, you need to change the url in the user data. In this repository you will find a .tgz file that needs to be put into an s3 bucket in your AWS account. You then need to copy the Object URL from your s3 bucket. (You can find this by clicking on the object, heading to properties and you’ll find it in the object overview) Paste the URL in the user data file shown in the code above. You also need to make sure that the object is publicly accessible.
The script is run the first time the instance/s are launched. It installs a web server on your EC2 instances/s, and runs an app that can be configured to point to your MySQL RDS instance. After you configure your RDS instance, it will present an address book that you can edit.
Step 19:- Create a file for variables
- Create
variables.tffile and add the below code to it
variable "region" {
  type        = string
  description = "The AWS region."
}
variable "instance_type" {
  type        = string
  description = "The instance type."
  default     = "t2.small"
}
variable "image_id" {
  description = "the ami"
}
variable "subnet_prefix" {
  description = "cidr block for the subnet"
}
variable "vpc_cidr" {
  description = "cidr block for vpc"
  default     = "10.0.0.0/16"
}
variable "allocated_storage" {
  type        = number
  description = "The allocated storage for rds"
}
variable "engine_type" {
  type        = string
  description = "Engine for the RDS Instance"
}
variable "engine_version" {
  description = "Engine version for the RDS engine type"
}
variable "instance_class" {
  type        = string
  description = "The instance class for the RDS instance"
}
Variables are really helpful in terraform…Variables let you customise aspects of Terraform modules without altering the module’s own source code. This allows you to share modules across different Terraform configurations, making your module composable and reusable. DRY!
Step 20:- Create a file for tfvars
- Create
terraform.tfvarsfile and add the below code to it
region   = "us-east-1"
image_id = "ami-0e731c8a588258d0d"
subnet_prefix = [{ cidr_block = "10.0.1.0/24", name = "Web_Subnet_1" }, { cidr_block = "10.0.2.0/24", name = "Web_Subnet_2" },
  { cidr_block = "10.0.11.0/24", name = "App_Subnet_1" }, { cidr_block = "10.0.12.0/24", name = "App_Subnet_2" },
{ cidr_block = "10.0.13.0/24", name = "Database_subnet_1" }, { cidr_block = "10.0.14.0/24", name = "Databse_Subnet_2" }]
allocated_storage = 10
engine_type       = "mysql"
engine_version    = "~> 8.0.35"
instance_class    = "db.t3.micro"
If you changed the Region, then you need to retrospectively change the AMI ID to reflect that change. This needs to be changed in the code above.
Now we have all the files needed to create our infrastructure and application. All we need to do is run it!
- Once you have configured your AWS credentials then follow these steps.
In your terminal run these commands in order…
terraform initto initialise the working directory and download the plugins of the provider
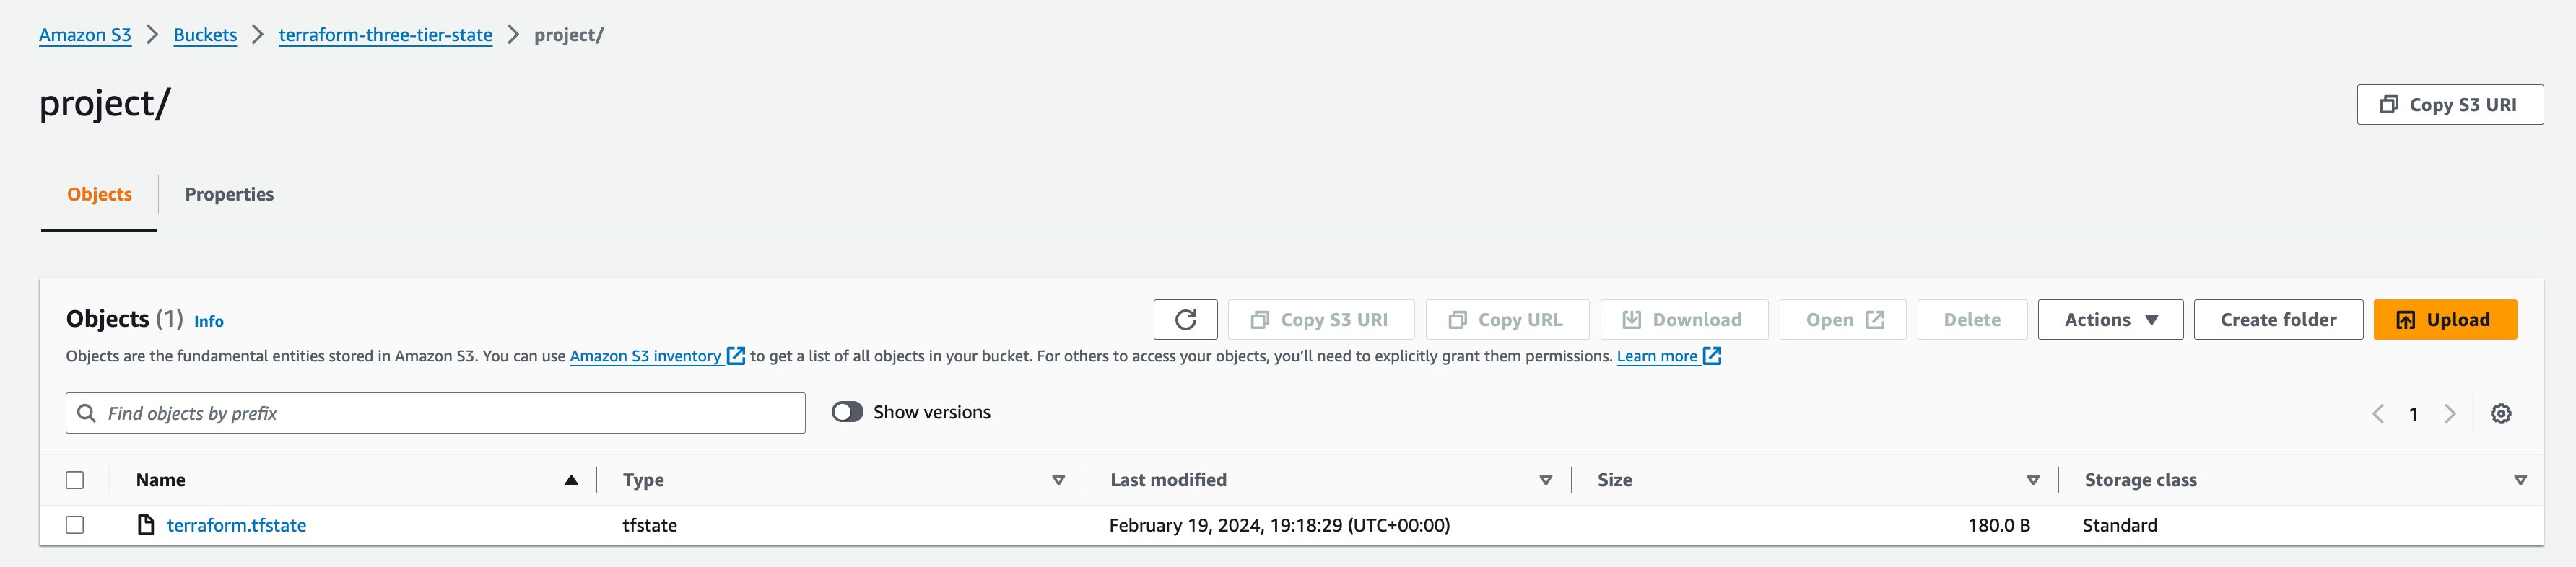
After initialization, we can verify the Terraform state file in S3, meaning we have done everything correctly.
terraform planis to create the execution plan for our code

terraform applyis to create the actual infrastructure.
Step 13:- Verify the resources
- Terraform will create the resources below
- VPC
- Application Load Balancer
- Public & Private Subnets
- Launch Template
- EC2 Instances
- NAT Gateways
- Elastic Ip’s
- Autoscaling group
- Route Tables
- Internet Gateway
- RDS Instance
- S3 Bucket & Flow Log
- Security Groups for Web & RDS instances
Once the resource creation finishes, you can get the DNS of the load balancer and paste it into a browser; you will then need to input the Database endpoint, DB name, username and password. This will then show your address book, which you can then input and delete values as you see fit.
That’s it now: you have learned how to create various resources in AWS using Terraform. Make sure to commit your code changes and push them to your Github repository.
We’ve built all the resources in our reference architecture and completed our project. Let’s clean up the resources we used in Terraform to create in our AWS account so we don’t incur further costs. Open your project folder and open a new terminal and run terraform destroy