
CICD Deployment with AWS Code Services
Introduction
AWS CodeCommit is a secure, highly scalable, managed source control service that hosts private Git repositories. You can use AWS CodeCommit to store anything from code to binaries. It supports the standard functionality of Git, so it works seamlessly with your existing Git-based tools. In this lab step, you will set up a repository that you will use for source control of your application (app). Because CodeCommit is secure in terms of storage and network, you need to establish a secure connection to the repository. You will generate credentials to allow you to connect via HTTPS to the repository in the following lab steps.
Instructions
1. In the AWS Management Console search bar, enter CodeCommit, and click the CodeCommit result under Services:

2. Click on Create repository:
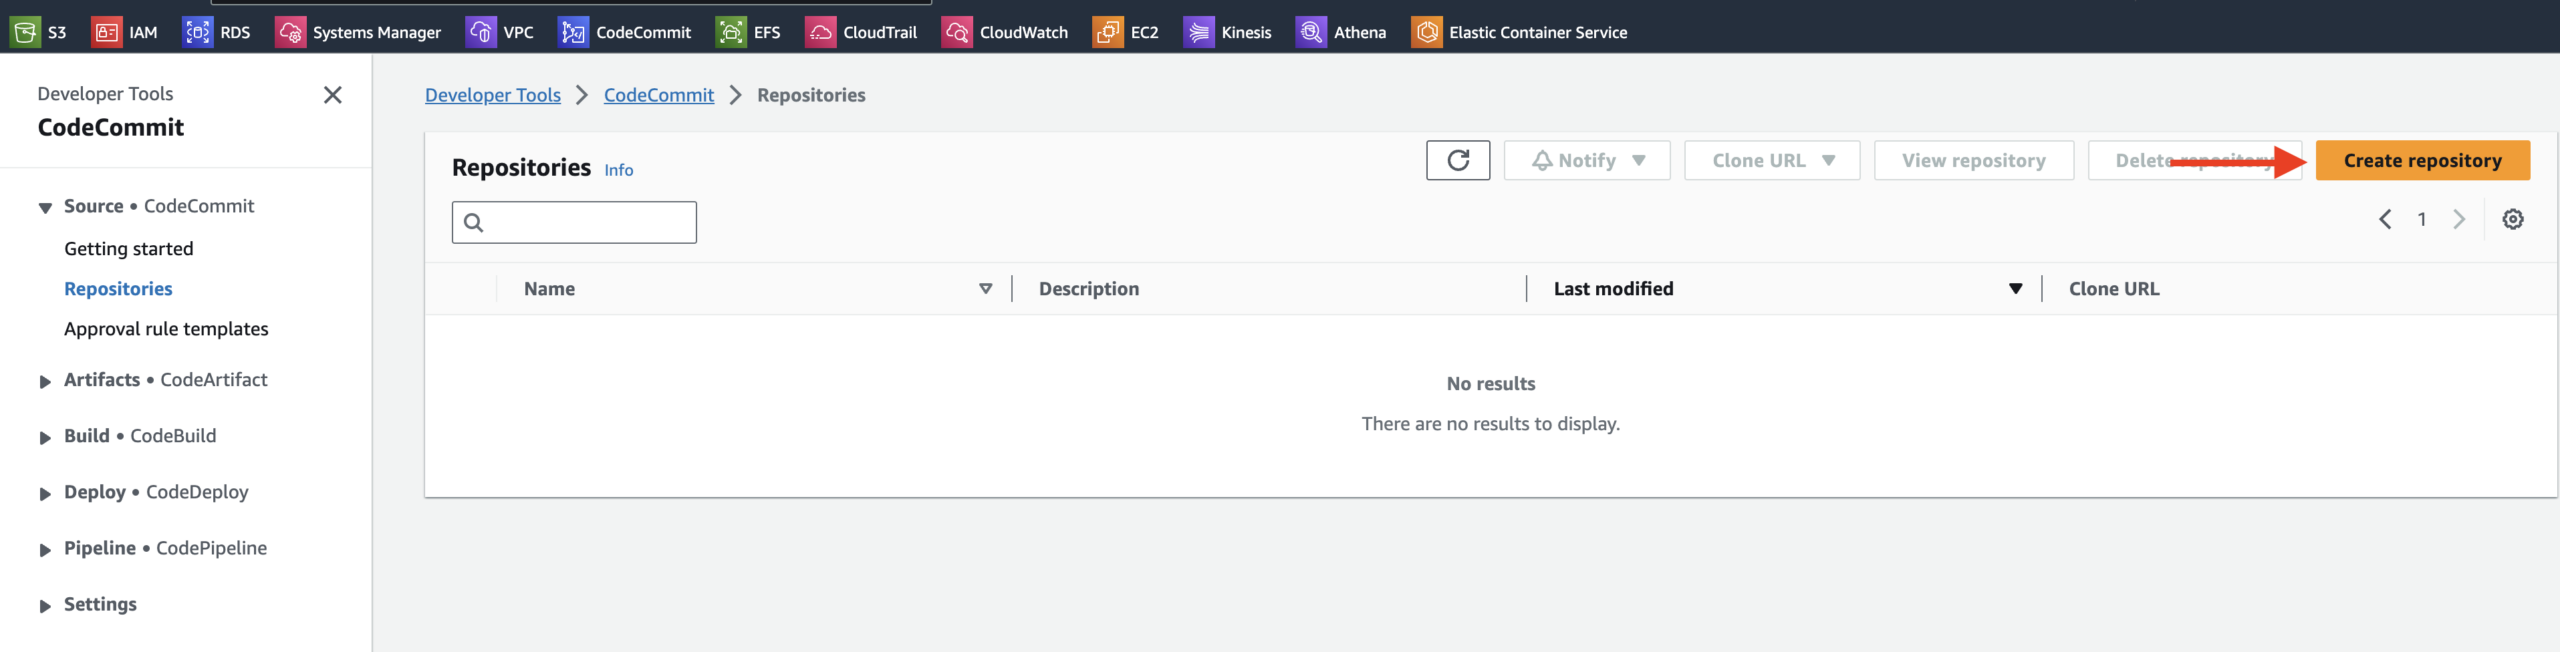
3. On the Create repository form, enter the following values:
- Repository name: ca-app-<Unique_string> (Replace <Unique_string> with a random sequence of approximately six letters and numbers)
- Description: – optional
Note: Repository names must be unique to the AWS Region. The names can consist of any combination of letters, numbers, periods, underscores, and dashes. Names must be between 1 and 100 characters in length. The remaining Lab Steps will use a repository named ca-app, but you should use your unique repository name in its place.
4. Click Create.
AWS CodeCommit creates the repository in seconds. When the repository is ready, you will see connection instructions:
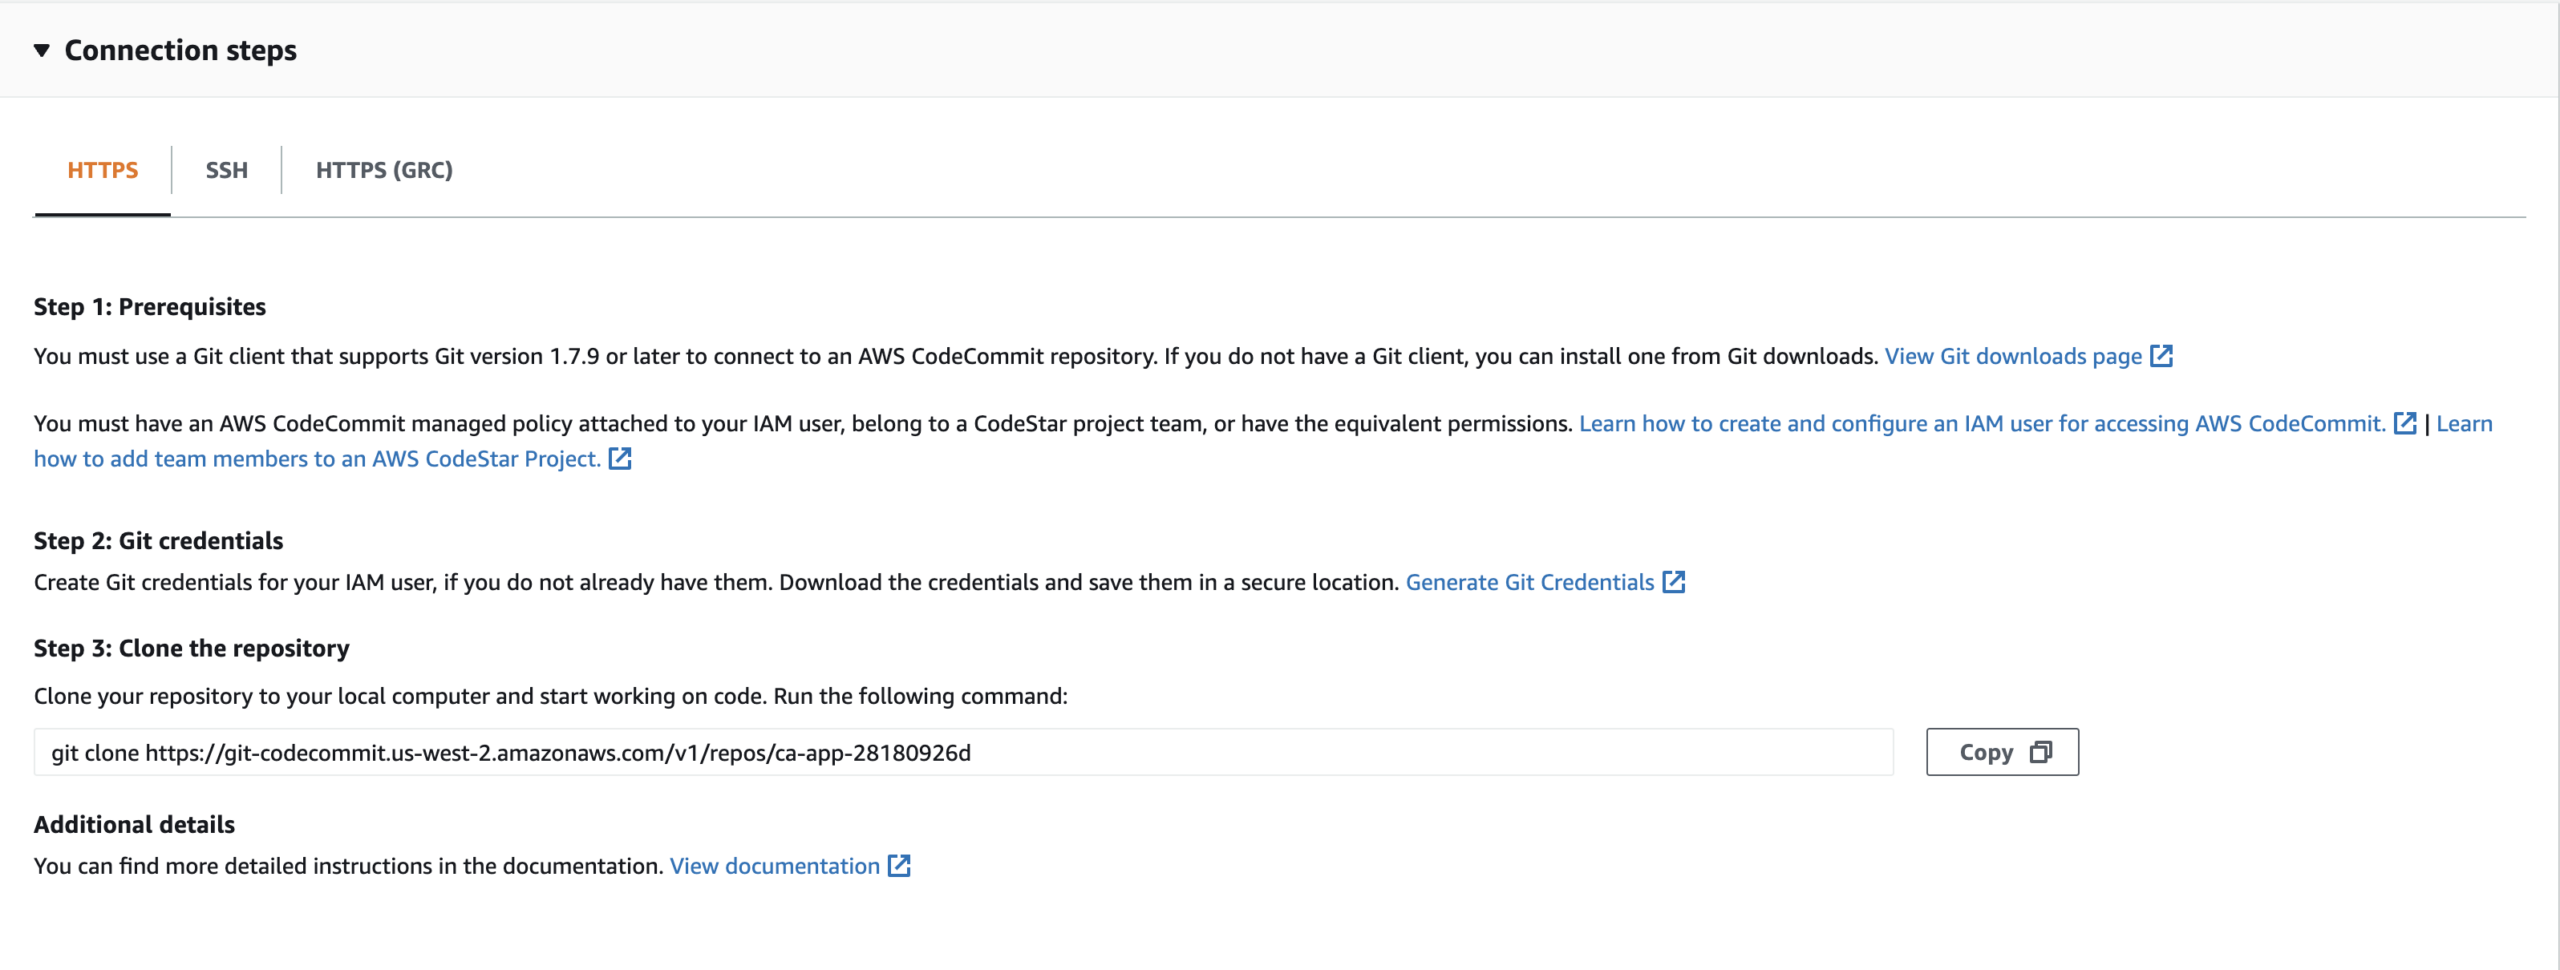
There are two methods for connecting to your repository: HTTPS and SSH. You will use HTTPS.
5. Copy the git clone command under Step 3: Clone the repository:

The command will create a copy of the repository on your local environment in a later Lab Step.
6. Paste the git clone command into a text document for later use.
7. Collapse the Connection steps panel.
You will see the repository view for the AWS CodeCommit repository you created:

You will return here when you have committed some code. For now, just notice that the Clone URL button is always available in the upper-right corner in case you lose the URL for the git clone command. In order to connect using HTTPS, you need credentials. You will now generate credentials to connect to your repository.
8. In the AWS Management Console search bar, enter IAM, and click the IAM result under Services:

9. Click on Users in the left navigation panel.
10. In the Users table, find your user account.
11. Click on the Security credentials tab.
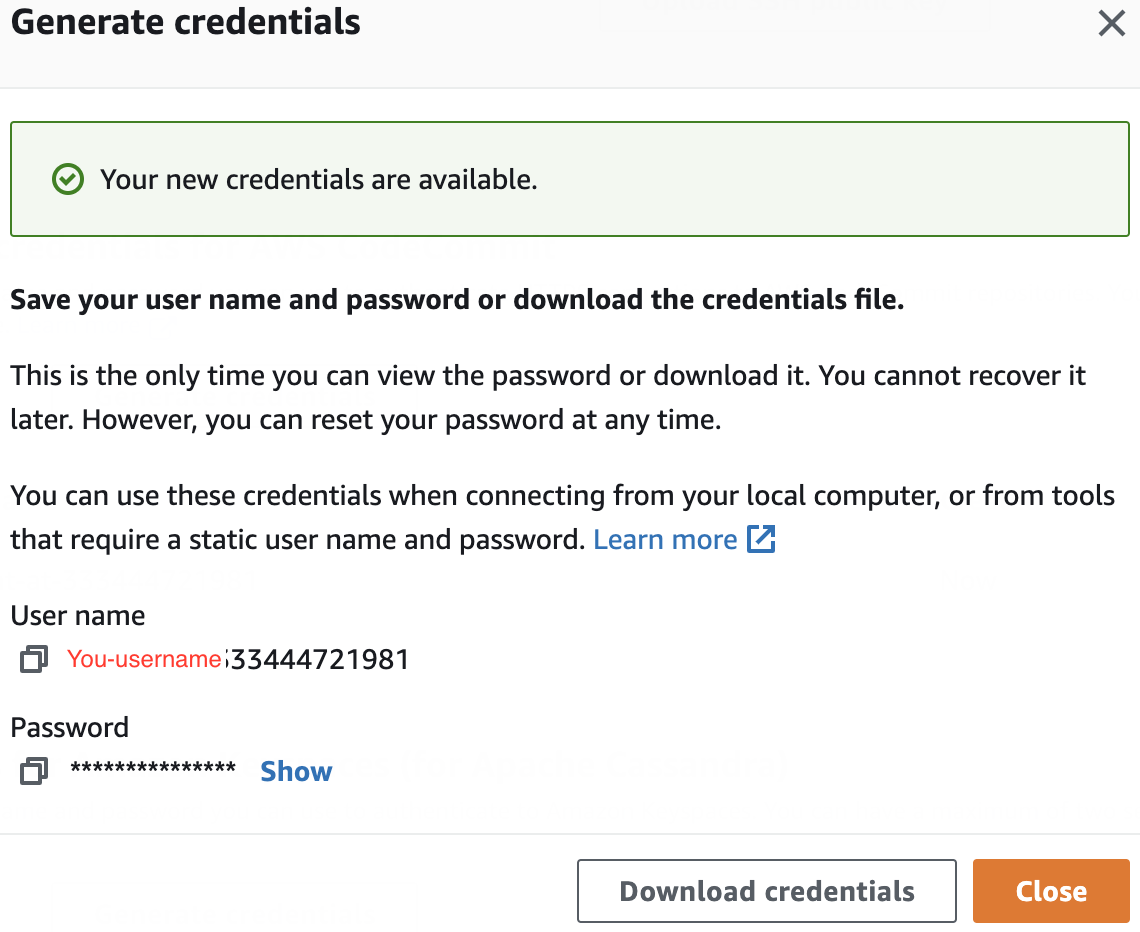
12. Scroll down to the bottom and click on Generate credentials under HTTPS Git credentials for AWS CodeCommit:
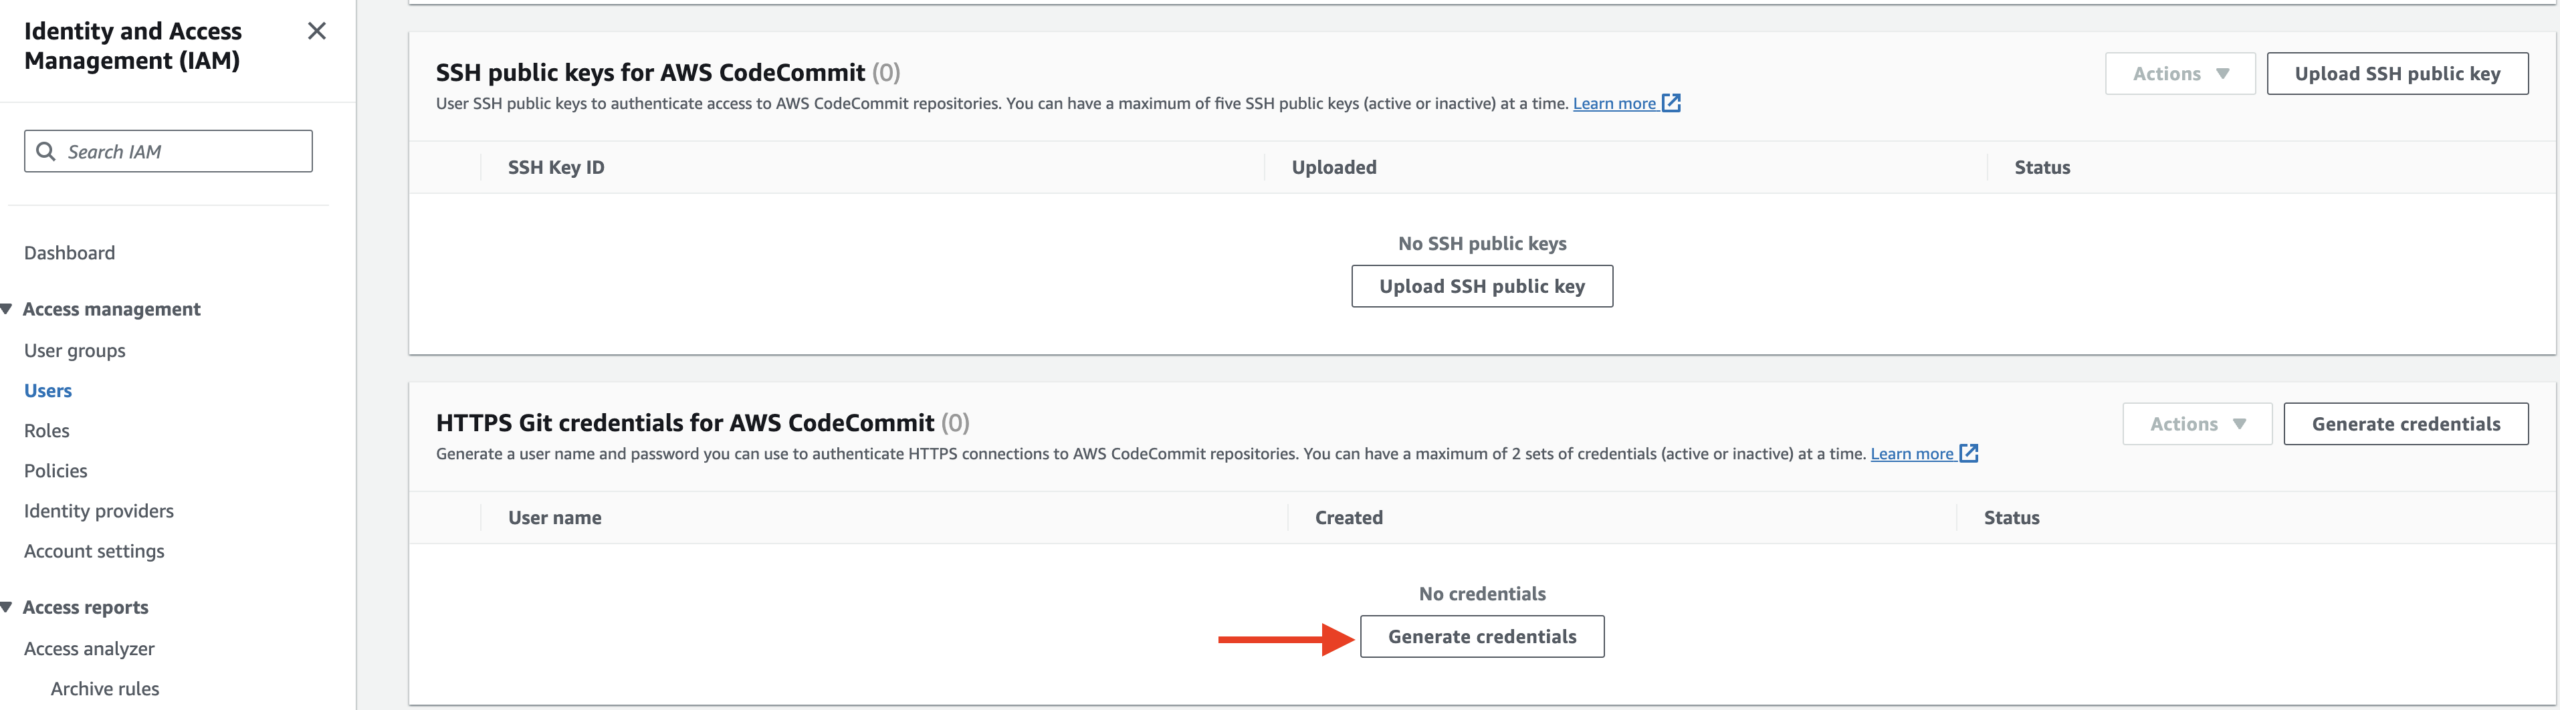
This will show a pop-up dialog showing you your credentials.
13. Click Show to reveal the Password and copy the User name and Password to the file with your git clone command:
Now you are ready to use HTTPS to connect to the AWS CodeCommit repository you created earlier.
Summary
In this lab step, you created an AWS CodeCommit repository and copied the Git command to create a clone of it. You also generated credentials that are required to connect to your CodeCommit repository using HTTPS.
Introduction
You will commit code into your AWS CodeCommit Repository in this Lab Step. You will use an EC2 instance for your development environment. The lab environment sets up the instance with a code project that you will use throughout the lab. You will commit the code to your repository using Git with the command and credentials you copied to a text file in the previous lab step.
Instructions
1. In the AWS Management Console search bar, enter EC2, and click the EC2 result under Services:

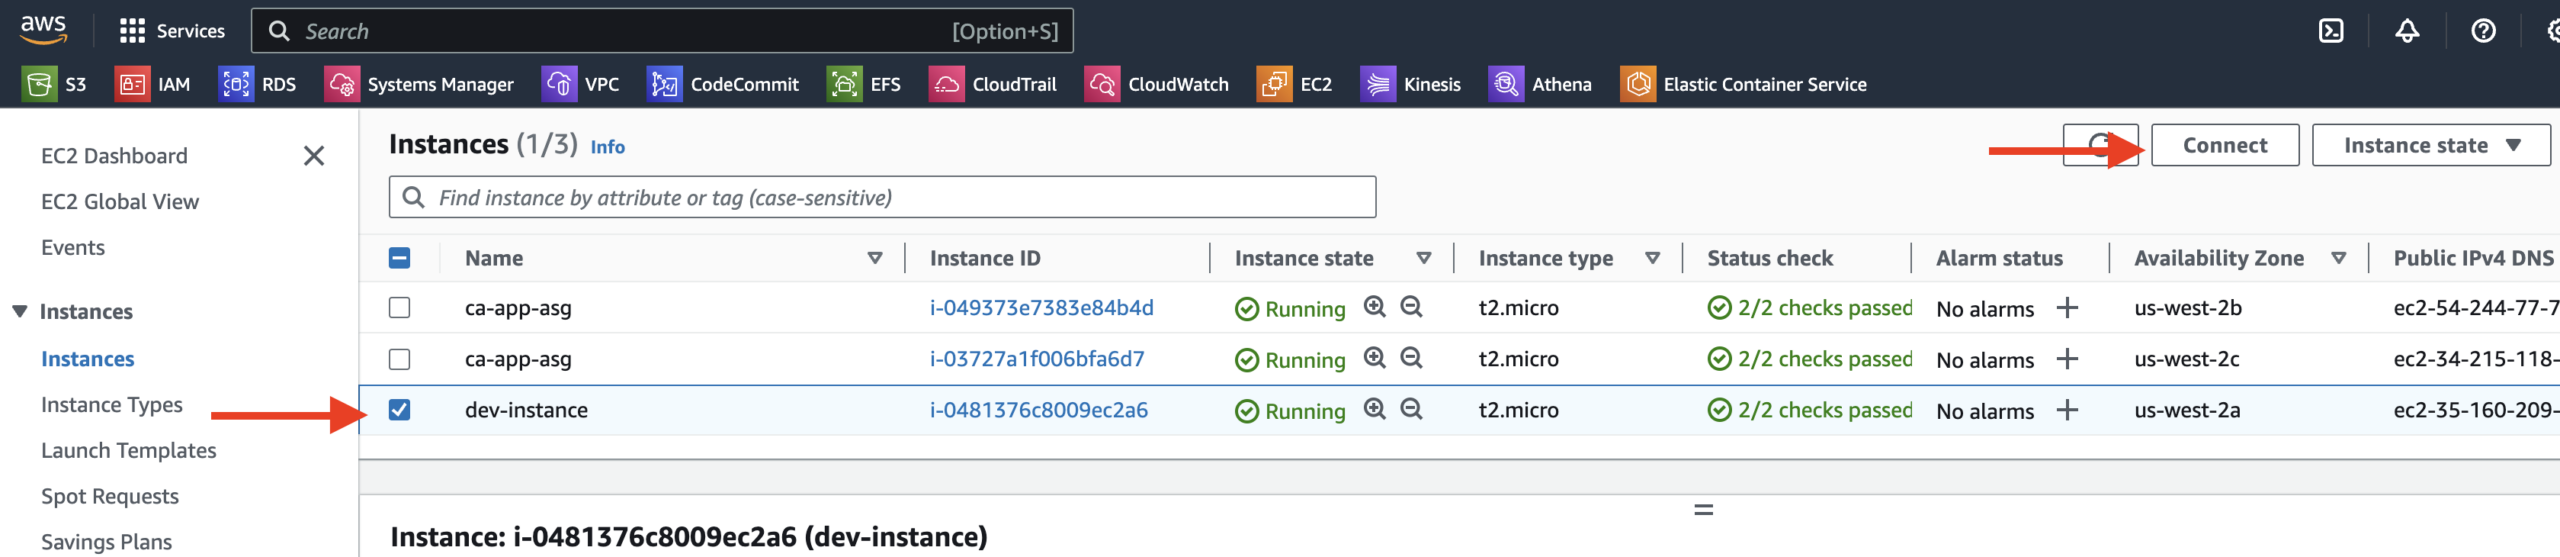
2. Click on Instances > Instances in the left navigation panel.
3. Select the instance named dev-instance and click Connect:
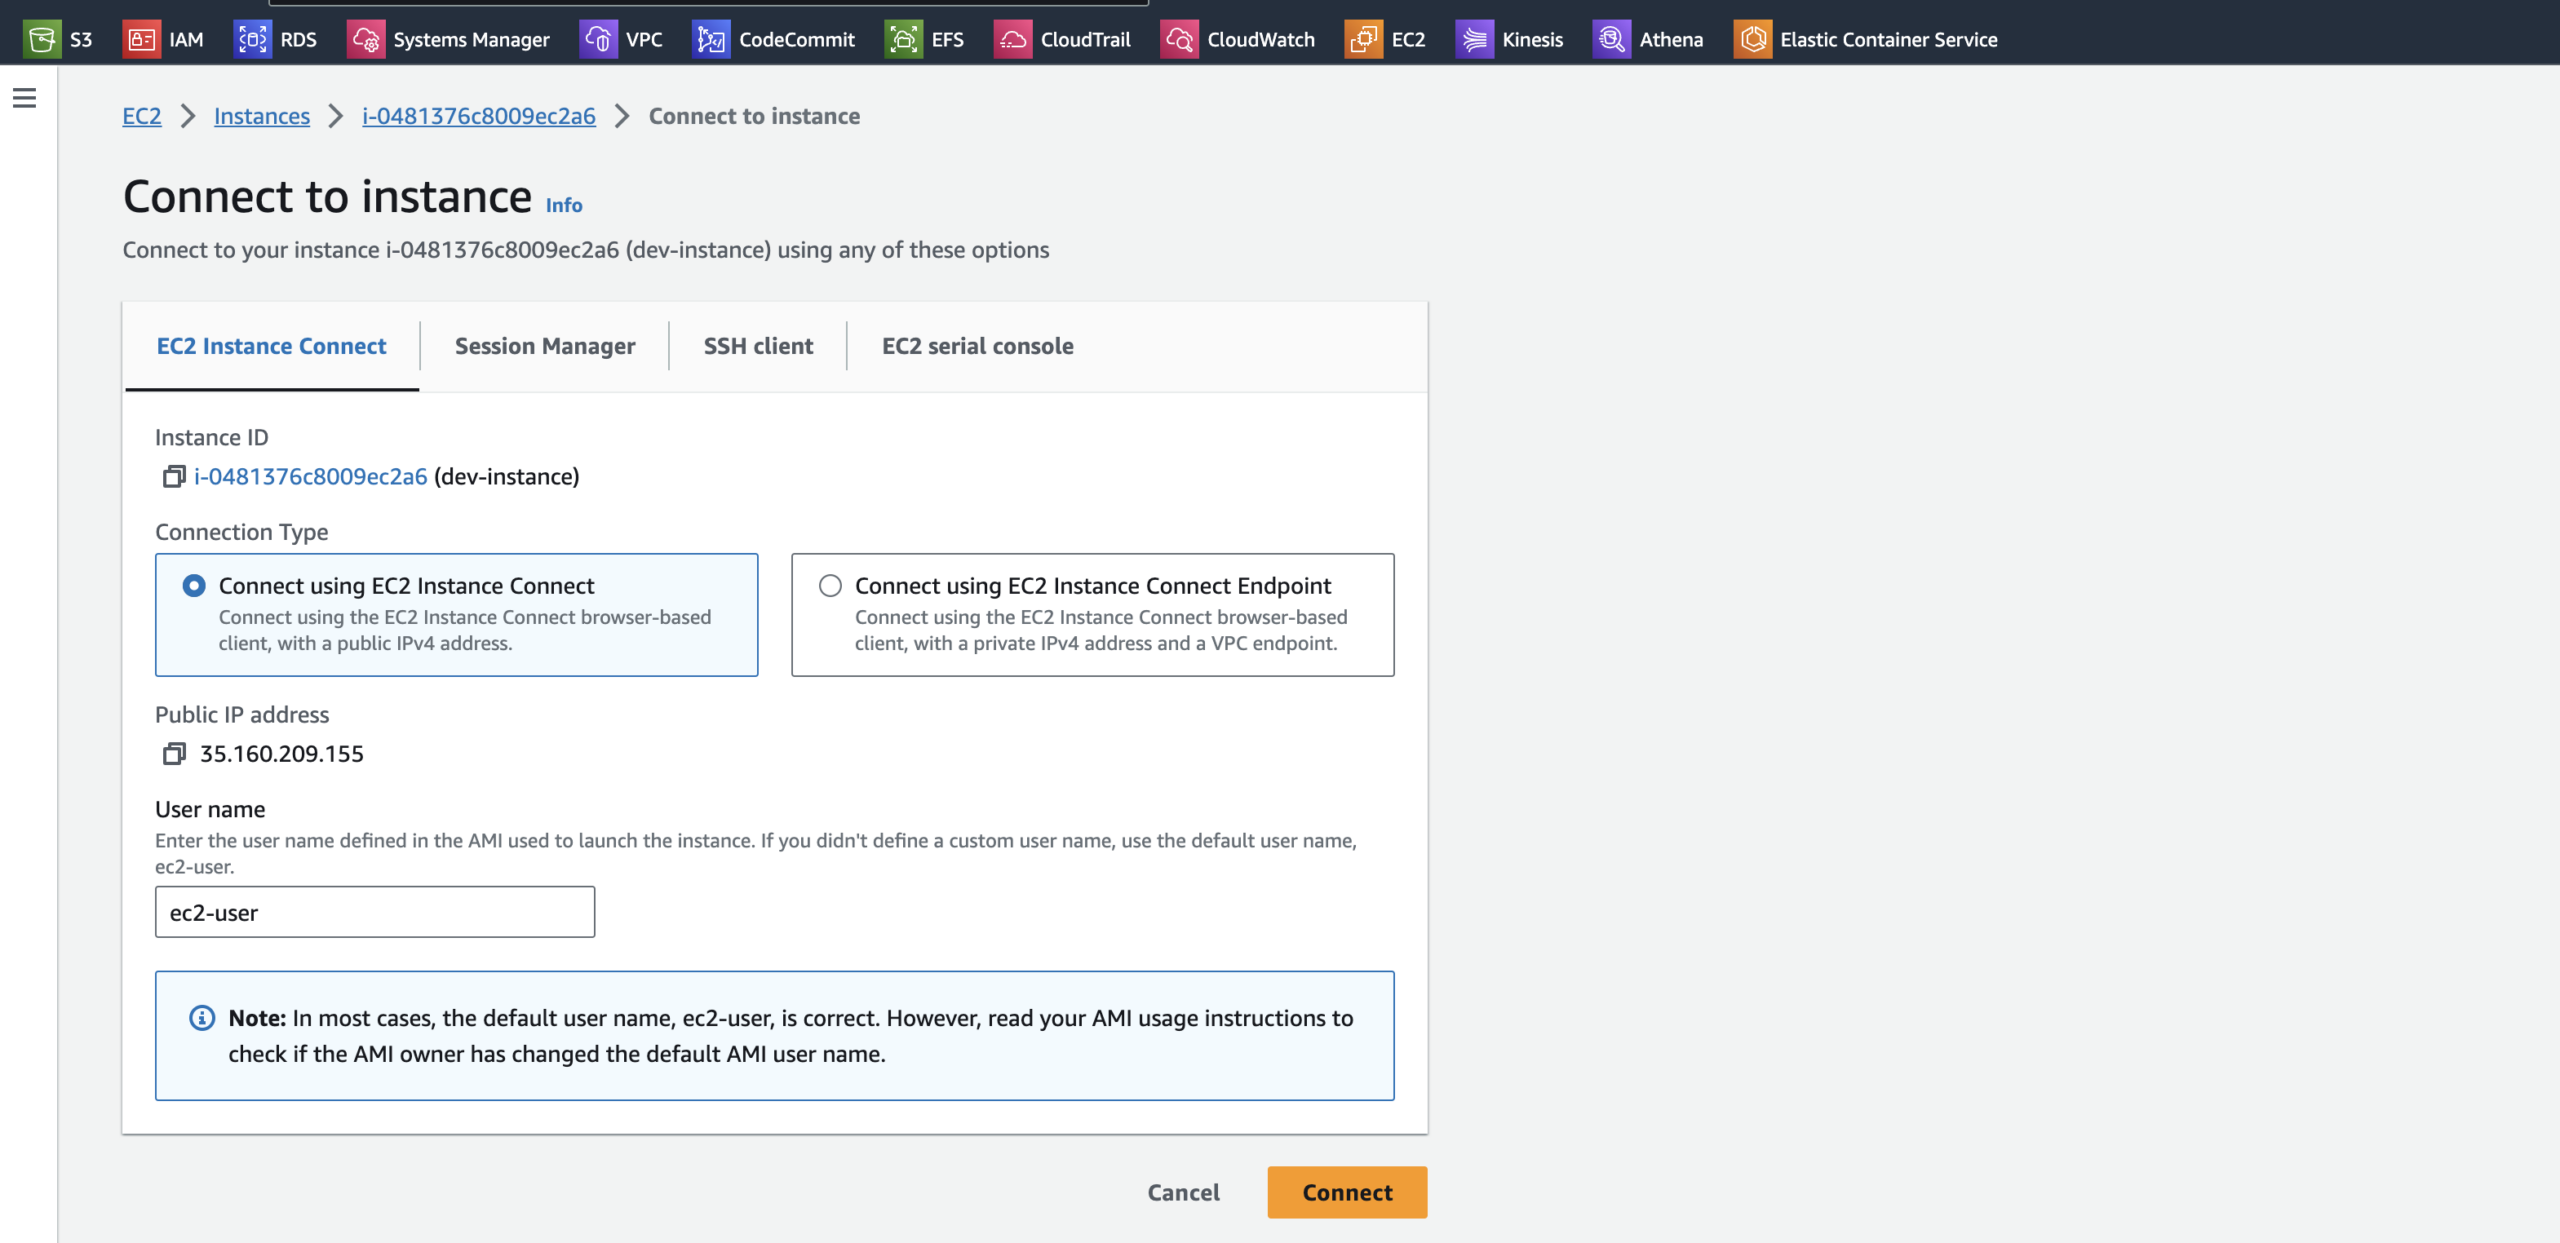
4. With the EC2 Instance Connect tab selected, click Connect to connect to the instance:
4. In the SSH shell, enter:
cd app5. Enter ls to list the directory contents:

The app is a Node.js web application using the Express.js web framework. The front end uses AngularJS and Pug view templates. The specifics of the project are not going to be a focus in this Lab. However, you will learn some details about the project that are common across most production code projects:
- There is a build procedure. In this case, the build tool (gulp) merges and compresses source files to improve web browser performance. The Cloud Academy Lab environment pre-built the app instance for you.
- There are automated tests. The app uses a test runner (Karma) and unit tests written in JavaScript (jasmine).
- The application has a development and a production mode. The development mode makes it easier to debug the code and includes a visual cue on the web app to indicate development mode. For this app, the development server uses port 3000 and the production server uses port 8080.
- The application can be scaled horizontally. The ability to use multiple instances to run the application creates more interesting deployment scenarios that you will see in later Lab Steps.
The code and commands are relatively simple compared to a production application. Thinking in these general terms will allow you to relate to projects you have worked on. You will see what the web app does shortly.
6. Run the app tests by issuing:
npm test
This will run the automated tests and report a success message when complete. Now that you know the tests are passing, you can try out the app.
7. Run the app by entering:
NODE_ENV=development DEBUG=aws-code-services:* npm start
NODE_ENV and DEBUG are environment variables set to modify how the app behaves. npm start is what starts the server running your app. The output tells you that it is running in development mode and the server is listening on port 3000.
8. Return to the EC2 Instance Console and copy the Public DNS of the instance named dev-instance:
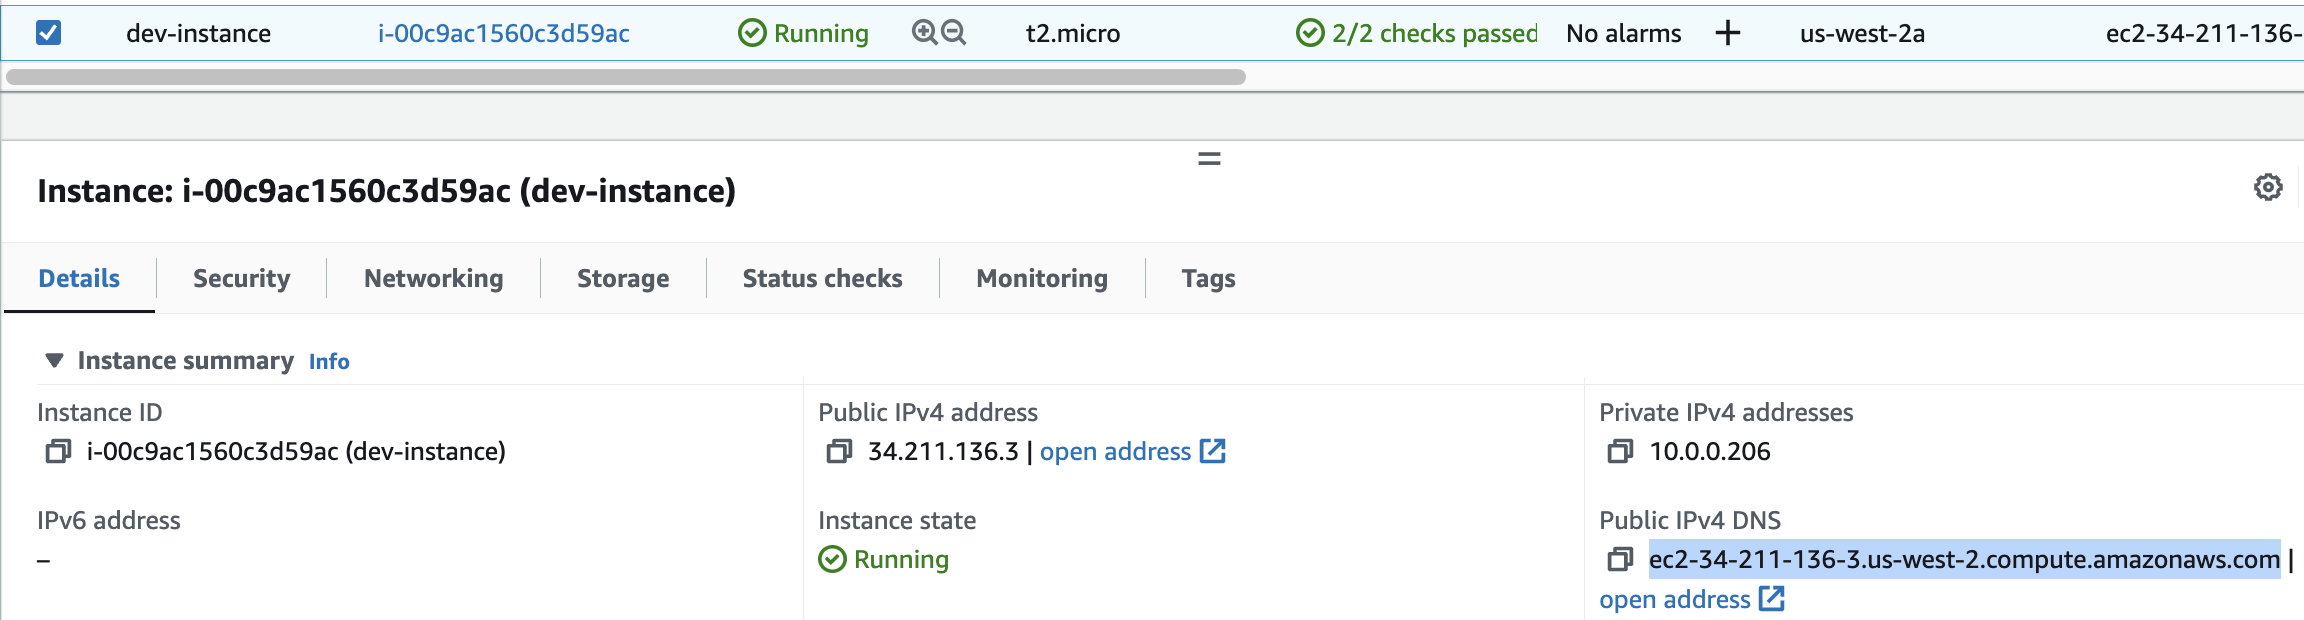
9. Open a new browser tab and enter the DNS value preceded by http://, and followed by :3000 into the address bar. The address will look like ec2-52-89-201-79.us-west-2.compute.amazonaws.com:3000:
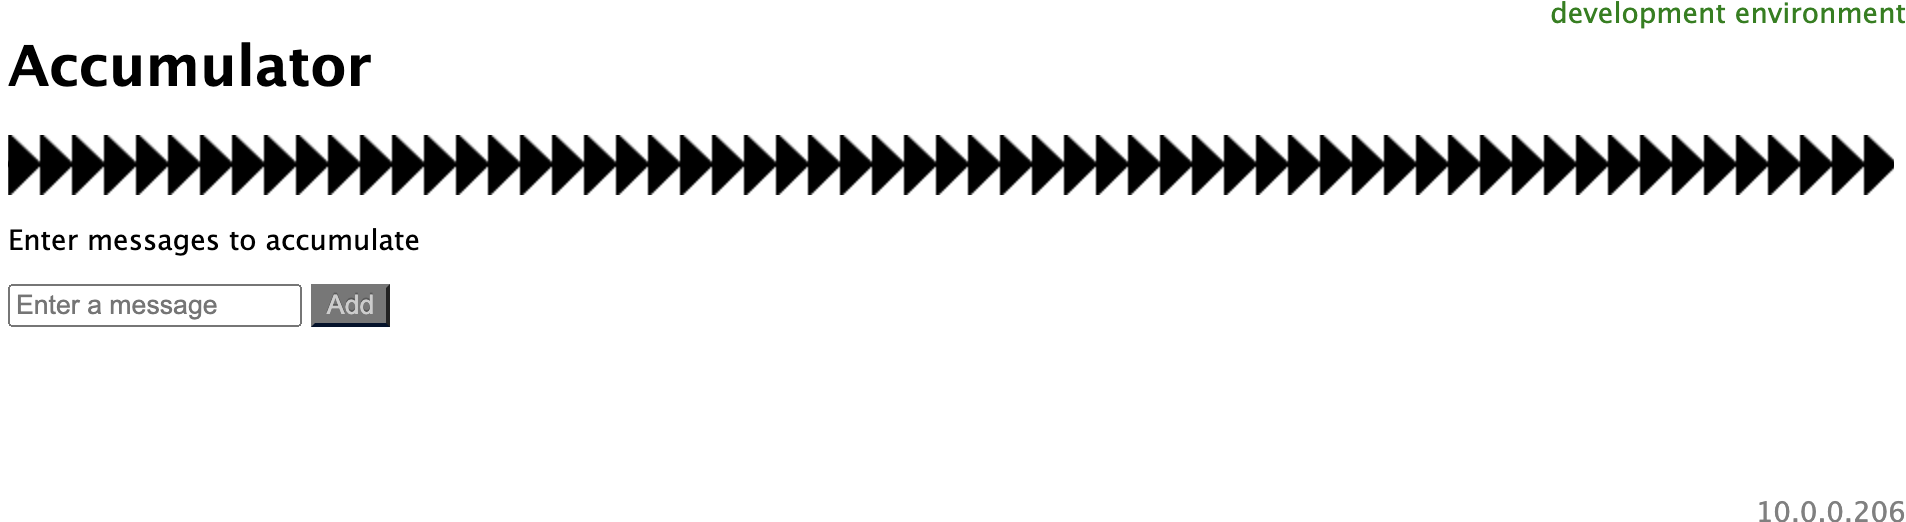
The app accumulates whatever non-empty messages you enter into a list. Try entering a few now. Notice it is easy to identify that the app is running in development mode from the notice in the upper right-hand corner. Also, notice the local IPv4 address of the server is in the bottom right-hand corner. The IP address display will be useful for identifying different instances when you deploy the app to production.
10. Return to the SSH shell and press Ctrl+C to stop the server.
11. Enter cd to return to your home directory of /home/ec2-user.
12. Enter the following command to tell Git to cache your credentials for a few hours after you enter them:
git config --global credential.helper 'cache --timeout=10800'
13. Clone your AWS CodeCommit repository by entering the command you copied in the last lab step. It will be similar to:
git clone https://git-codecommit.us-west-2.amazonaws.com/v1/repos/ca-app234_pp
Note: The ca-app234_pp at the end of the URL will be different in your command since you’ll be cloning your own CodeCommit repository.
14. When prompted, enter the Username and Password you saved in a text file in the previous Lab Step.
Tip: The password generated by AWS is long and it is easy to make a typo when entering it. To avoid errors copy and paste the password.
You will receive a warning that you cloned an empty repository:
![]()
That is true and expected. You will add code to the repository next. You now have a local copy of the AWS CodeCommit remote repository.
15. Change the repository directory name to ca-app:
mv ca-app-<Unique_string> ca-appNote: Change
ca-app-<Unique_string>to the name of your repository.
This won’t change the repository name. It will only simplify the instructions at the command line by not having to enter your unique string following ca-app in this and later lab steps.
16. Copy the app into your local repository:
cp -R app/. ca-app17. Change into your new local repository directory:
cd ca-app18. View the local repository status:
git status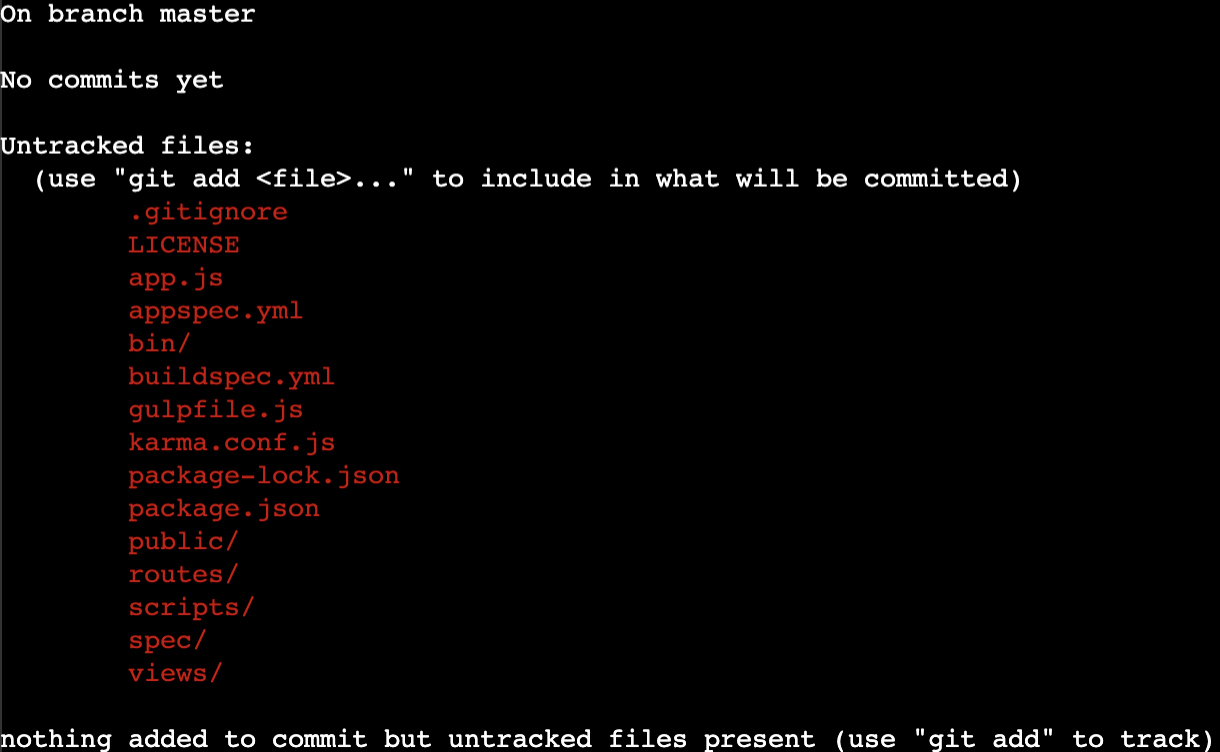
This tells you that you are on the master branch and working from the initial code commit. The output also lists which files and directories are untracked. You need to add them and commit them to have them included in the source control.
19. Add all of the files to initiate change tracking on them:
git add -A20. Commit the added files to the local repository:
git commit -m "app v1.0"21. Push the changes in your local repository to the AWS CodeCommit remote repository so they are synchronized:
git push22. In your browser, navigate to CodeCommit and click on your repository:
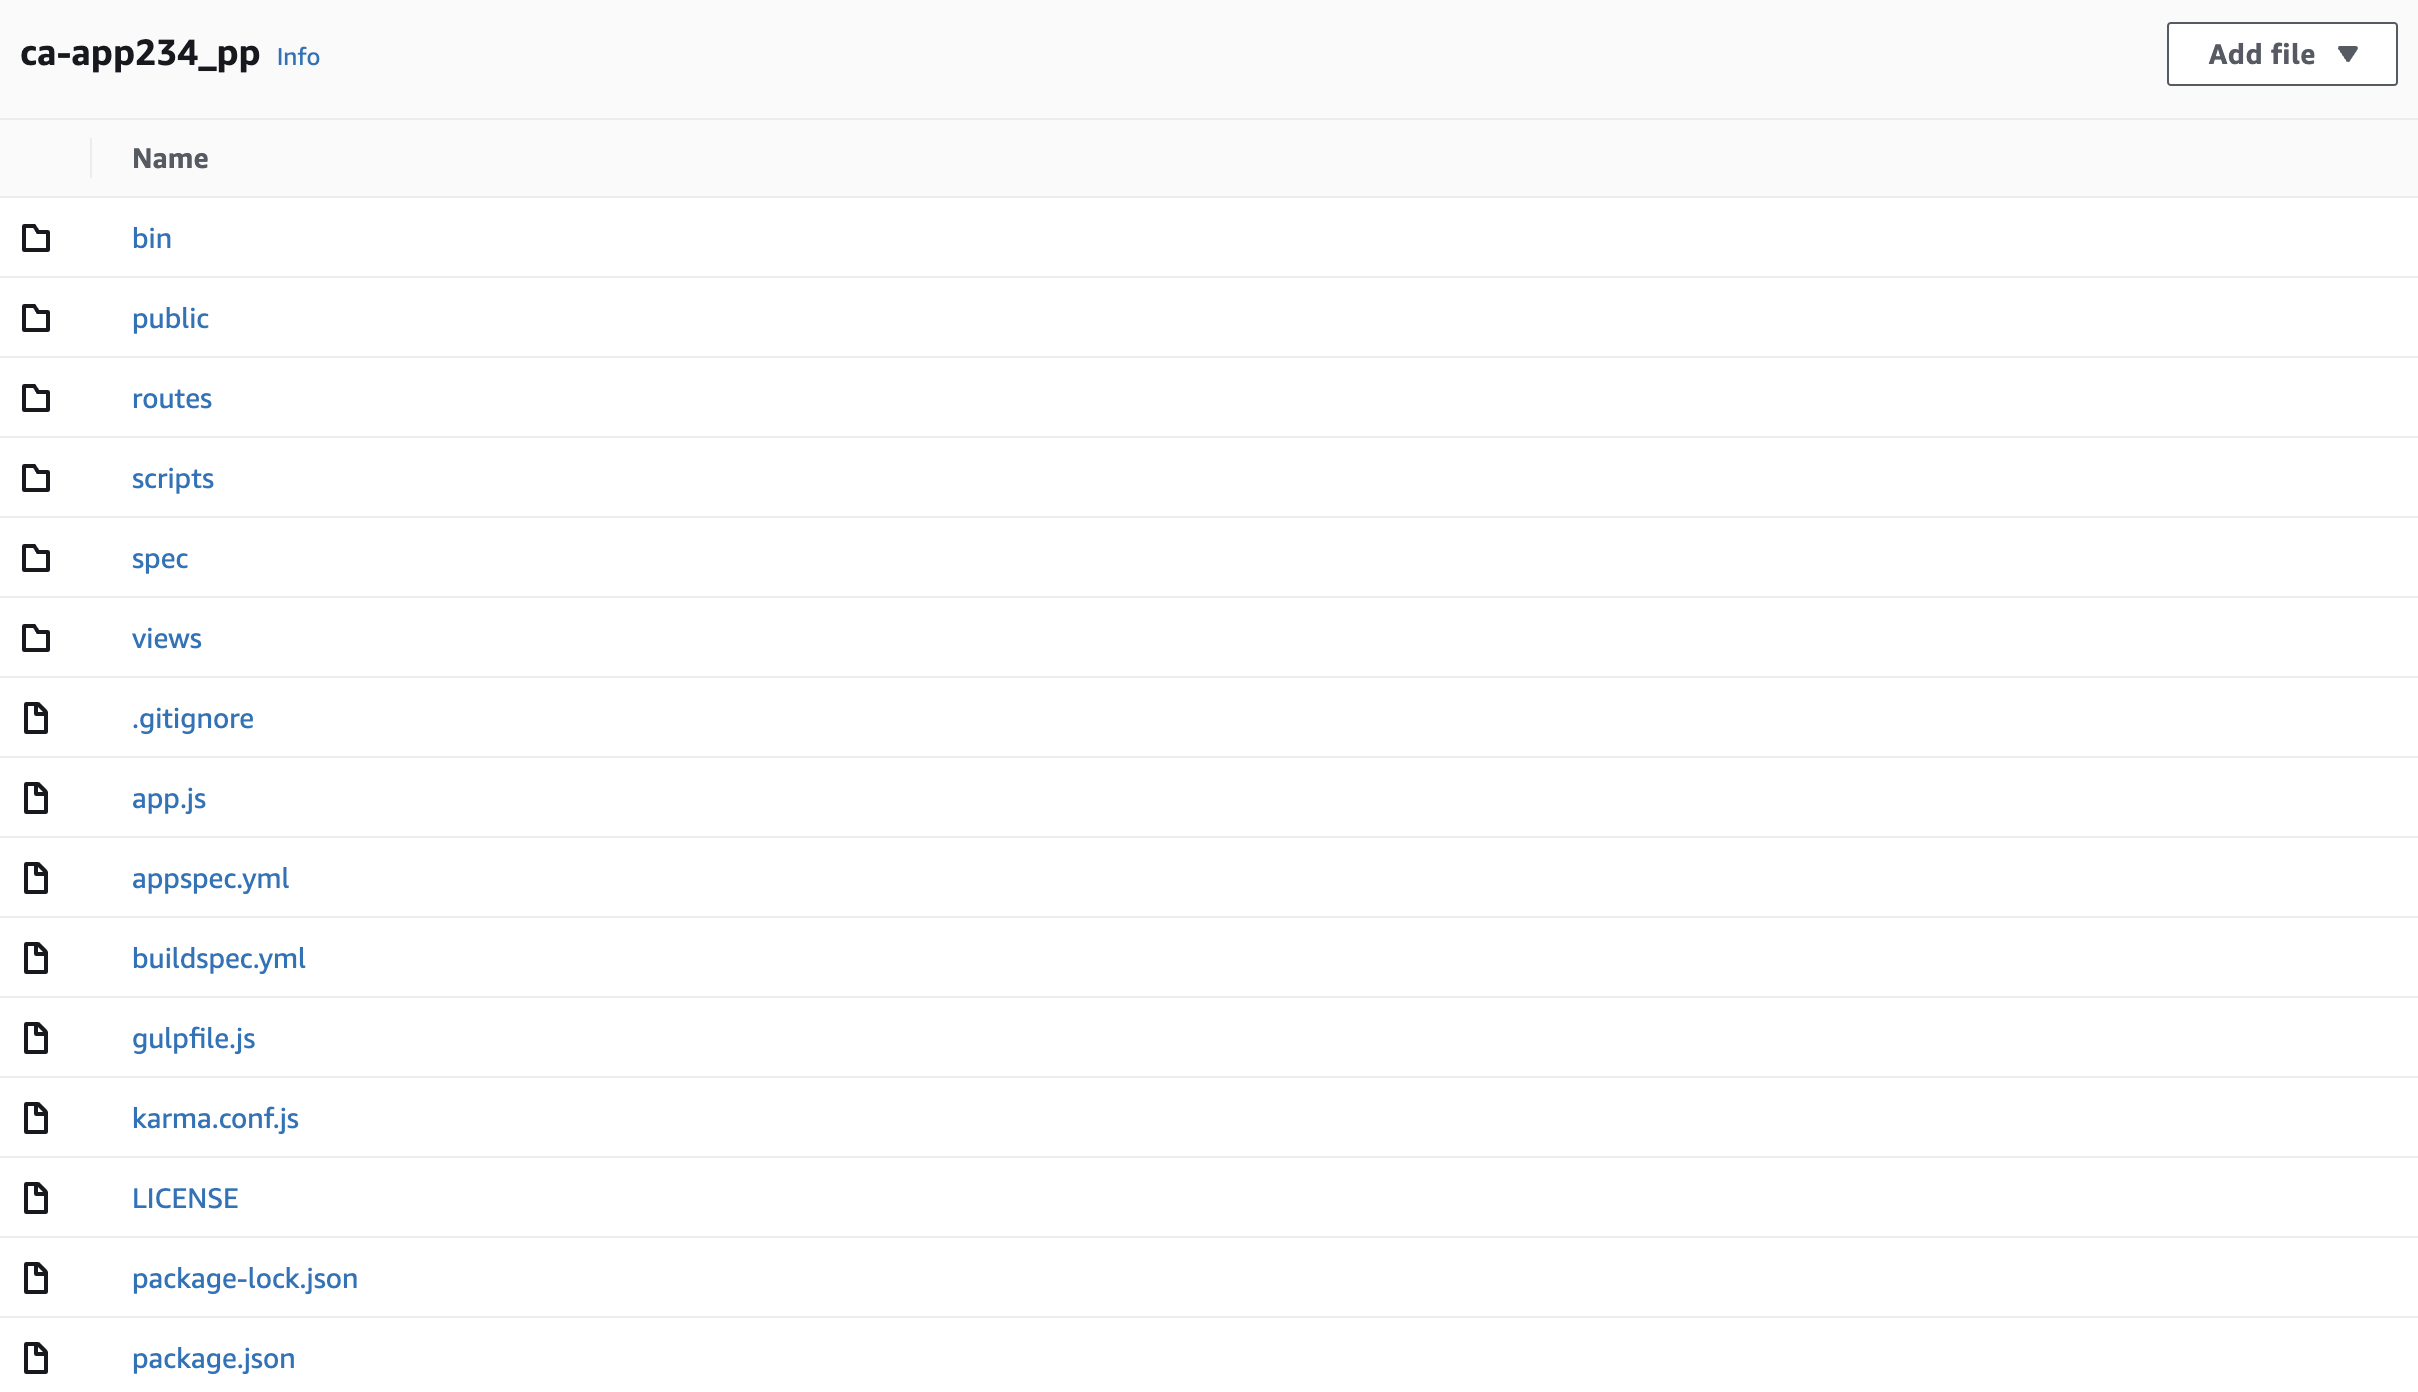
You have pushed the app to the AWS CodeCommit repository. You can explore the Commits and Branches views to see the commit you performed and view the status of the master code branch you worked on. As you work through the Lab, there will be more to see in those views.
Summary
In this lab step, you worked with the provided Node.js app and learned how to run the app in development mode. You also learned how to run the automated tests. You setup your local repository and added the app to it, as well as committed version one of the app. Finally, you pushed version one of the app to the remote AWS CodeCommit repository.
Introduction
AWS CodeBuild provides a service to support continuous integration. The service is fully managed for you and you are charged for the number of minutes it takes the service to complete your build. AWS CodeBuild provides support for several common build environments, though you can fullly customize the build environment as well. You will use the built-in support for Node.js to build your app in this Lab Step. CodeBuild provides two approaches for specifying the build commands: entering a single shell command or defining a buildspec.yml file in the root of your project. The buildspec.yml approach is more instructive for learning the phases AWS CodeBuild goes through. You will use the buildspec.yml approach. AWS CodeBuild can produce artifacts and upload them to an S3 bucket. You will learn how this is done in this Lab Step.
Instructions
1. In your dev-instance SSH shell, enter the following command to display the contents of your app’s buildspec.yml:
more buildspec.yml
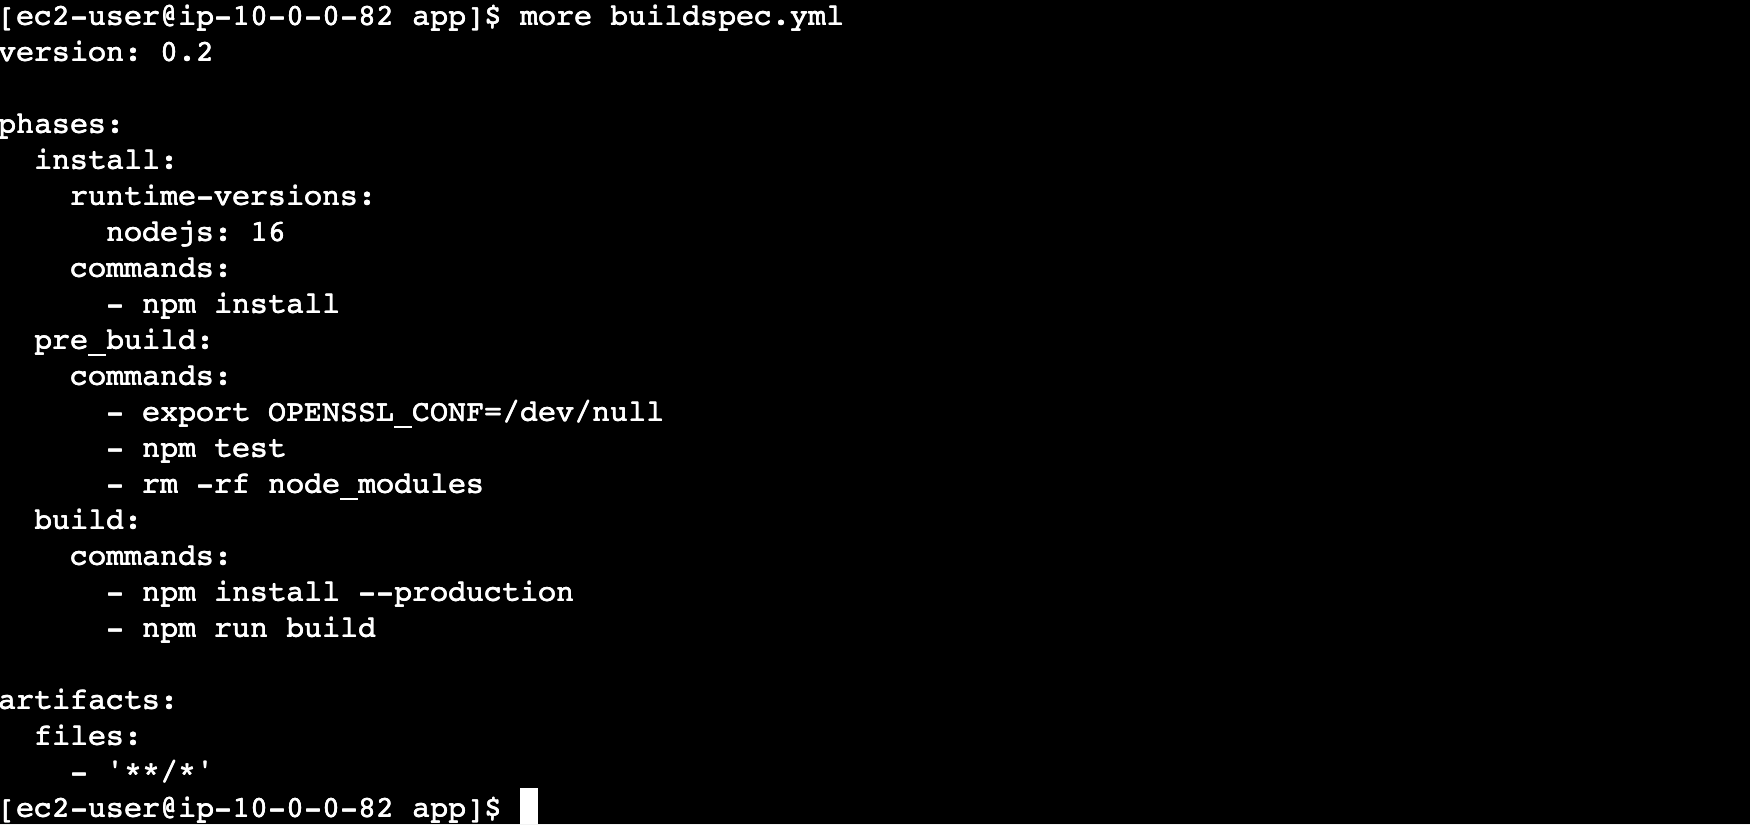
The contents of the file are written in YAML. It’s not necessary to understand YAML for this Lab. Each phase has a commands array that will be executed in the build phase. The phases of the AWS CodeBuild build process used in this example are install, pre_build, and build. install is used to specify the Docker runtime used at build-time and to install dependencies. In this case, it is installing development dependencies needed for running tests. For simplicity, the pre_build phase is performing the automated tests and removing the development dependencies. In a production application you may create a separate build for testing. Finally, the build phase performs the production build. There is a post_build phase as well, but it is not used for your app. The artifacts specify what files to include in the created build artifact. The pattern '**/*' specifies all files in the project directory. Now you will see how AWS CodeBuild uses this to set up an automated build.
2. In the AWS Management Console search bar, enter CodeBuild, and click the CodeBuild result under Services:

3. Click Create build project:
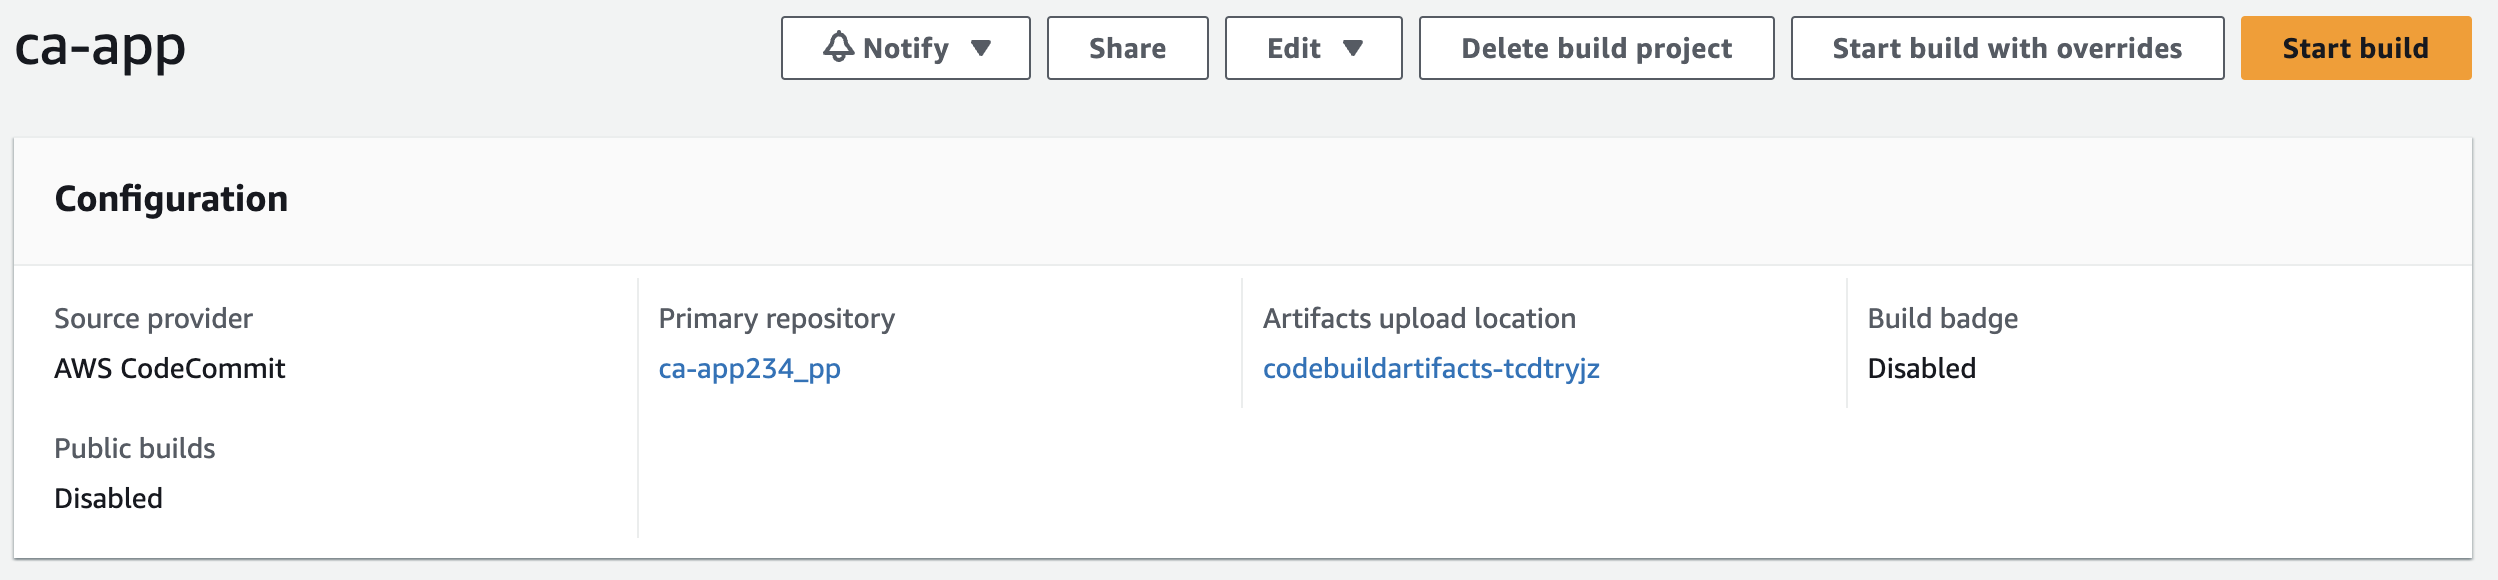
4. In the Create build project form, enter the following for the entire form leaving the default values for additional settings:
- Project configuration:
- Project name: ca-app
- Source:
- Source provider: AWS CodeCommit (notice Amazon S3 and Github are also supported)
- Repository: ca-app (your exact repository name will appear in the drop-down menu)
- Branch: master
- Environment:
- Environment image: Managed image
- Operating System: Ubuntu
- Runtime: Standard
- Image: aws/codebuild/standard:6.0
- Image Version: Always use the latest image for this runtime version
- Service role: Existing service role
- Role ARN: Select the role named codebuild-ca-app-role
- Allow AWS CodeBuild to modify this service role so it can be used with this build project: unchecked
- Buildspec:
- Build specifications: Use a buildspec file
- Artifacts:
- Type: Amazon S3
- Bucket name: Select the bucket from the drop-down menu containing codebuildartifacts in the name
- Name: ca-app-artifacts.zip
- Artifacts packaging: Zip
The Cloud Academy Labs environment created an appropriate role for you to use.
It is worth knowing what advanced settings are available by clicking Additional configuration at the bottom of different sections, but don’t change any of the default values. Notice that AWS CodeBuild uses an encryption key managed by AWS to keep all of your artifacts secure default but you can supply your own KMS key. Also, if you have an intense build procedure, there are more powerful instances that can be used for builds.
5. Click Create build project.
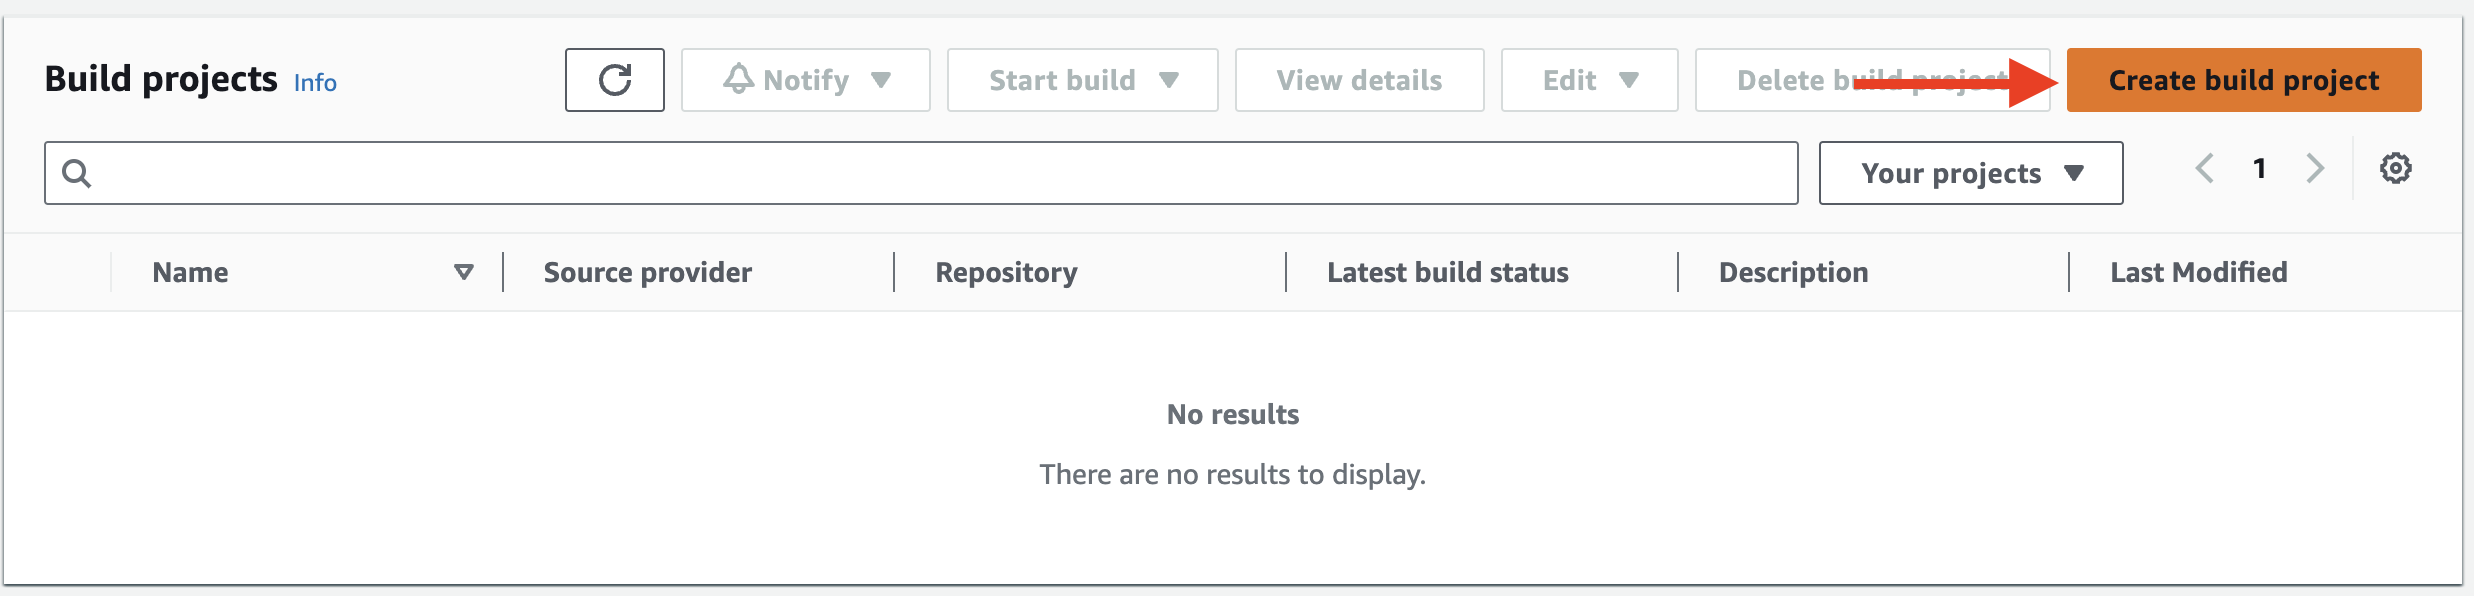
6. You will see your project listed in the projects view:
7. Click Start build.
This will take you to a view where you can review the Phase details as they progress, as well as view the Build logs output generated by your build:

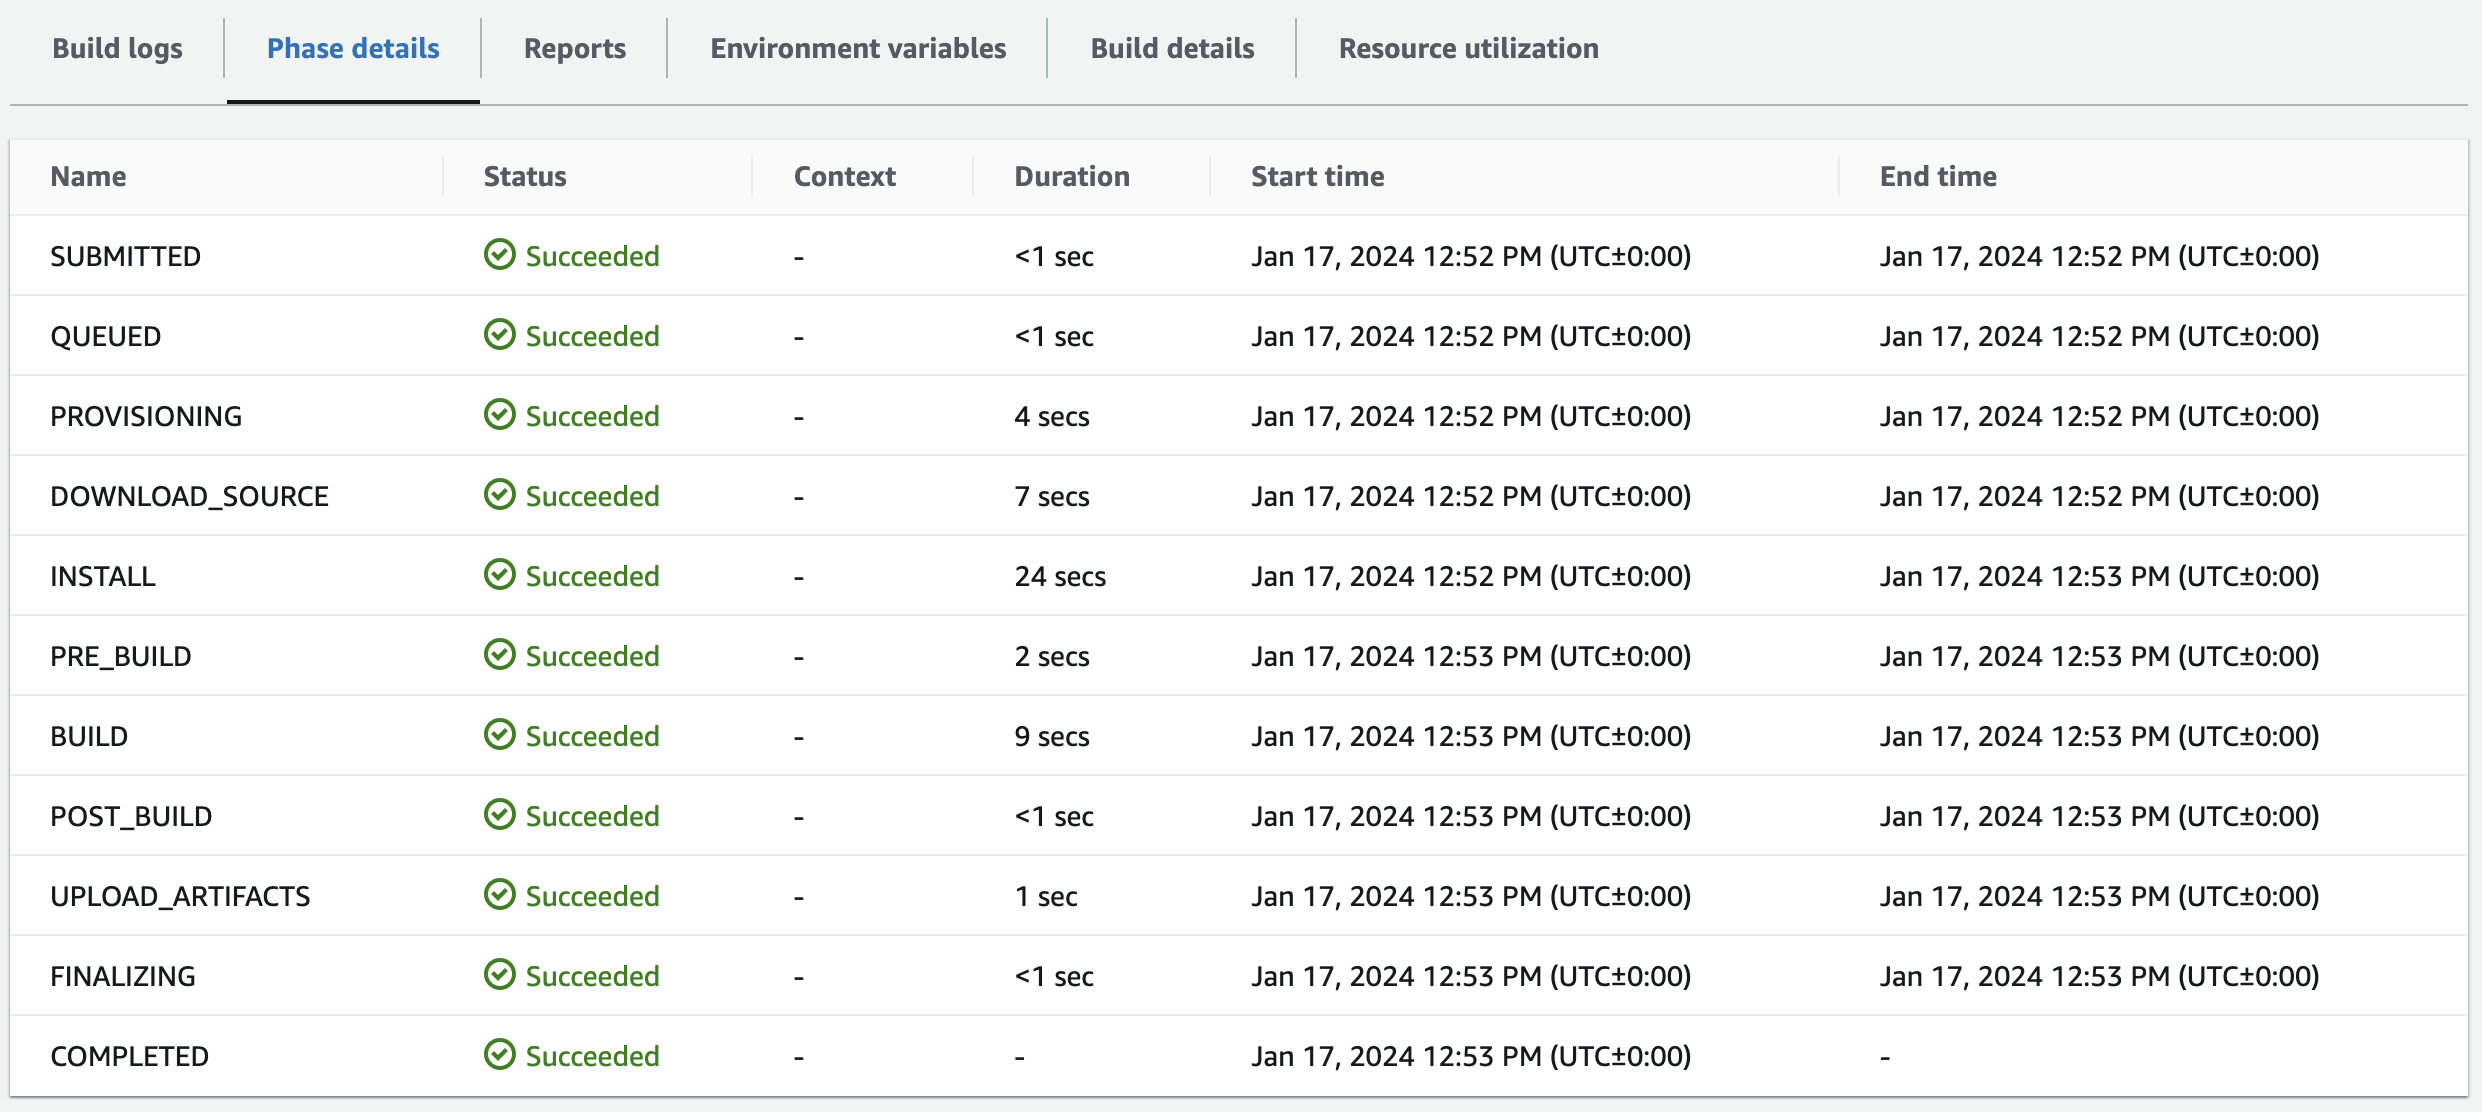
The log view is very useful when errors in your build do occur. If an automated test failed, it would be clear from the logs, since the build won’t continue after a phase fails. Notice the POST_BUILD phase has <1 second Duration since your app omitted it in the buildspec.yml file.
Note: You may need to refresh your browser once you see the Phase complete: UPLOAD_ARTIFACTS Success: true message in the Build logs to make all of the Phase details appear.
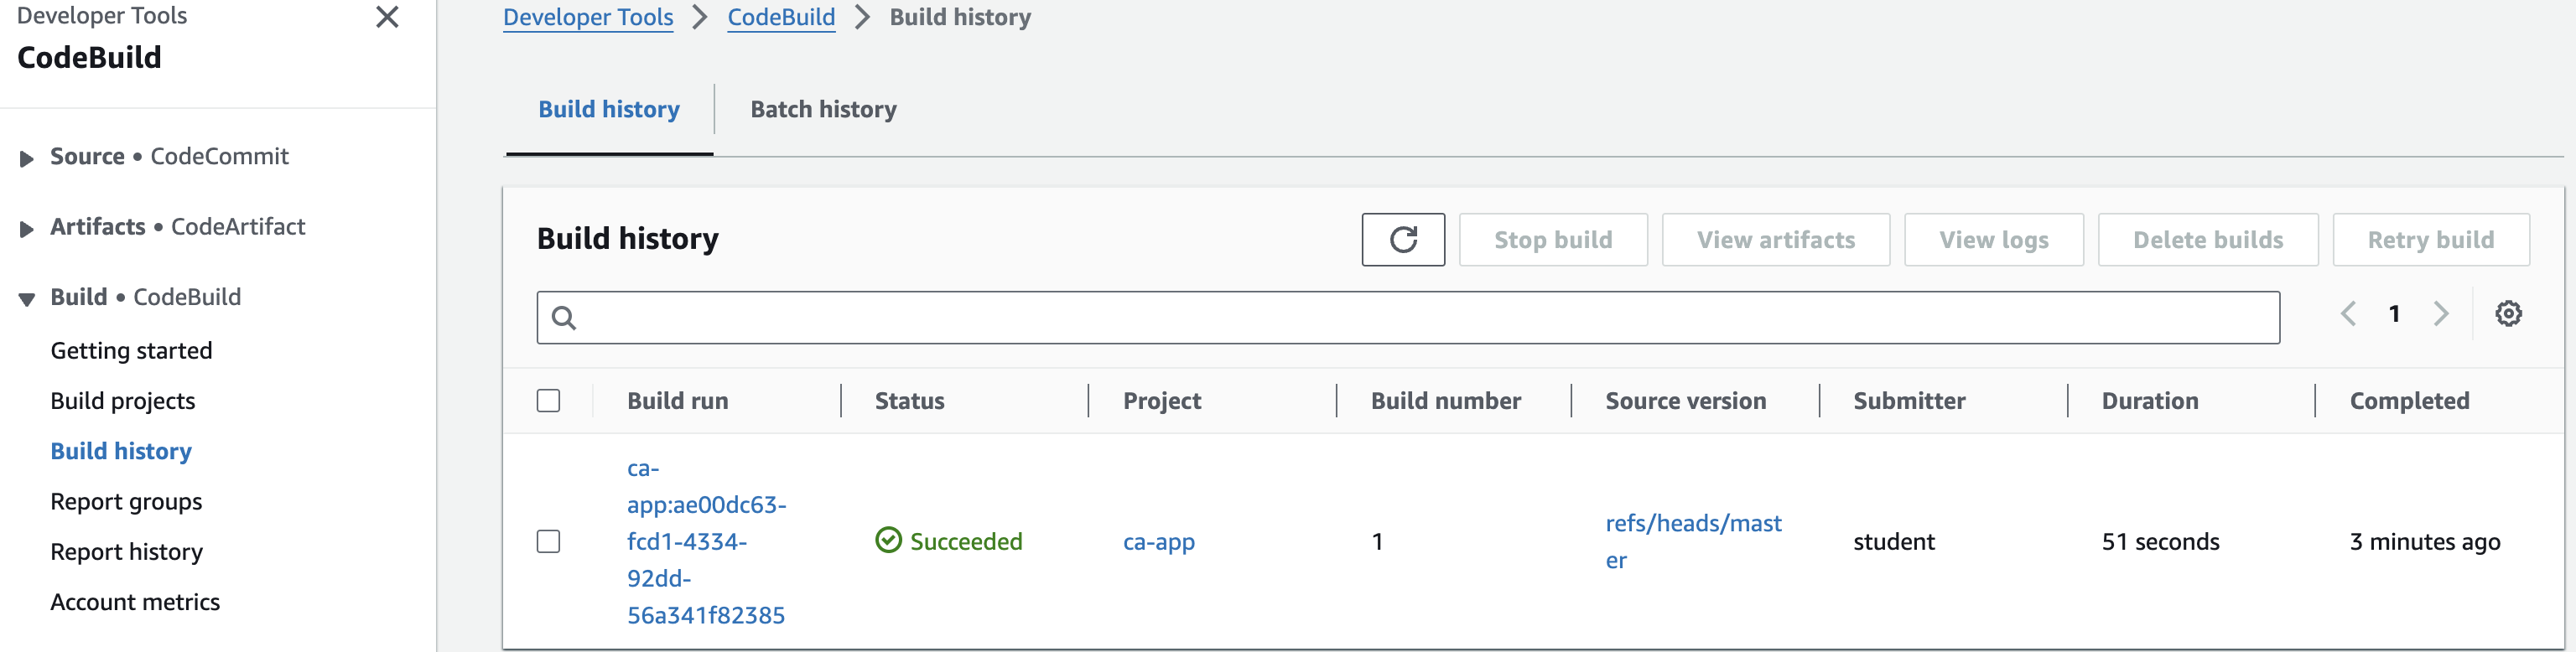
8. Click on Build history in the navigation panel.
This is where the service stores a record of all your builds. You only have one build so far. You can see that it succeeded and took around three minutes:
9. In the AWS Management Console search bar, enter S3, and click the S3 result under Services:

10. Click on the bucket containing codebuildartifacts in the name.
11. Observe that the service uploaded the build artifacts file to the bucket with the name you specified:

Summary
In this lab step, you created a build project and built your app using AWS CodeBuild. You discovered the build details view to help you track down issues in your build. You looked at the build history view which keeps a record of all of your builds. Finally, you saw that AWS CodeBuild uploads your artifacts to an Amazon S3 bucket.
Introduction
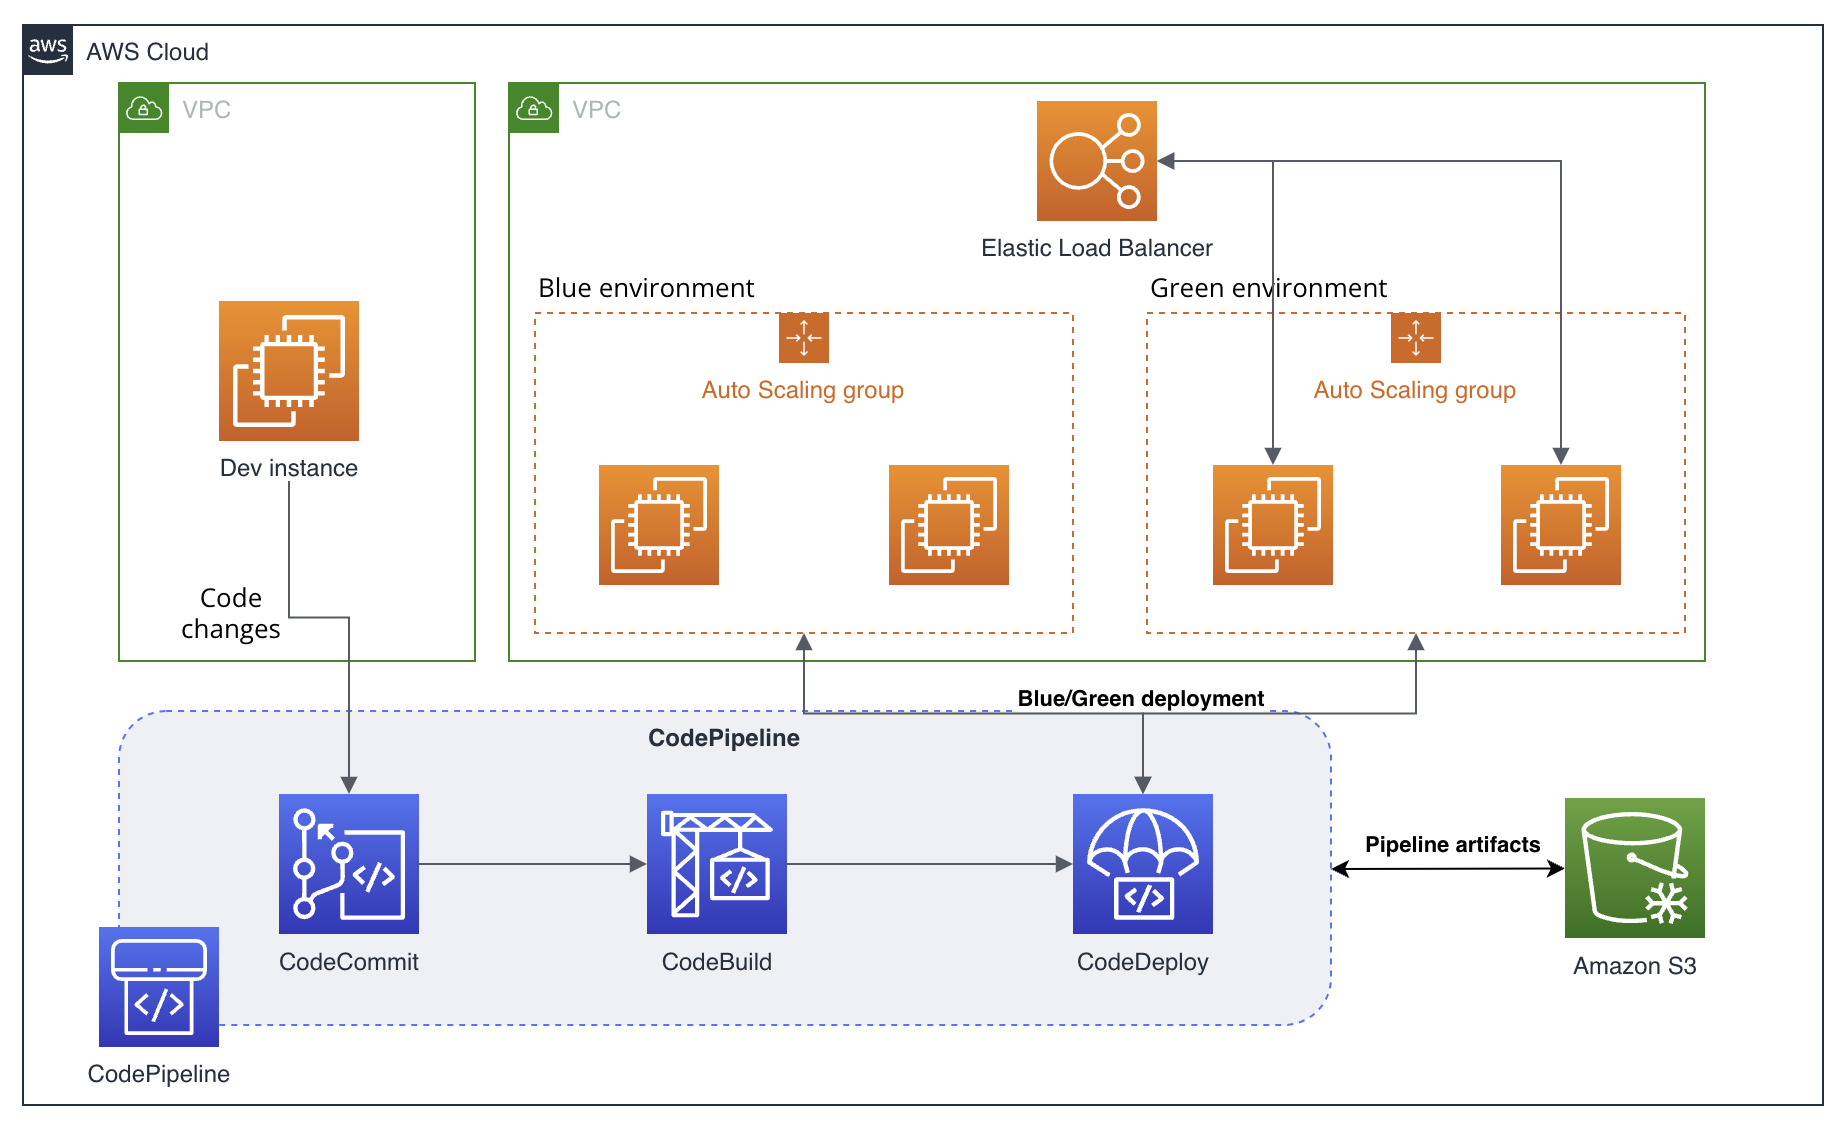
AWS CodeDeploy is a platform-agnostic automated code deployment service. You can run AWS CodeDeploy anywhere, not just on EC2 instances. The service works by installing a CodeDeploy Agent on servers that respond to deployment tasks. AWS CodeDeploy makes it easy to handle rollbacks and provides support for two deployment types: in-place and blue/green. AWS CodeDeploy deployment groups target a group of instances to deploy the application. You can specify the instances using tags or Auto Scaling groups. AWS CodeDeploy also leverages an Elastic Load Balancer (Application) to balance requests between deployment group instances.
You will set up deployment groups for both in-place and blue/green deployments in this lab step. The Cloud Academy lab environment has created the Auto Scaling group and load balancer for you. The capacity of the Auto Scaling group is two. Following best practices, the Auto Scaling group and load balancer are using multiple Availability Zones for fault tolerance. You will make use of the deployment groups in the following lab steps that work with the complete continuous deployment pipeline.
Instructions
1. In the AWS Management Console search bar, enter CodeDeploy, and click the CodeDeploy result under Services:

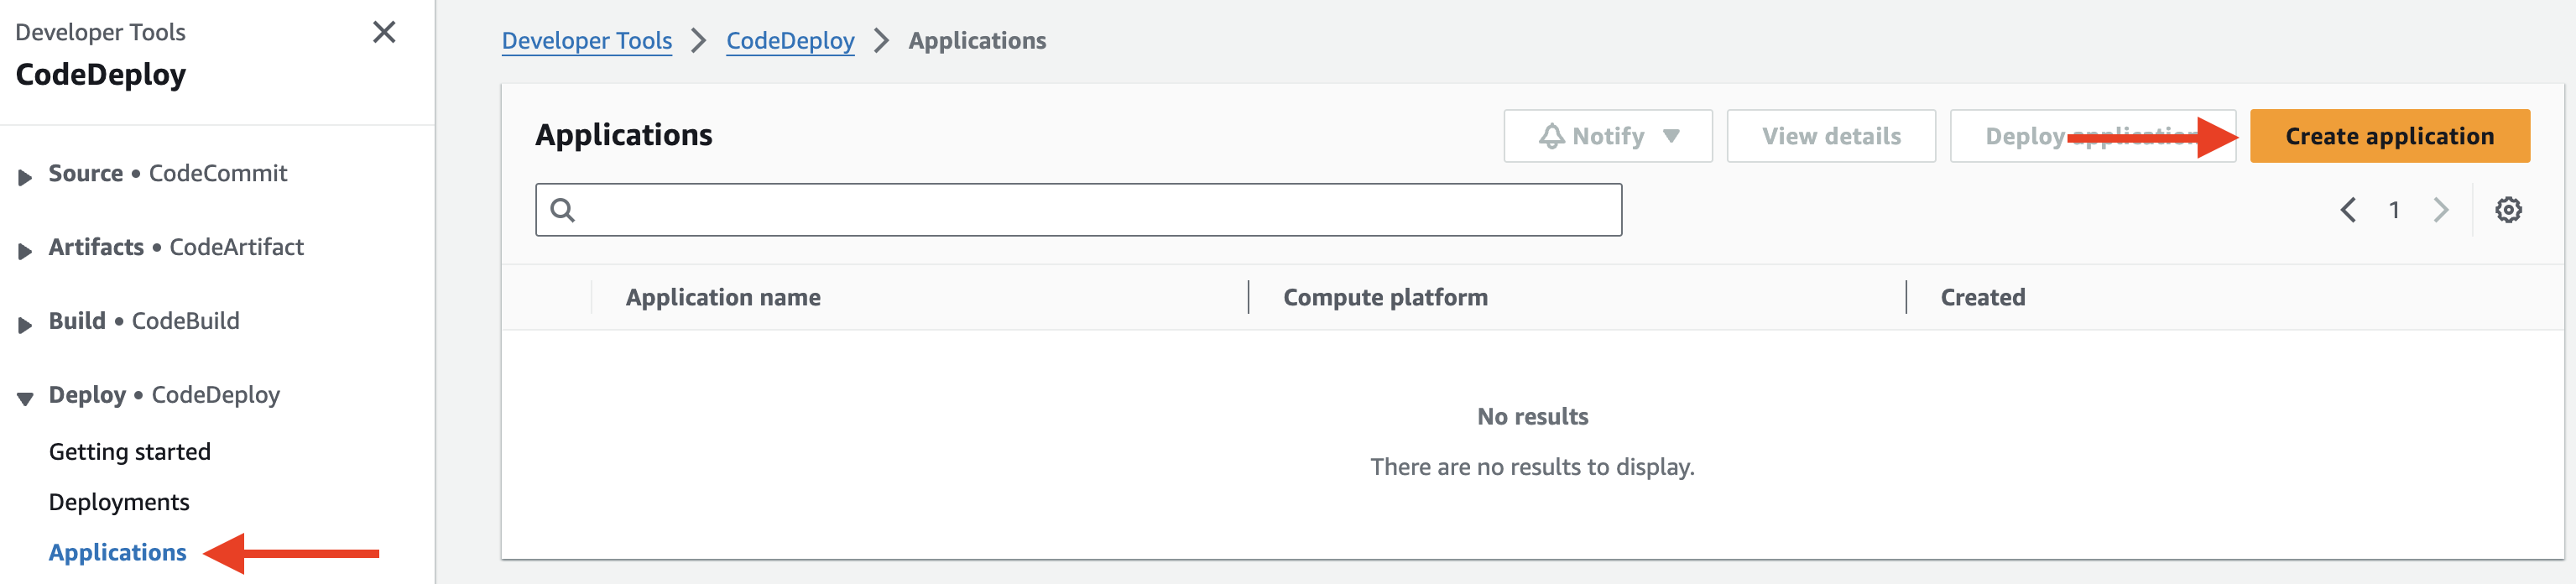
2. In the left-hand menu, under Deploy, click Applications, and then click Create application on the right-hand side:
3. In the Create application wizard, enter the following values before clicking Create application:
- Application name: ca-app
- Compute platform: EC2/On-premises
This lab uses EC2 instances, but CodeDeploy also supports deploying to on-premises instances and Lambda functions.
4. Click Create deployment group in the Deployment groups panel.
5. In the Create deployment group wizard, enter the following values:
- Deployment group name: ca-app-group
- Service role: codedeploy-ca-app-role
- Deployment type: In-place (The in-place deployment type will temporarily take instances out of service while they upgrade to a new revision. The impact on app users can be reduced by configuring the load balancer to use connection draining.)
The Cloud Academy lab environment has created the IAM instance profile, Auto Scaling group, and installed the AWS CodeDeploy agent on the EC2 instances you will deploy to. You will not use on-premises instances, but know that there are additional requirements for using them.
6. Under Environment configuration, set the following values:
- Amazon EC2 Auto Scaling groups: Checked
- Select cloudacademylabs-ProdAutoScalingGroup-… from the drop-down menu (You will utilize an existing Auto Scaling group and load balancer to deploy your app)
AWS CodeDeploy will use the instances running in the Auto Scaling group to deploy the application. The Auto Scaling group created for this lab does not have any scaling policies. However, AWS CodeDeploy will work with all Auto Scaling group configurations.
7. For Deployment settings choose CodeDeployDefault.OneAtATime.
This configuration keeps the most instances available to serve traffic while a rolling update is performed on the instances. Other configurations are half at a time and all at once.
8. Check Enable load balancing and enter the following values:
- Load balancer: Select Application Load Balancer or Network Load Balancer
- Choose a target group: Enter ca-app-tg
The load balancer is set up to listen on port 80 and direct traffic to production port 8080 of your app on instances. Instances not responding to requests on port 8080 fail the load balancer’s health check.
9. Click on Advanced – optional to reveal the advanced configuration settings.
10. Uncheck Disable rollbacks and check Roll back when a deployment fails. Accept the defaults for the other advanced settings.
This instructs AWS CodeDeploy to automatically roll back a failed deployment. A deployment fails when any of the instances fail to reach the final AWS CodeDeploy life cycle event. A failure can be caused by a wide variety of issues. AWS CodeDeploy will use the last working code revision as the roll back point.
11. Click Create deployment group.
After a few seconds, you will see a congratulatory message. It mentions one way to use AWS CodeDeploy. You can disregard most of the message since you will use AWS CodePipeline to automate the deployment. However, it is a good time to look at an AppSpec file. Every application needs an appspec.yml file at the root of the project directory in order to work with AWS CodeDeploy. This file instructs AWS CodeDeploy on how to deploy the application. It is similar to the buildspec.yml file that is used by AWS CodeBuild.
12. Return to your SSH shell and enter:
more appspec.yml
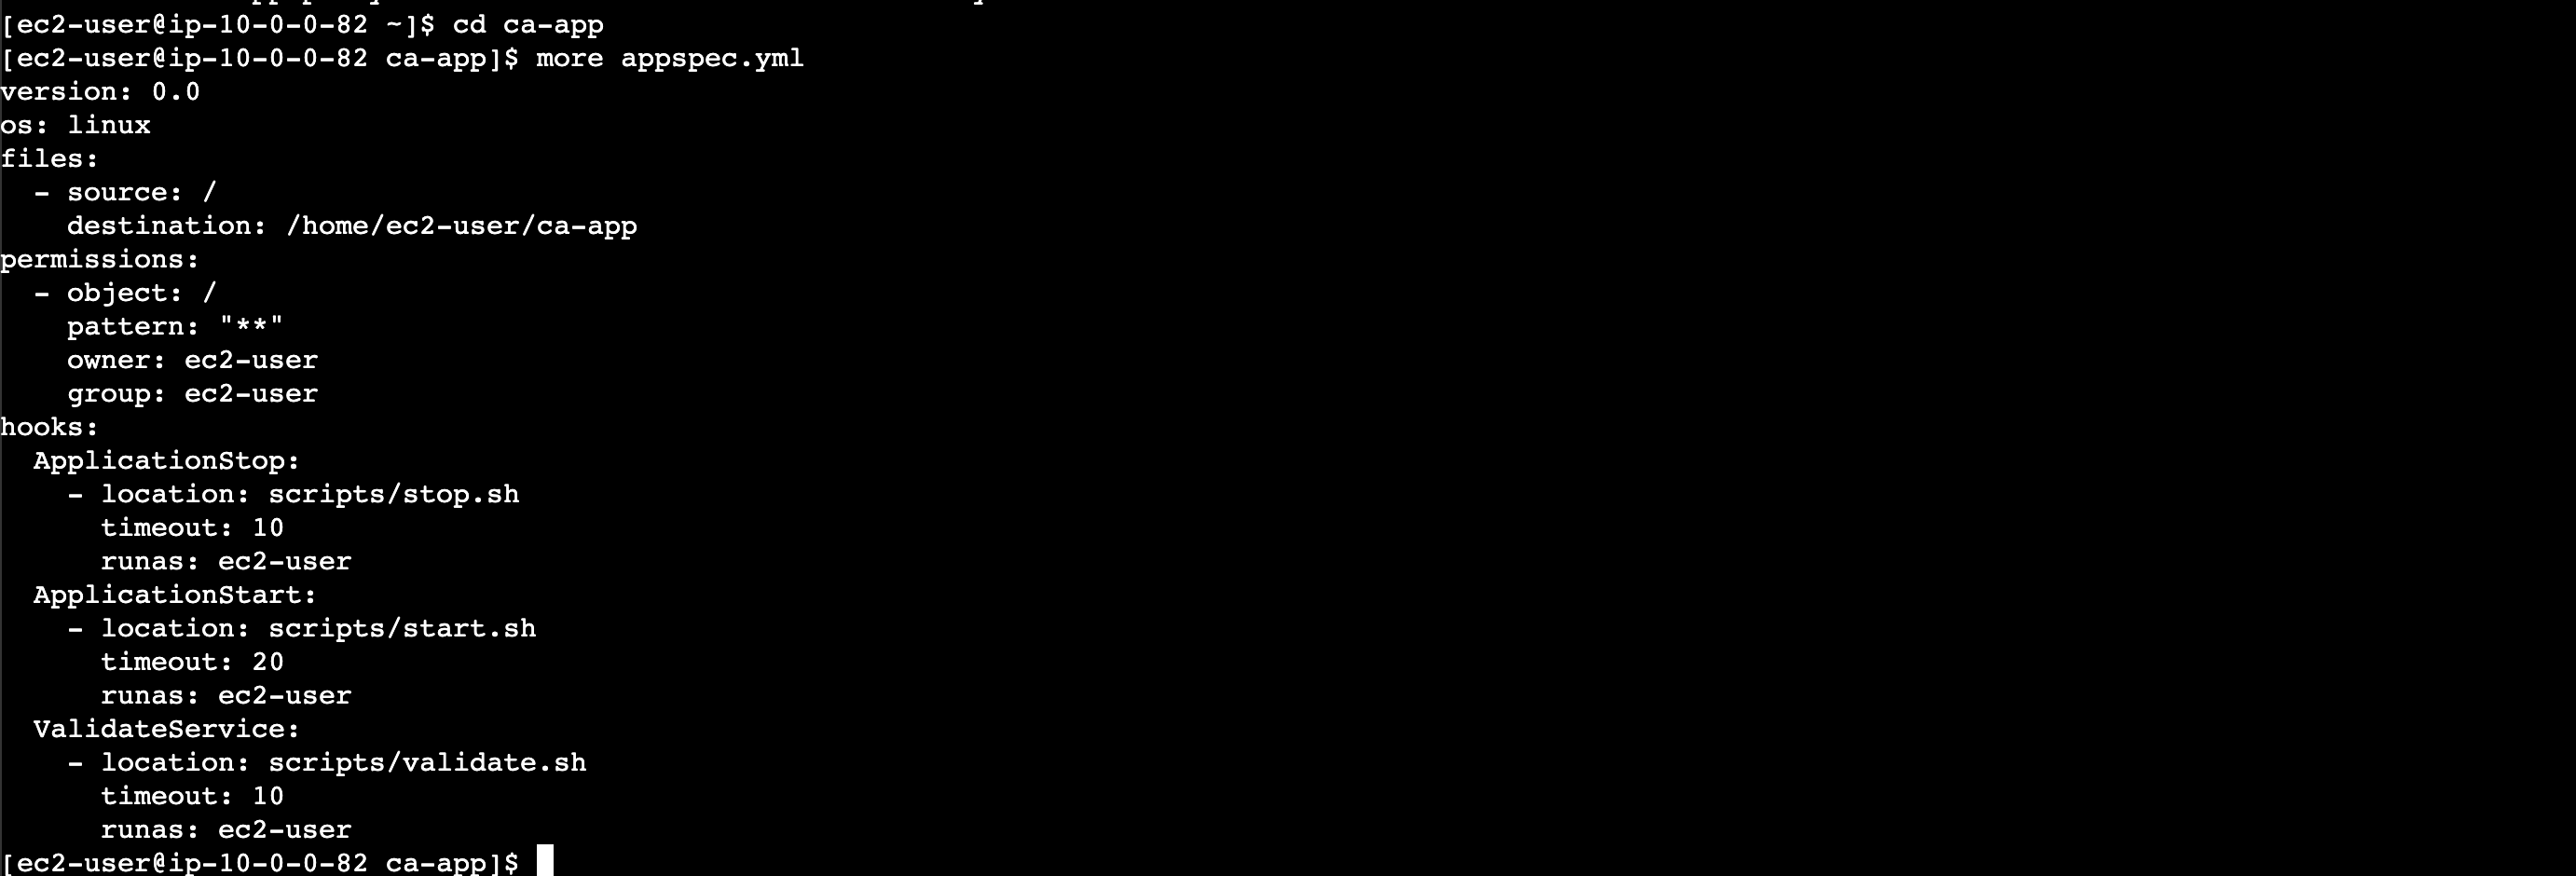
It is a YAML file. The os can be set to linux or windows. The files section tells AWS CodeDeploy where to copy files from the build artifact bundle it receives. You can use the permissions section to change the file permissions of any file in the artifact bundle. Lastly, the hooks section allows you to run scripts at different life cycle events in a deployment. The life cycle events can trigger any arbitrary commands. The scripts your app has configured for different life cycle events are as follows:
- ApplicationStop: Stops any running instance of the server
- ApplicationStart: Starts running the server in production mode
- ValidateService: Checks that the server responds to requests on port 8080
If any of the commands in the scripts fail, the deployment fails and a rollback is triggered.
You will now configure a blue/green deployment group so you have both deployment types available for use. Blue/green deployments create a second environment to perform an update, leaving the original environment to serve traffic until all of the instances in the second environment are ready. All traffic is then redirected to the second environment using a load balancer. You can then terminate the original environment or keep it in place in case of a roll back. This deployment type uses more instances, but avoids taking instances out of service as in a rolling deployment.
13. Return to your web browser, navigate to Deploy > Applications > Application > Deployment groups, and click Create deployment group:

14. Enter the following values in the wizard:
- Deployment group name: blue-green
- Service role: codedeploy-ca-app-role
- Deployment type: Blue/green
- Environment configuration: Automatically copy Amazon EC2 Auto Scaling group
- Select the only auto scaling group (It will contain ProdAutoScalingGroup in the name)
15. In Deployment settings, set the following:
- Select Reroute traffic immediately. Traffic rerouting allows you to choose when traffic gets rerouted.
- Select Keep the original instances in the deployment group running. This will keep the instances running in case you need to roll back. If you planned to keep the instances for some time, you would establish a policy for how long to keep them running. For the sake of this Lab, you won’t worry about when to terminate them.
- Set the Deployment configuration to CodeDeployDefault.OneAtATime.
16. In the Load balancer section, set:
- Classic Load Balancer: Select Application Load Balancer or Network Load Balancer
- Choose a target group: Select ca-app-tg
17. Click on Advanced – optional to reveal the advanced configuration settings.
18. Uncheck Disable rollbacks and check Roll back when a deployment fails. Accept the defaults for the other advanced settings.
19. Click Create deployment group.
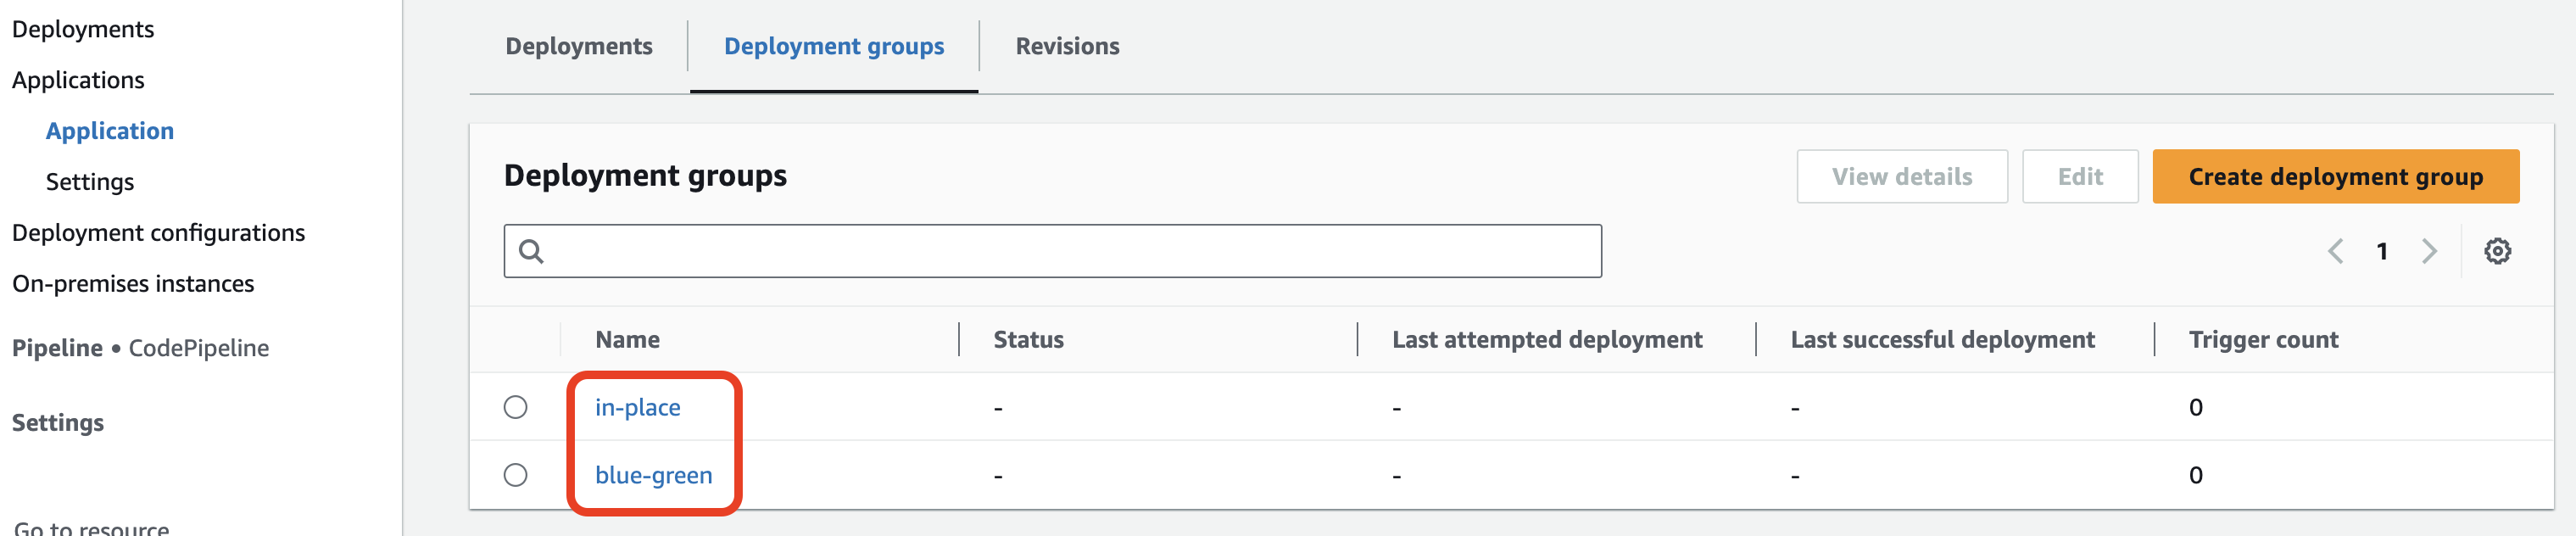
You will receive a congratulations notice when the deployment group is created. You will see your two deployment groups in the Deployment groups table:
Summary
In this lab step, you learned the differences between in-place and blue/green deployments in AWS CodeDeploy. You created one of each deployment group type. You also learned how AWS CodeDeploy knows how to deploy your application via the appspec.yml file.
Introduction
AWS CodePipeline is a highly available continuous integration and continuous delivery service in the cloud. AWS CodePipeline defines a workflow to describe your software release process. The workflow is divided into stages and each stage is comprised of one or more actions. Actions Stages are connected by transitions. Actions can be anything from building or deploying, to publishing to an SNS Topic for manual approval or executing an AWS Lambda function. Transitions are visually represented as arrows from one stage to the next.
When a stage succeeds, it creates an output artifact. These artifacts are kept in an S3 bucket that is managed by AWS CodePipeline. The following stage uses the artifact as its input artifact to perform actions on. If a stage fails, subsequent stages are not executed. For example, assume you have a build stage and a deploy stage. If the build stage fails, AWS CodePipeline will not attempt to deploy. The entire pipeline is executed when a new source code revision is detected.
In this lab step, you will create an end-to-end deployment pipeline that uses the AWS Code Services you have set up: AWS CodeCommit, AWS CodeBuild, and AWS CodeDeploy. At first, you will use the in-place deployment group defined in AWS CodeDeploy. You will use the pipeline you build throughout the remainder of this lab.
Instructions
1. In the AWS Management Console search bar, enter CodePipeline, and click the CodePipeline result under Services:

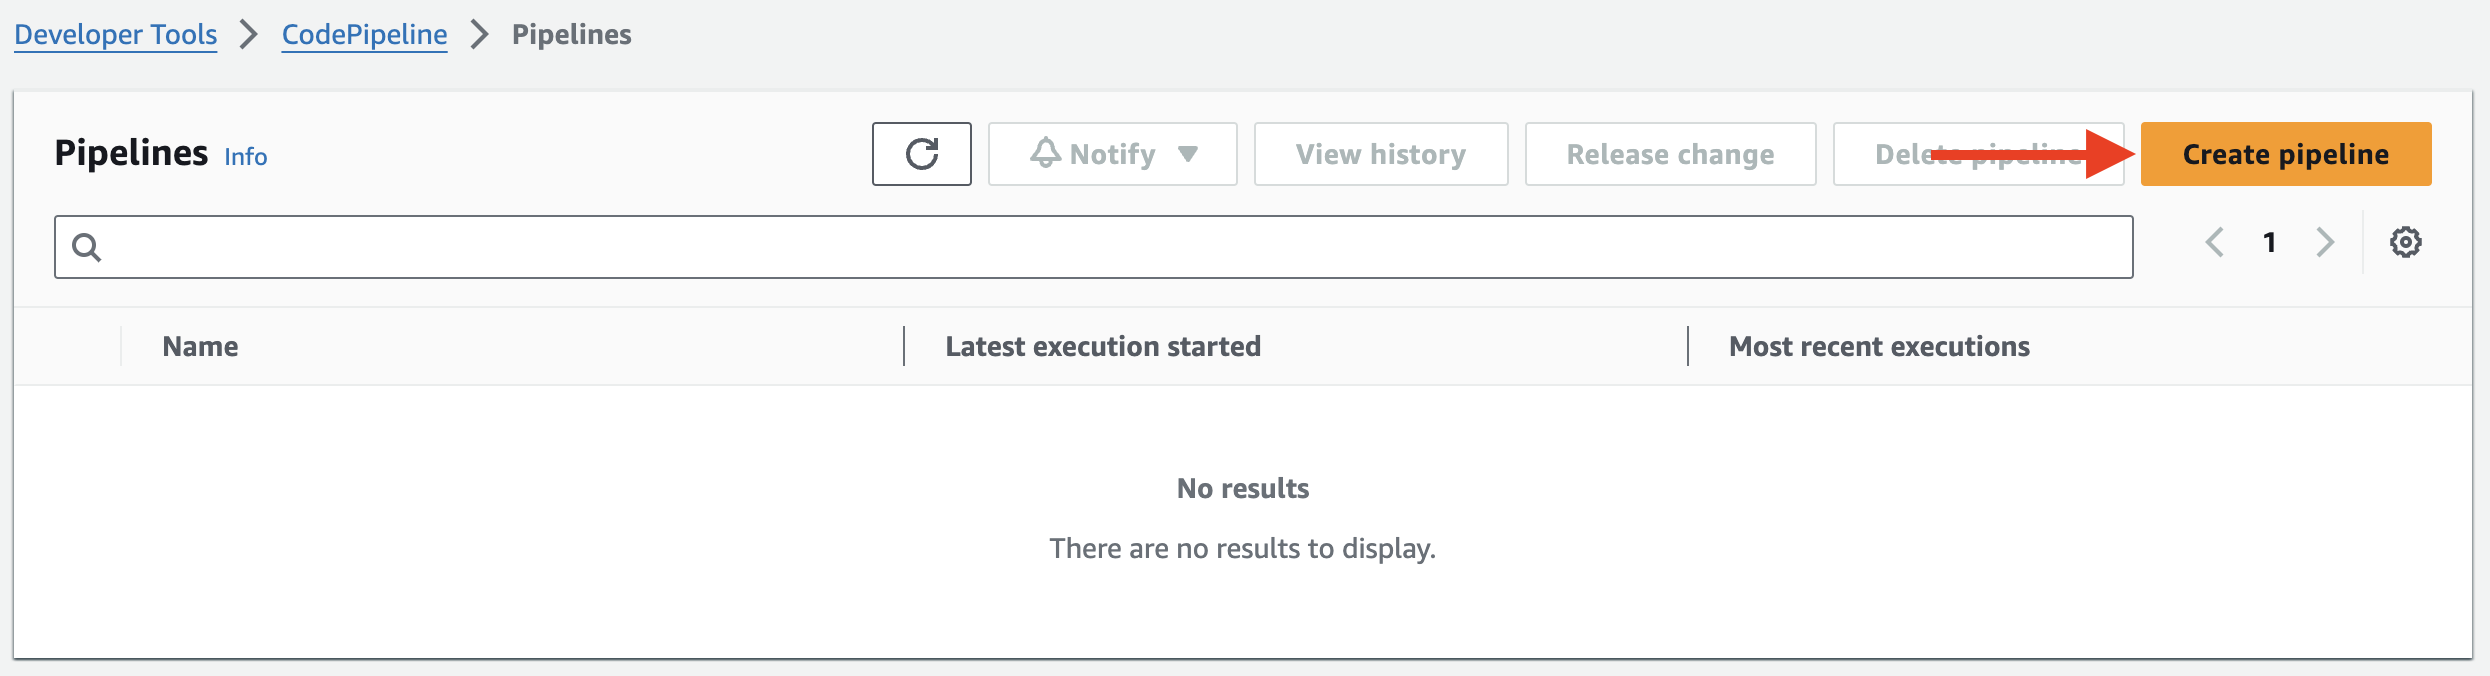
2. To start configuring a new pipeline, click Create pipeline:
3. In the first step of the Create new pipeline wizard, set the following and leave the defaults for the rest:
- Pipeline name: ca-app
- Service role: Existing service role
- Role ARN: Select the role ending with /codepipeline-ca-app-role
4. Click Next.
5. Enter the following in the Add source stage:
- Source provider: AWS CodeCommit
- Repository name: ca-app (your exact repository name will appear in the drop-down menu)
- Branch name: master
- Change detection options: AWS CodePipeline
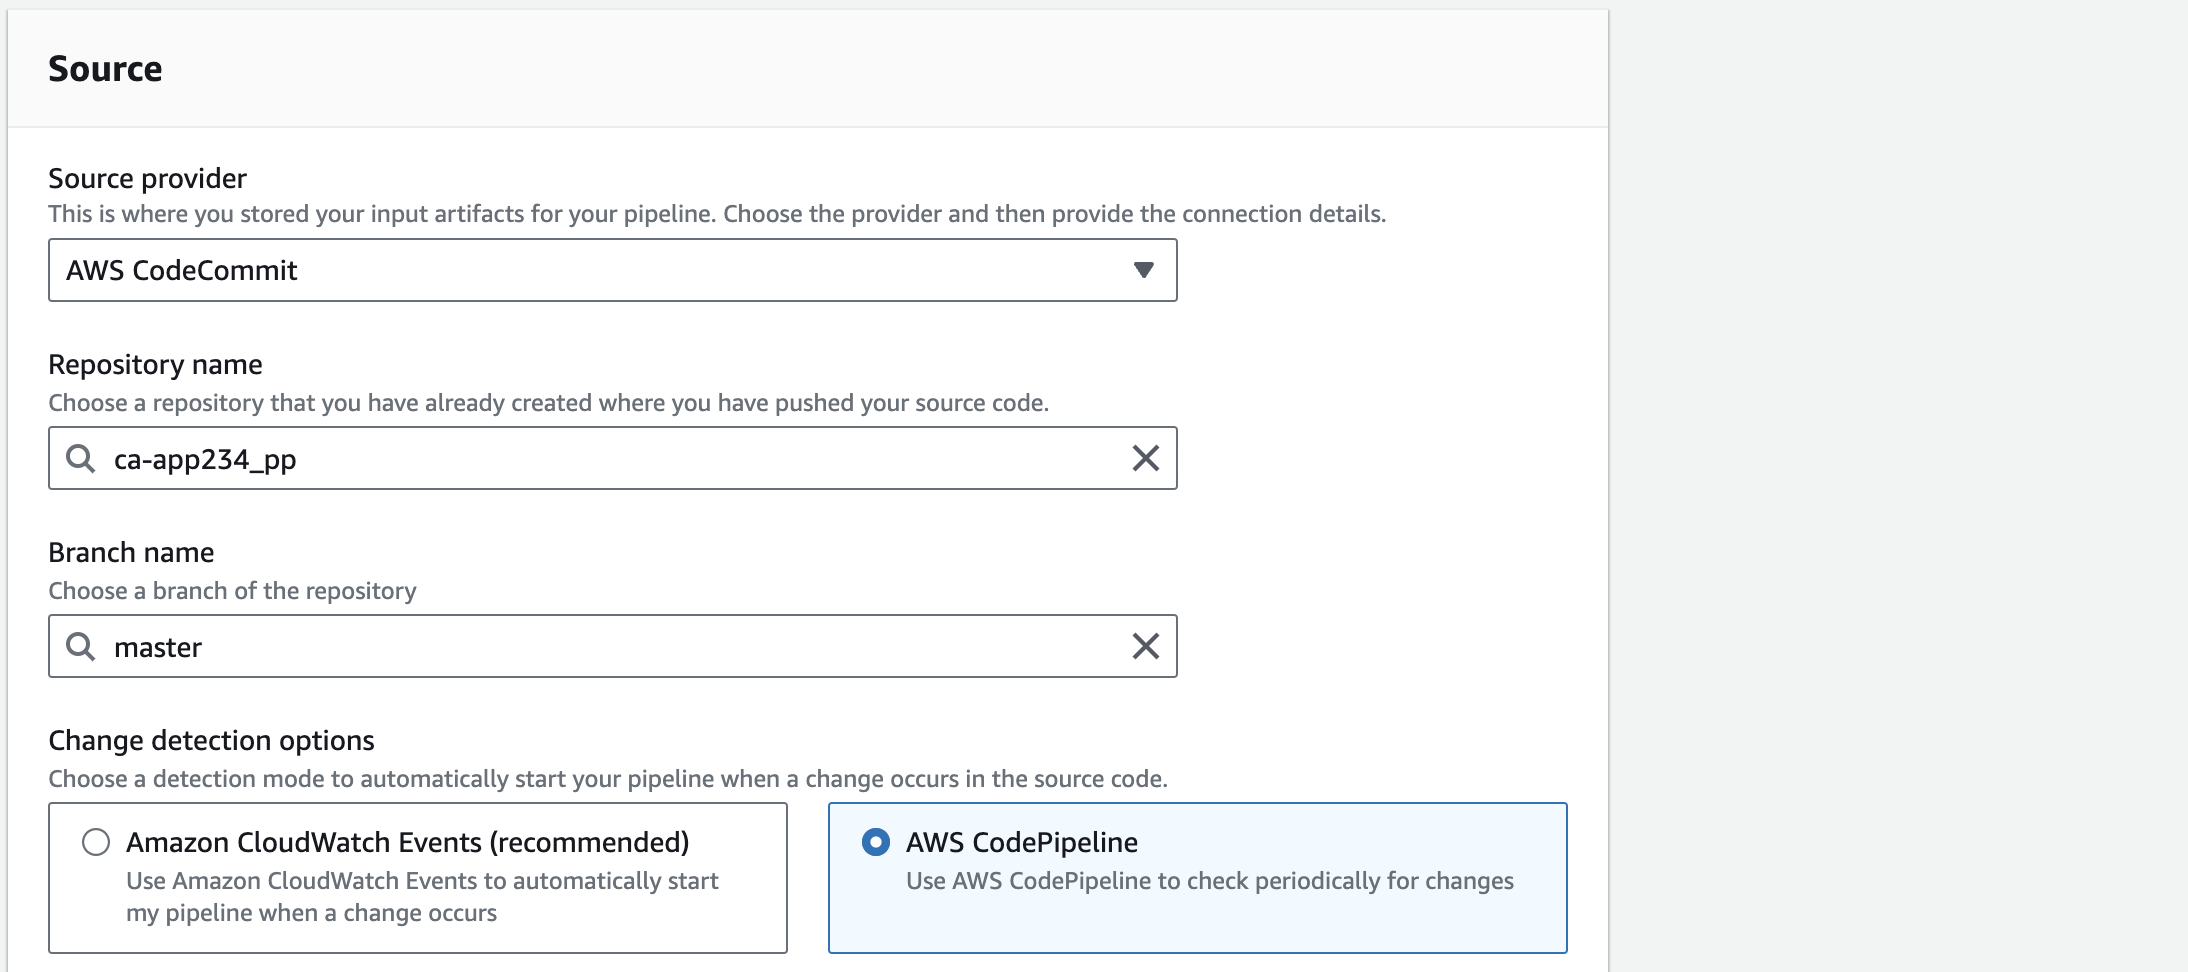
Using AWS CodePipeline to check periodically for changes is slower and less configurable than using CloudWatch Events, but it is sufficient for the purpose of this lab.
6. Click Next.
7. Enter the following in the Build step:
- Build provider: AWS CodeBuild
- Project name: ca-app
8. Click Next.
9. Click Skip deploy stage to not set a deploy provider.
Selecting no deployment will let you see how to add a pipeline stage in the graphical user interface (GUI). It also avoids the default deploy label of staging, which isn’t accurate for your pipeline. You can’t rename a pipeline stage once it is created.
10. Click Skip in the confirmation dialog box.
11. Review the pipeline and click Create pipeline.
You will receive a congratulatory notice and be presented with a graphical representation of your pipeline. The pipeline will begin executing automatically. Proceed to complete the following instructions anyway.
12. Click Edit.
13. Click + Add stage at the bottom of the pipeline:

14. Enter Stage name Production and click Add stage.
15. In the Production stage, click + Add action group.
16. In the Edit action form, enter the following:
- Action name: CodeDeploy
- Action provider: Deploy > AWS CodeDeploy
- Input artifacts: BuildArtifact
- Application name: ca-app
- Deployment group: in-place
17. Click Done to save the action.
18. Click Save in the upper-right corner to save the pipeline changes and click Save again in the confirmation dialog.
Your continuous deployment pipeline is now complete:
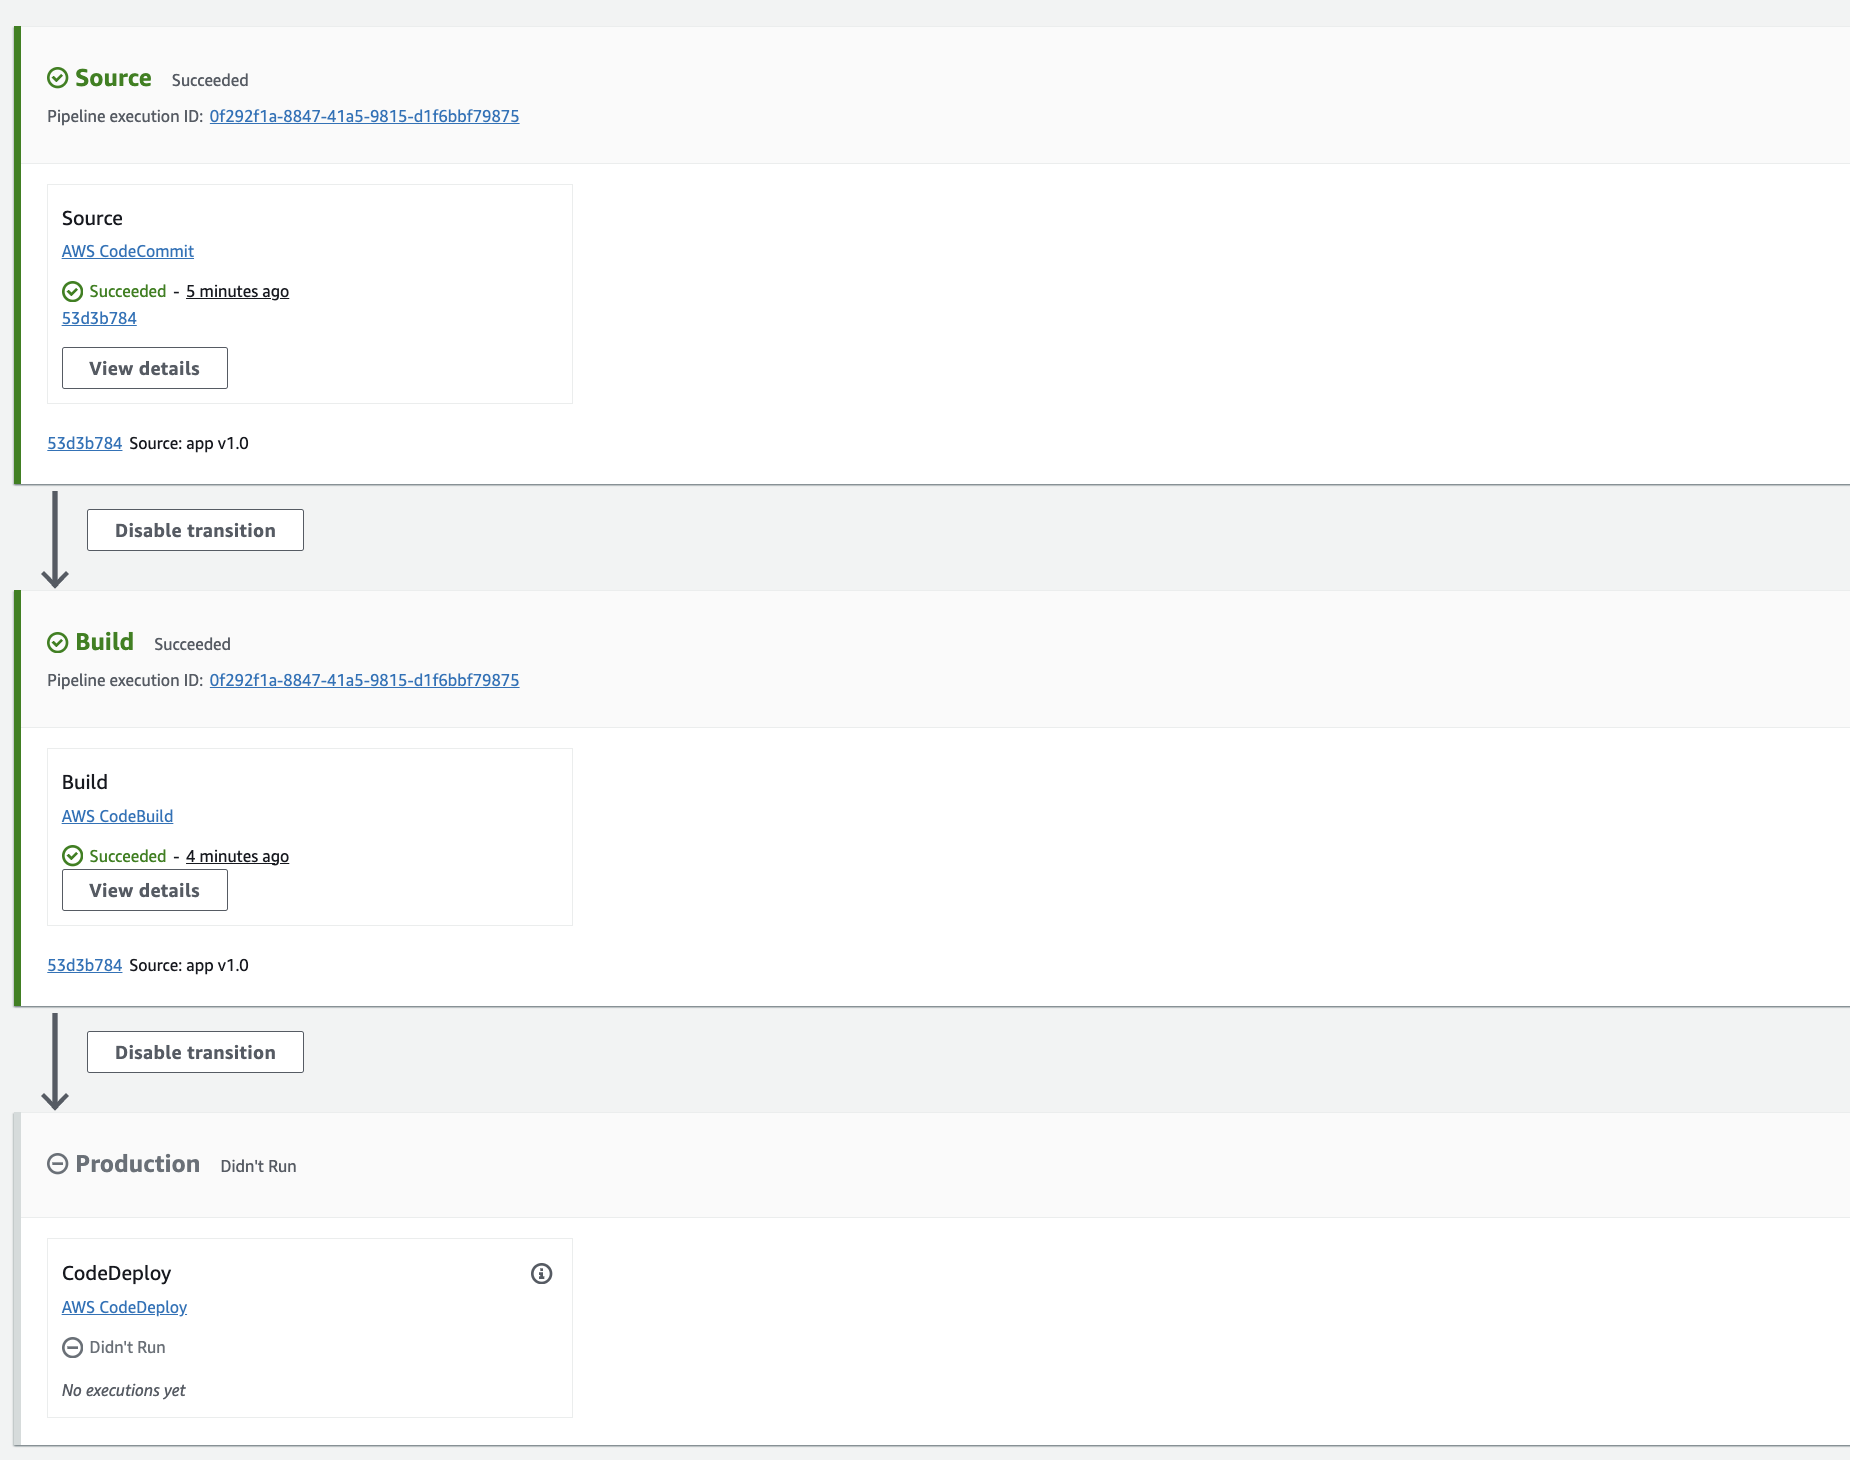
Any code commits that you push to the AWS CodeCommit repository will go through the pipeline. Ultimately, any code commit results in an in-place deployment using AWS CodeDeploy.
Summary
In this lab step, you constructed a continuous deployment pipeline using AWS CodePipeline. You saw how to use the wizard to construct an initial pipeline. You modified the pipeline by adding a deployment stage.
Introduction
Now that you have set up a continuous deployment pipeline, you will see it in action under various scenarios in the rest of this lab.
In this lab step, you will follow the pipeline as it performs a successful in-place deployment by going through the stages you defined. You will see how stages transition to one another and observe artifacts created after each stage.
For the first time, you will also see how AWS CodeBuild uses your buildspec.yml to execute the build phases. At the end of the lab step, you will watch the in-place deployment go through the AWS CodeDeploy lifecycle events that you hooked into in your appspec.yml file.
Instructions
1. From the ca-app pipeline graphical view, click Release change.
This will manually trigger the pipeline to run, starting with the latest revision of the code in AWS CodeCommit.
2. In the Release change dialog that appears, click Release.
3. Notice the colour of the left edge change to blue on the Source stage. This indicates the service is executing it:
After a minute, a Succeeded status will appear inside the Source action, and the stage turns green.
4. Observe the build stage turning blue and change the status to In Progress.
After a minute or two, it will succeed. Watch as the Production stage turns blue.
5. Dive deeper into this stage by clicking on Details inside the action.
This takes you to the AWS CodeDeploy deployment details view.
6. Inspect the deployment details:
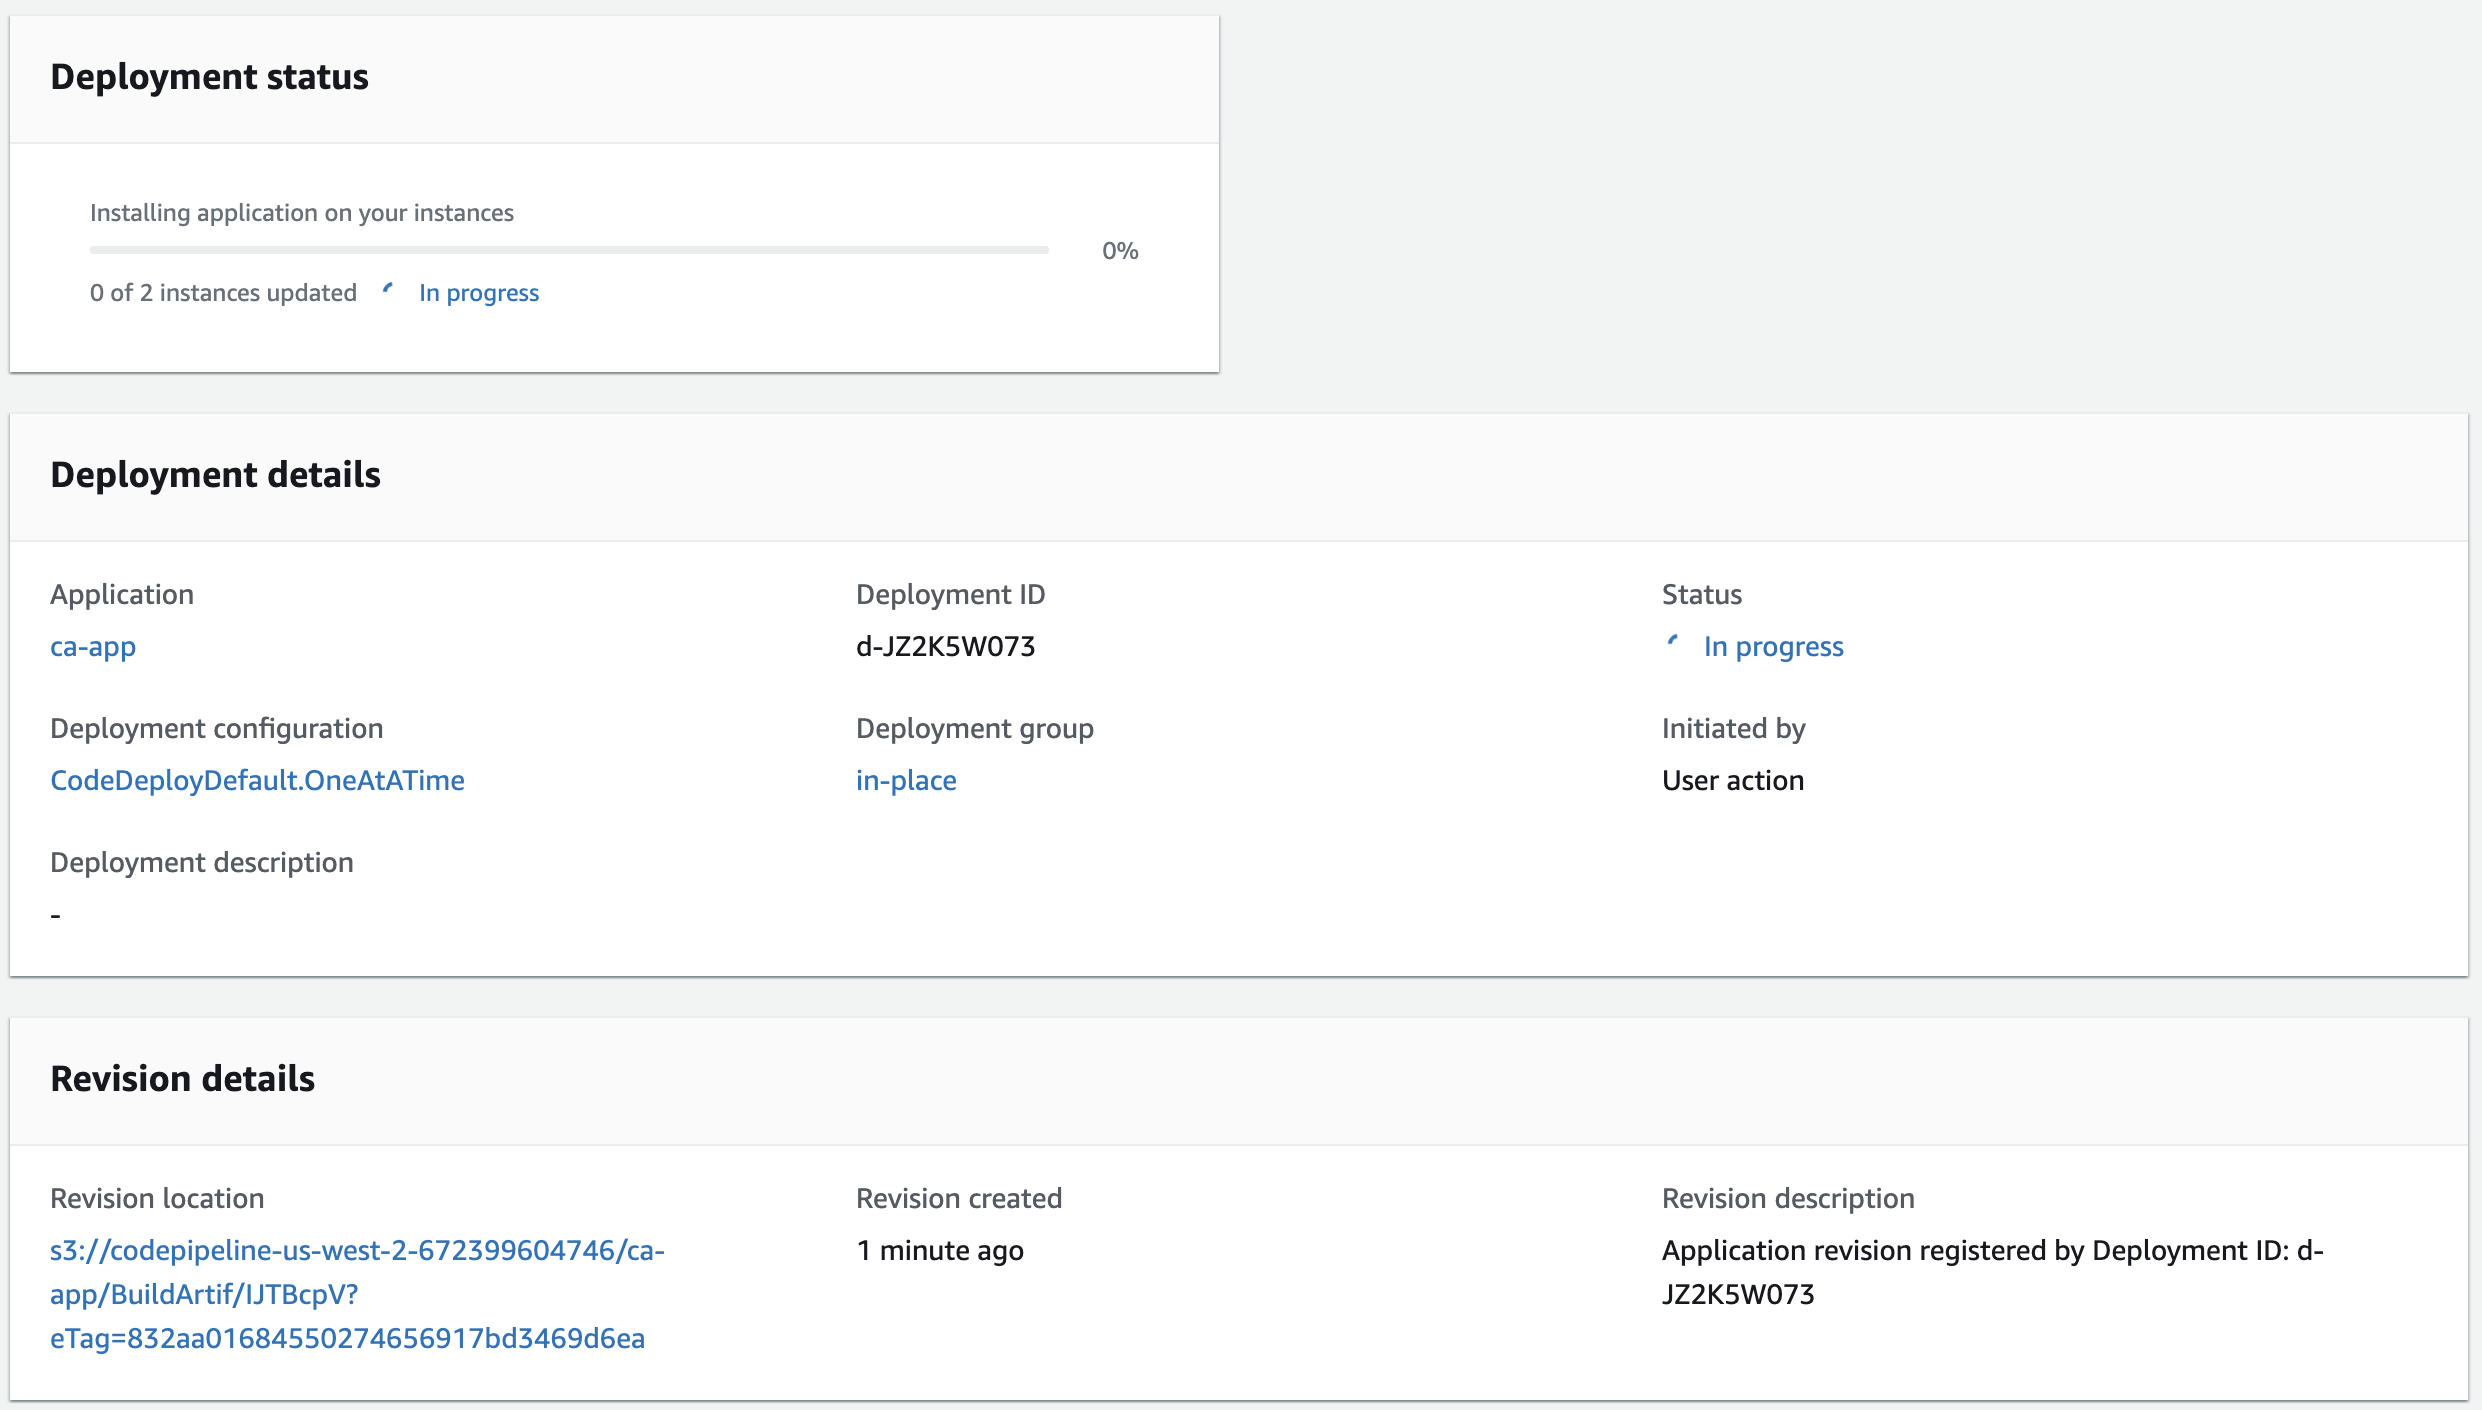
This view shows both the In progress deployment status as well as the application revision being deployed in the Revision details section. The revision was uploaded by AWS CodePipeline as the final step of the Build stage.
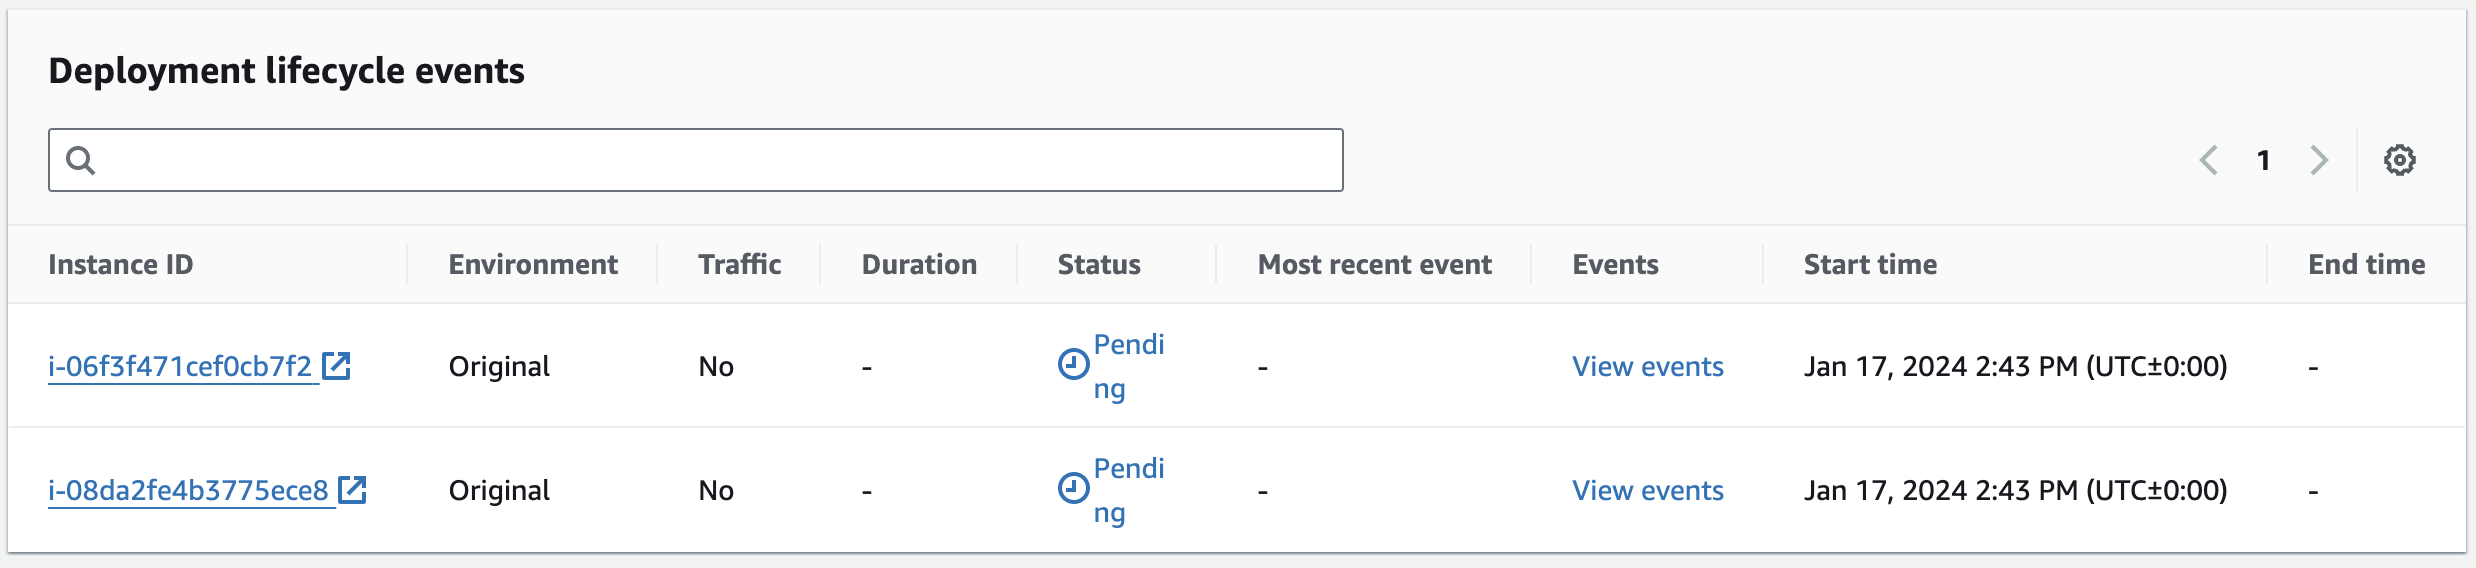
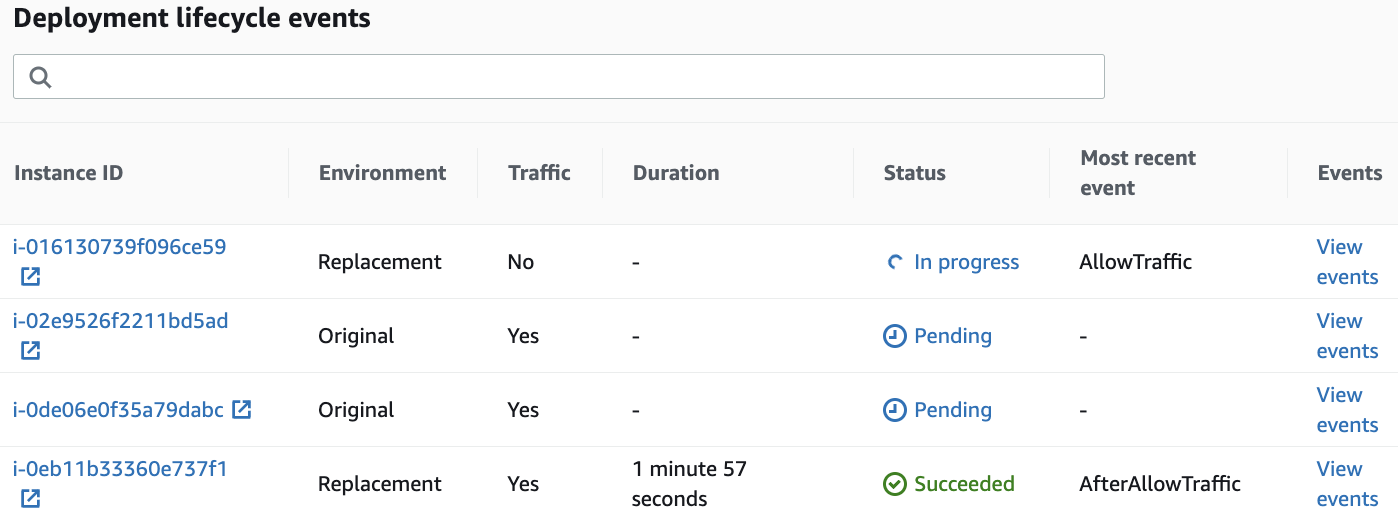
7. Observe the Deployment lifecycle events at the bottom:
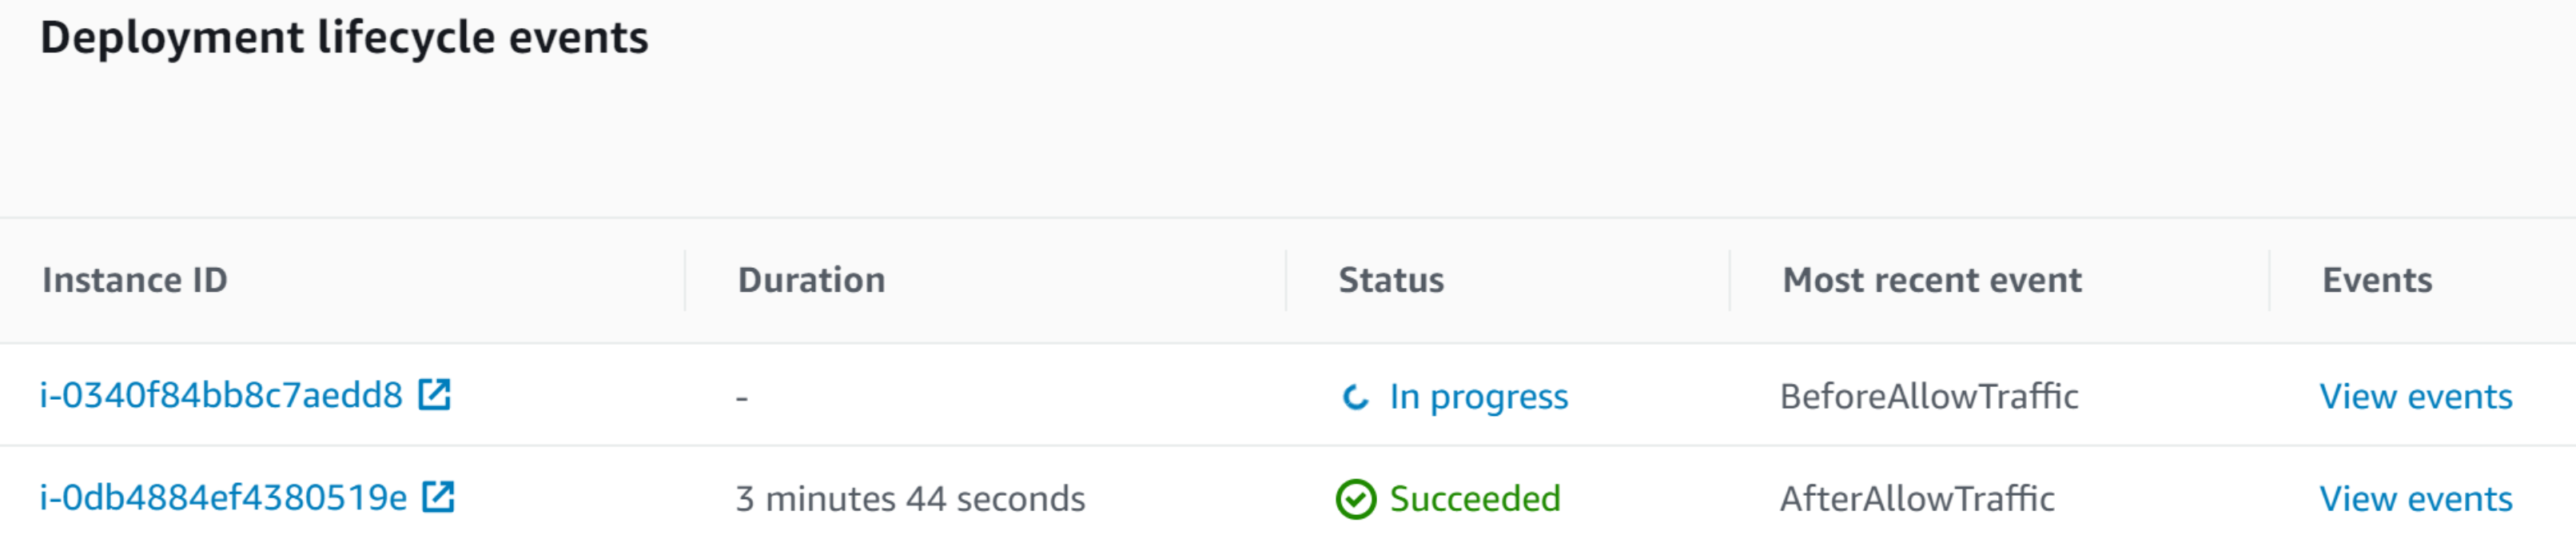
The table lists the instances in the deployment group. The Status values may be In progress, Pending, or Succeeded depending on how much time has elapsed since deploying. The lifecycle events are also listed; BeforeAllowTraffic and AfterAllowTraffic in the image above.
8. Click on View events for an instance.
9. Observe the full table of lifecycle events for instance:
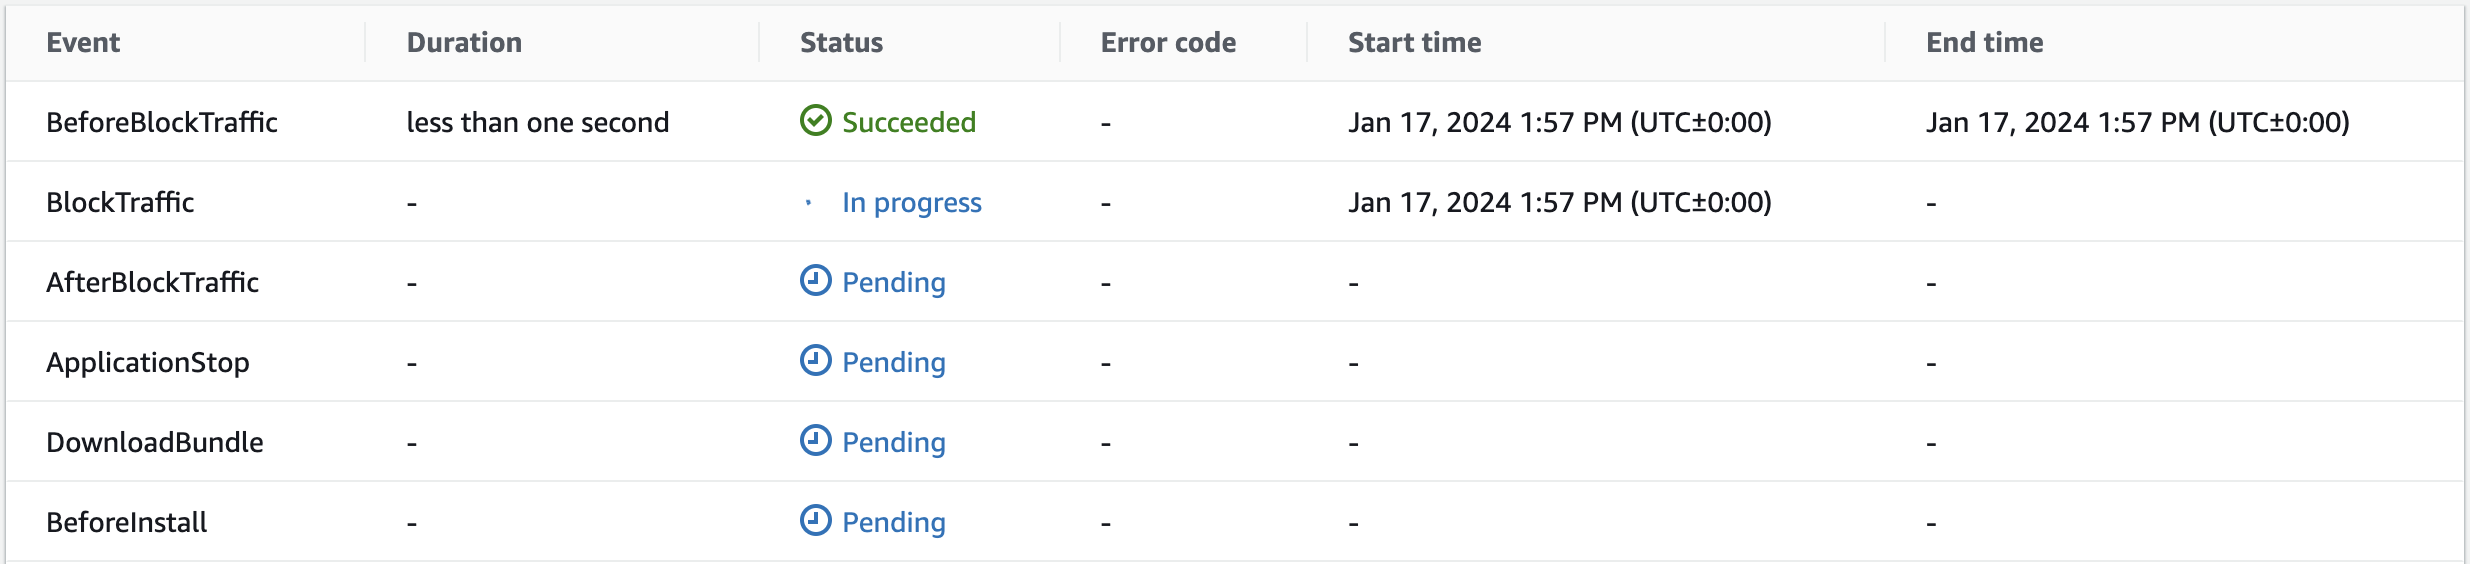
For in progress instances, you can watch the upgrade proceed on the instance from this view. If there is any error, you will also be able to link to the logs from this view.
10. Return to the Deployment progress view and wait until the deployment is complete:

It takes around four minutes for each instance to complete the upgrade. This can be a relatively long time for an instance in the deployment group to be out of service. Blue/green deployments can be an attractive alternative if that is the case.
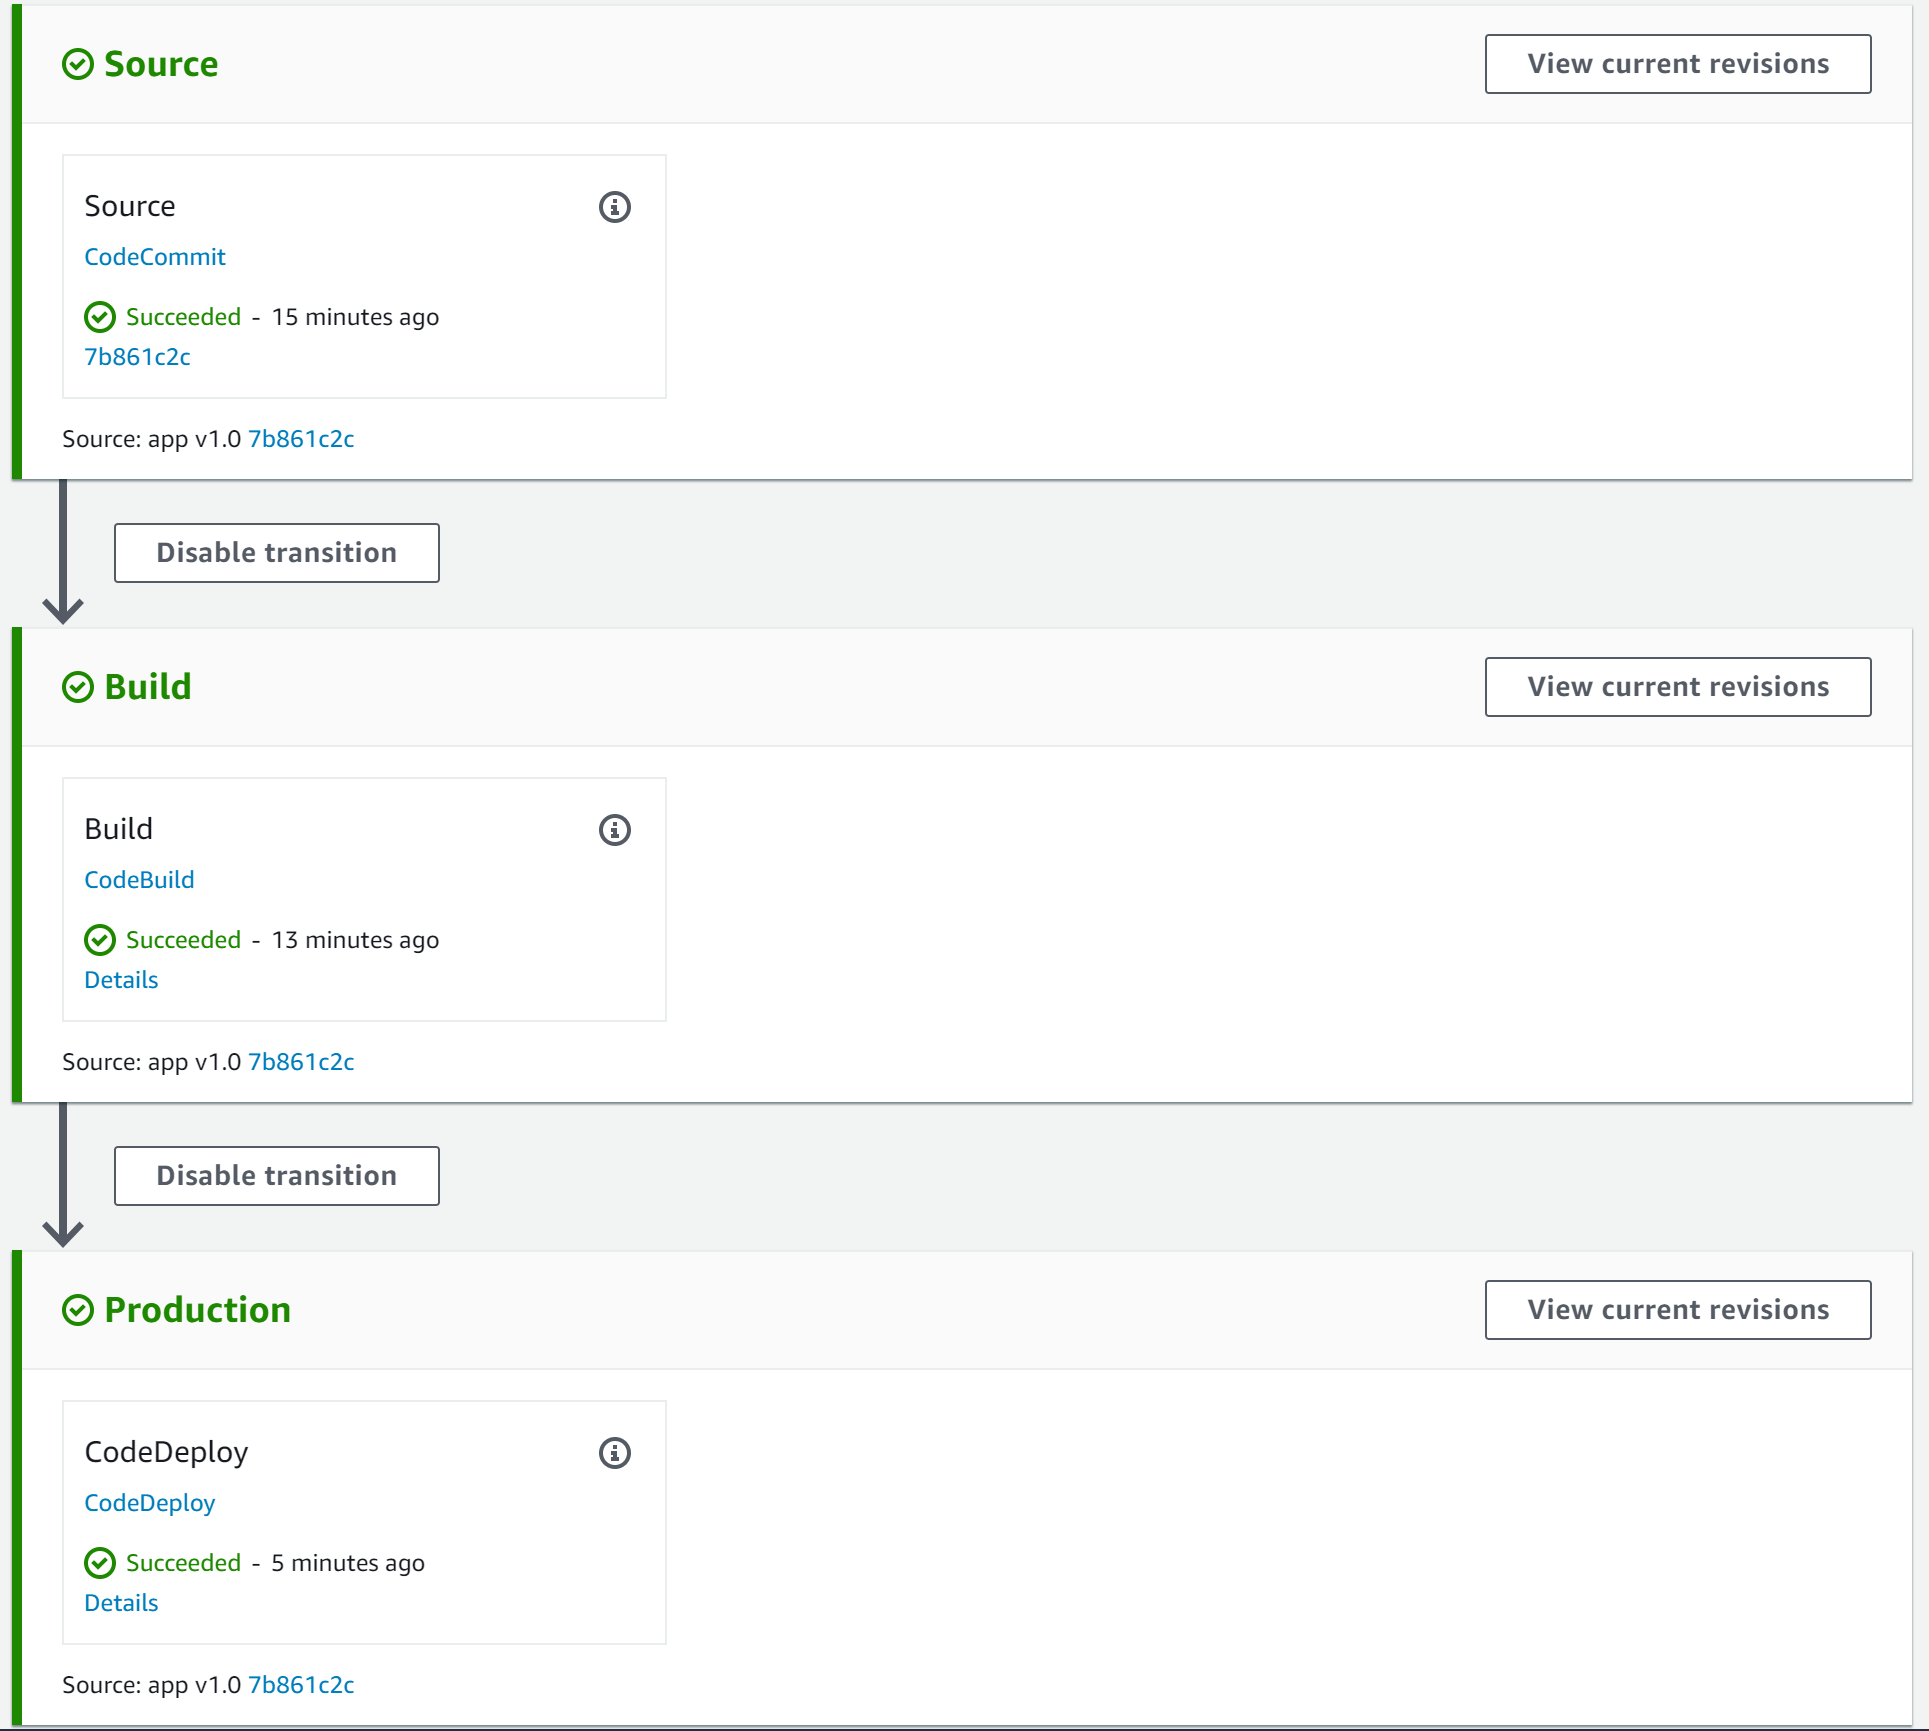
11. Return to the AWS CodePipeline browser tab and observe all stages have Succeeded:
To verify everything is working, you will load the app in your browser.
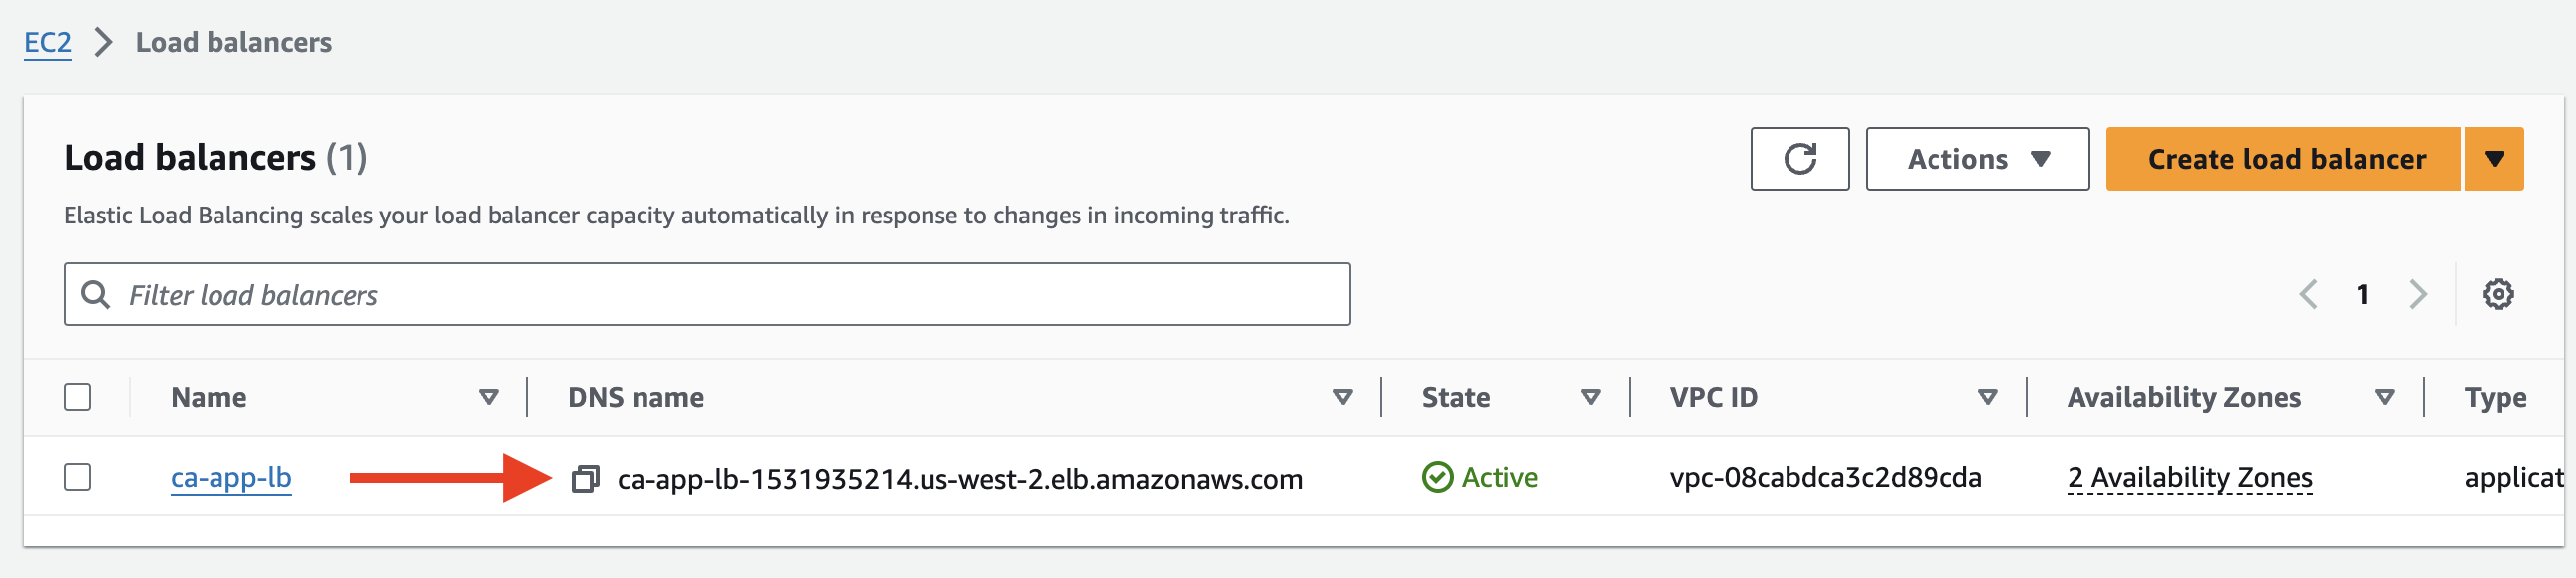
12. Navigate to Services > Compute > EC2 > LOAD BALANCING > Load Balancers.
13. Select ca-app-lb and copy the DNS name on the Details tab:
14. Open a new browser tab and navigate to the DNS name:
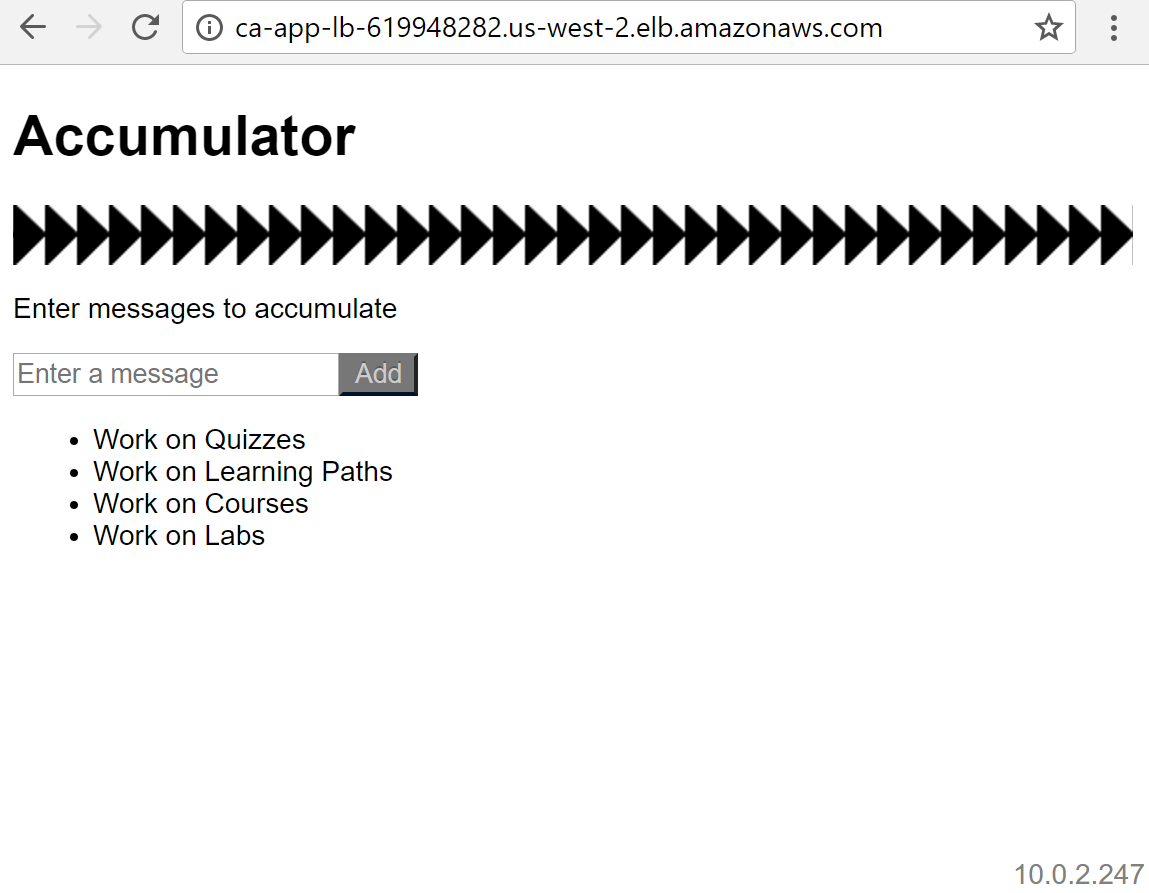
Notice that there is no development mode notice in the upper right corner. This signifies that the app is running in production mode. Take note of the server address in the bottom right corner of the page. Refresh the page a few times and see how it changes. This tells you that the load balancer is directing traffic to both instances in the deployment group.
Summary
In this lab step, you followed the stages through your continuous deployment pipeline. You paid special attention to AWS CodeDeploy. You verified the app was properly deployed across instances in the deployment group by loading the app in your web browser using the load balancer’s DNS name.
Introduction
In this lab step, you will intentionally commit a breaking change. For demonstration purposes, the automated tests run by AWS CodeBuild won’t detect the issue. If they did, AWS CodePipeline would not proceed to deploy the app. In this case, the broken app will sneak through to deployment. This will actively show you how the automatic rollback capabilities of AWS CodeDeploy.
Note: You can also perform manual rollbacks by selecting a revision to roll back to. Automatic rollbacks will use the most recent successful revision.
Instructions
1. Return to your SSH shell connected to dev-instance and enter the following commands:
cd
cp -R commits/v1_1/. ca-app/
This will write new changes for v1.1 of the app from a pre-loaded commits directory.
2. To see what files changed, enter:
cd ca-app
git status
This version has made the server accidentally listen to port 80 instead of port 8080.
3. Push the changes to the remote AWS CodeCommit repository by issuing:
git add -A
git commit -m "app v1.1"
git push
4. In your browser, navigate to Services > Developer Tools > CodeCommit > Repositories.
5. Click on ca-app.
6. Click on Commits in the left-hand menu.
7. On the app v1.1 commit, observe the production port has changed to port 80. The green is the new commit and the red is the previous commit:

8. Open up the graphical representation of your continuous deployment pipeline in AWS CodePipeline.
9. Notice the pipeline was triggered automatically by the code commit, and because it introduced a misconfigured port listener the Production stage failed:
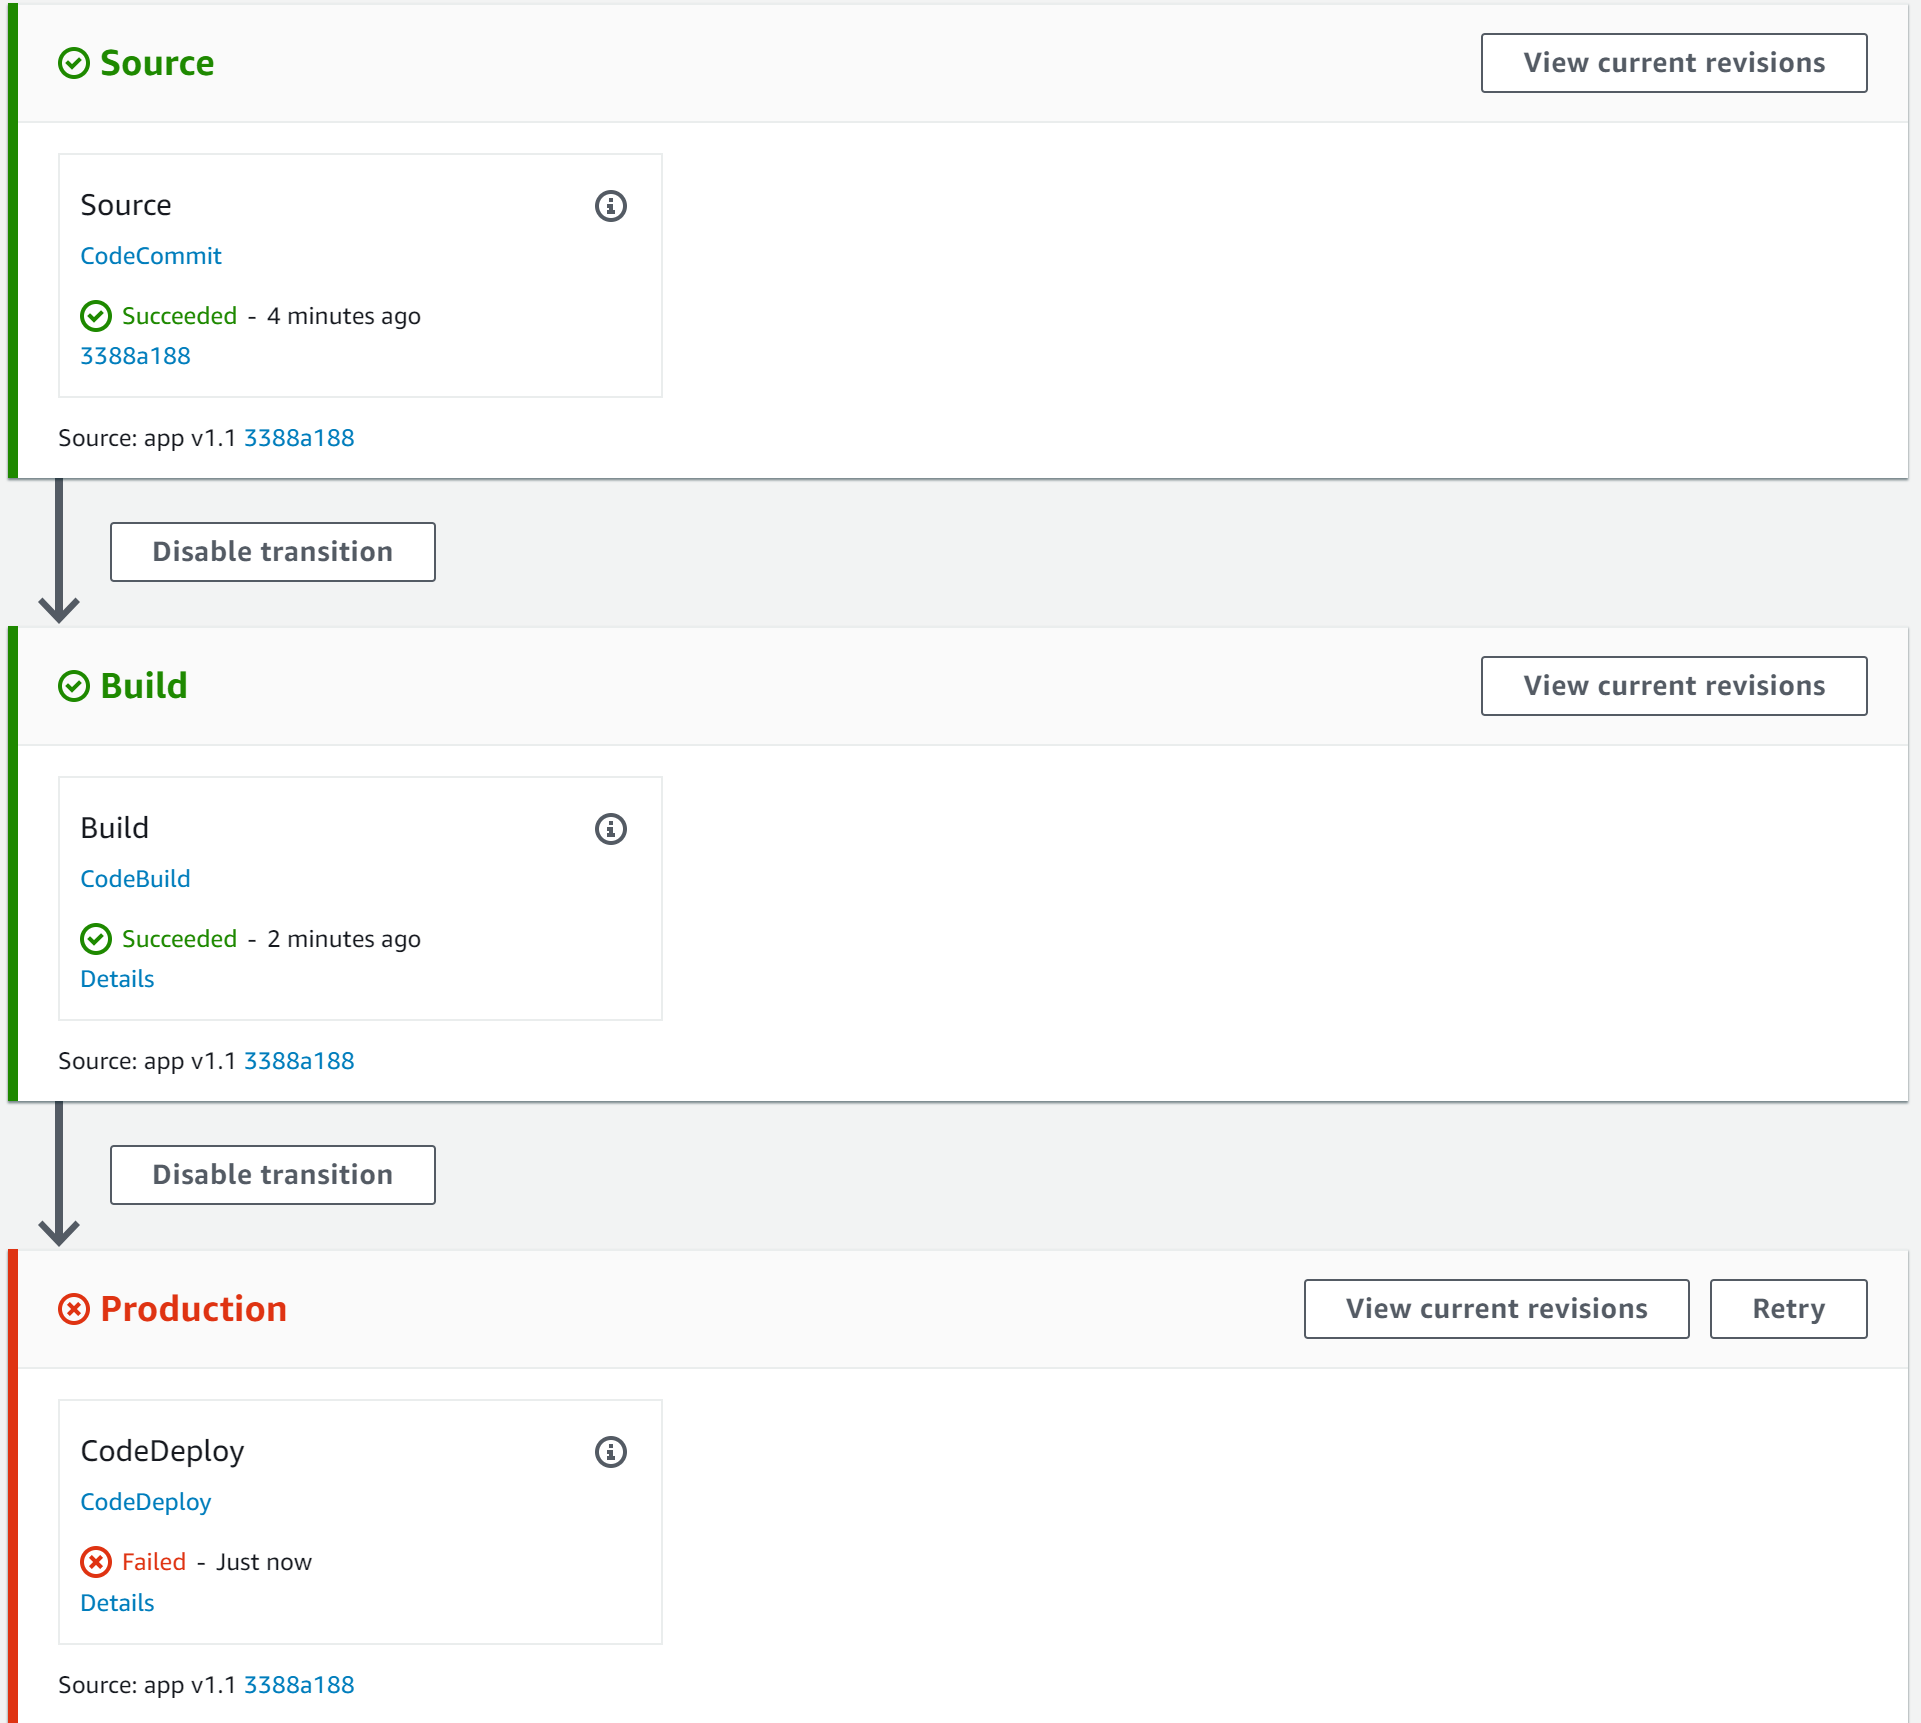
Note: It can take up to five minutes for the production stage to fail.
This view might be cause for concern in some cases, but you set up automatic rollbacks so you have nothing to worry about. You will now investigate how the rollback transpired.
10. Click on AWS CodeDeploy in the Production stage.
11. Notice that the in-place deployment shows a Status of Succeeded, immediately letting you know the rollback was successful.
Note: The Status may be In Progress or Failed, depending on how quickly you arrived at this instruction. You can wait until a Status of Succeeded is reached in that case by refreshing your browser periodically.
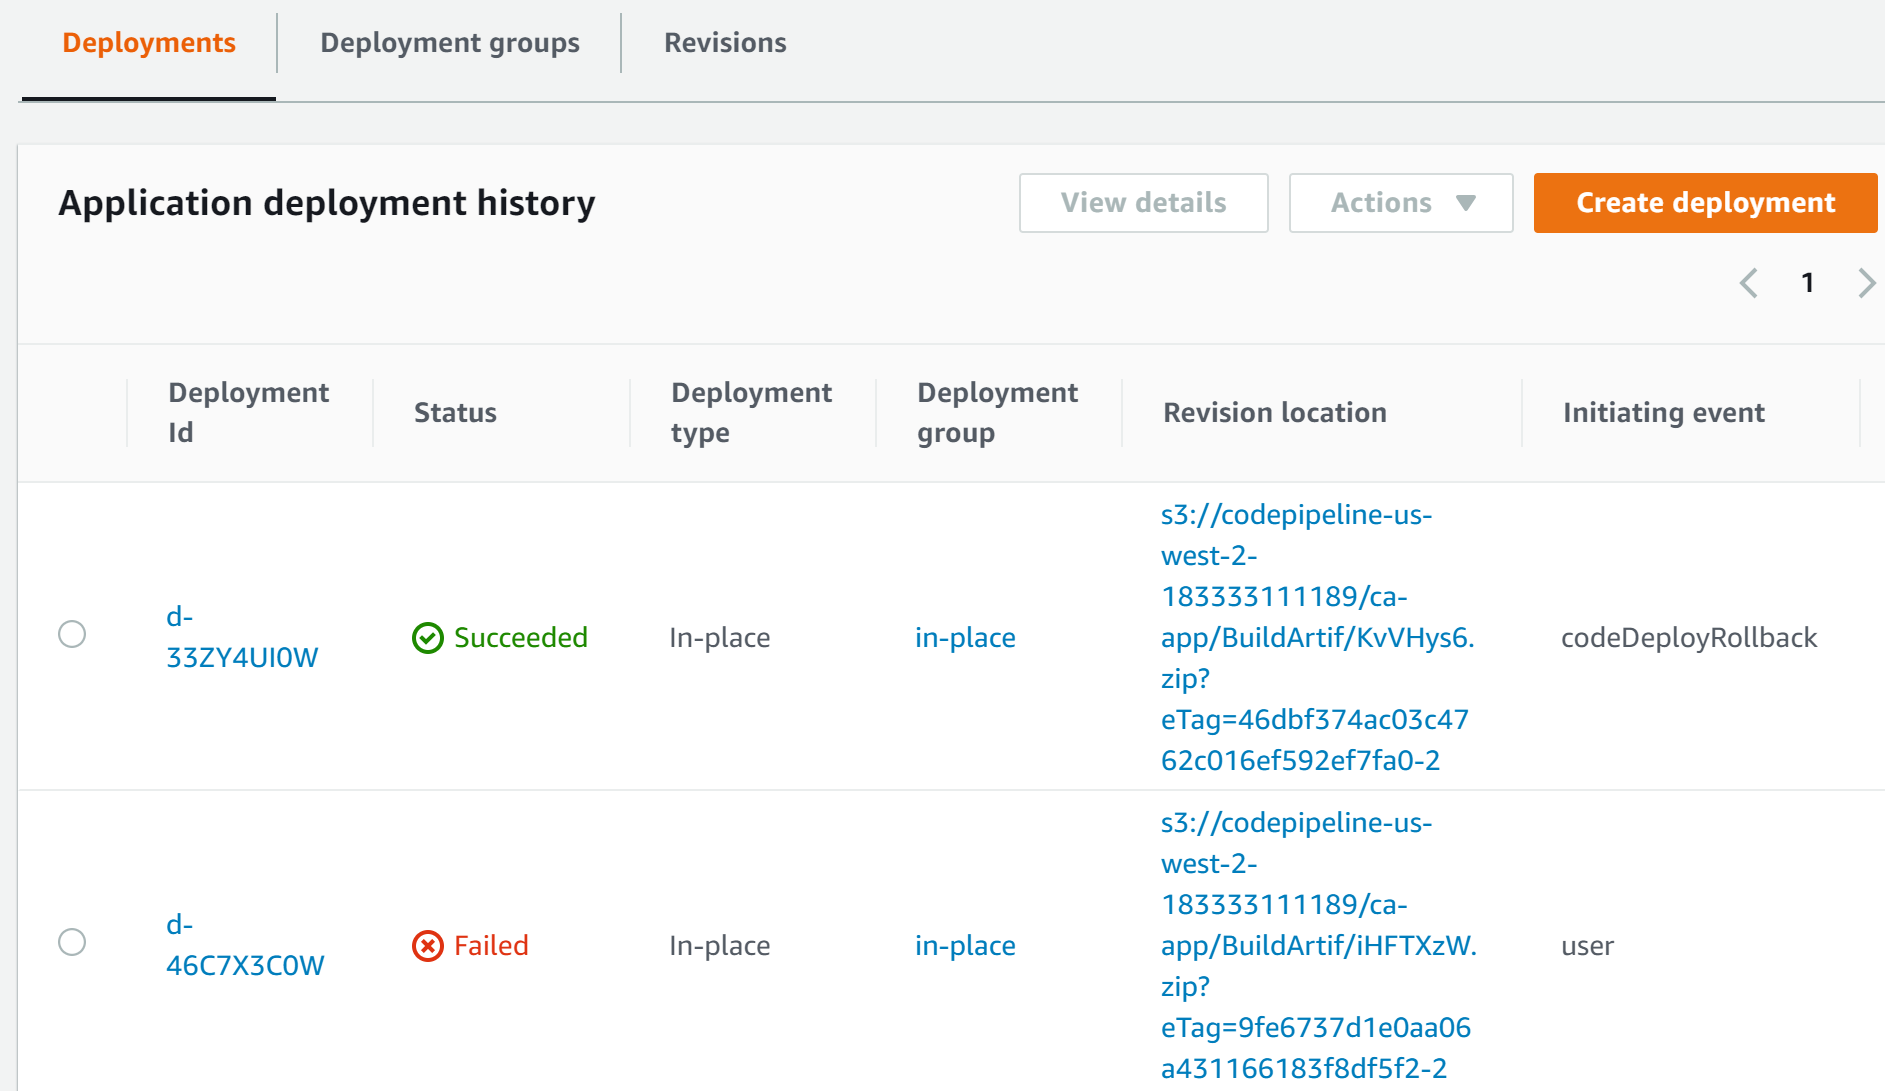
12. In the Deployments tab, notice that the second-to-last deployment Failed and the most recent deployment has an Initiating event of codeDeployRollback:
17. Click on Deployments in the upper navigation trail.
18. Click on the Deployment ID of the deployment that has an Initiating event of CodeDeploy rollback.
The progress bar shows only 1 of 2 instances updated:

This is because one of the instances was still serving the working revision of the application.
Summary
In this lab step, you committed a version of the code with an issue that slipped past the automated tests and went to deployment. The validate script connected to the AWS CodeDeploy life cycle hook, detected the issue, and failed the deployment on the first instance. The deployment automatically rolled back the instance to the latest working revision. The app was always available throughout the failed deployment and rollback because only one instance in the deployment group was taken out of service to attempt the upgrade first.
Introduction
You have been using in-place deployments for your code up to this point. One disadvantage of in-place deployments is that an instance is out of service during an update to a new application application. While updates are happening your deployment group has fewer instances than you desire to serve traffic. You can minimize this impact by using the one-at-a-time deployment configuration. However, the time to upgrade the deployment is longer than doing half at a time. These two strategies are the same for your deployment group because it only has two instances, but in general, this is not the case. In-place deployments can also run the risk of subtle configuration issues. That is because the same instances are used for deploying every version of the application. Over time the server configuration may drift and cause unexpected problems.
Blue/green deployments overcome the shortcomings of in-place deployments. To overcome in-place deployment issues, blue/green deployments utilize both the original blue environment and a second green environment. During a deployment, a green environment is created using new instances. By not reusing instances there is no risk of configuration drift. This is sometimes referred to as immutable infrastructure. The instances in the green environment install and run the new version of the application. While this is happening, all of the instances in the blue environment continue to serve traffic as usual. Once the green environment instances are ready and the application is validated, it is safe to switch traffic to the green environment. The switch is achieved using an Elastic Load Balancer in AWS CodeDeploy. When the traffic switches to the green environment, it becomes the blue environment. You can keep or destroy the original blue environment depending on whether or not you anticipate possibly needing to roll back. The blue and green environments are referred to as original and replacement in some areas of AWS CodeDeploy.
In this lab step, you will see how AWS CodeDeploy seamlessly manages a blue/green deployment. You modify your code pipeline to use the blue/green deployment group you created earlier. You will commit a new feature to your AWS CodeCommit repository and observe the blue/green deployment procedure in AWS CodeDeploy.
Instructions
1. Open the graphical representation of your pipeline in AWS CodePipeline.
2. Click Edit.
3. In the Production stage, click Edit stage followed by the pencil inside the CodeDeploy action:

4. Change the Deployment group to blue-green, and then click Done:

5. Click Save on the pipeline edit screen, and click Save again in the confirmation dialog.
Your pipeline is now configured to use the blue/green deployment you set up earlier in AWS CodeDeploy.
6. To kick off the pipeline, return to your SSH shell and enter the following commands:
cd
cp -R commits/v1_2/. ca-app/
cd ca-app/
git add -A
git commit -m "app v1.2"
git push
This version of the code introduces a new feature that lets you emphasize messages in your accumulator.
7. Return to your pipeline in AWS CodePipeline and watch the stages complete until the Production stage is In Progress.
Note: It may take a minute or two for the source stage to start building.
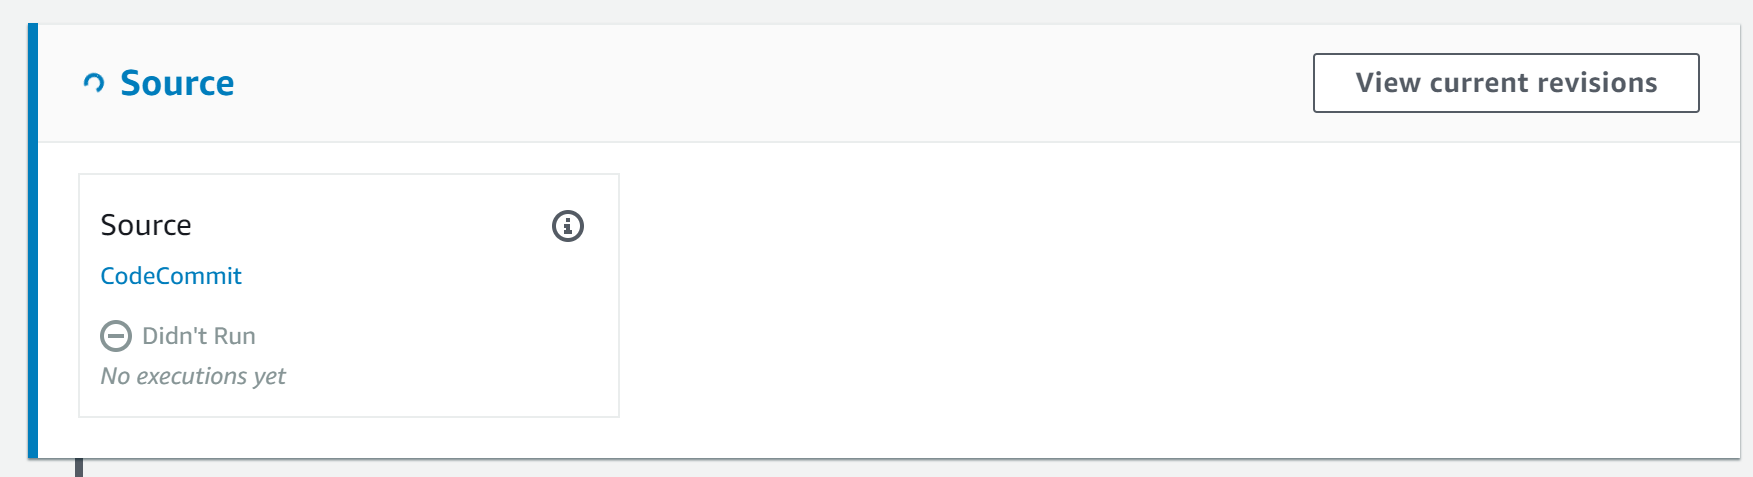
Observe the text at the bottom of the Source and Build stages:
![]()
It updates with the commit identifier and message. This shows you know which version of the app is going through your pipeline.
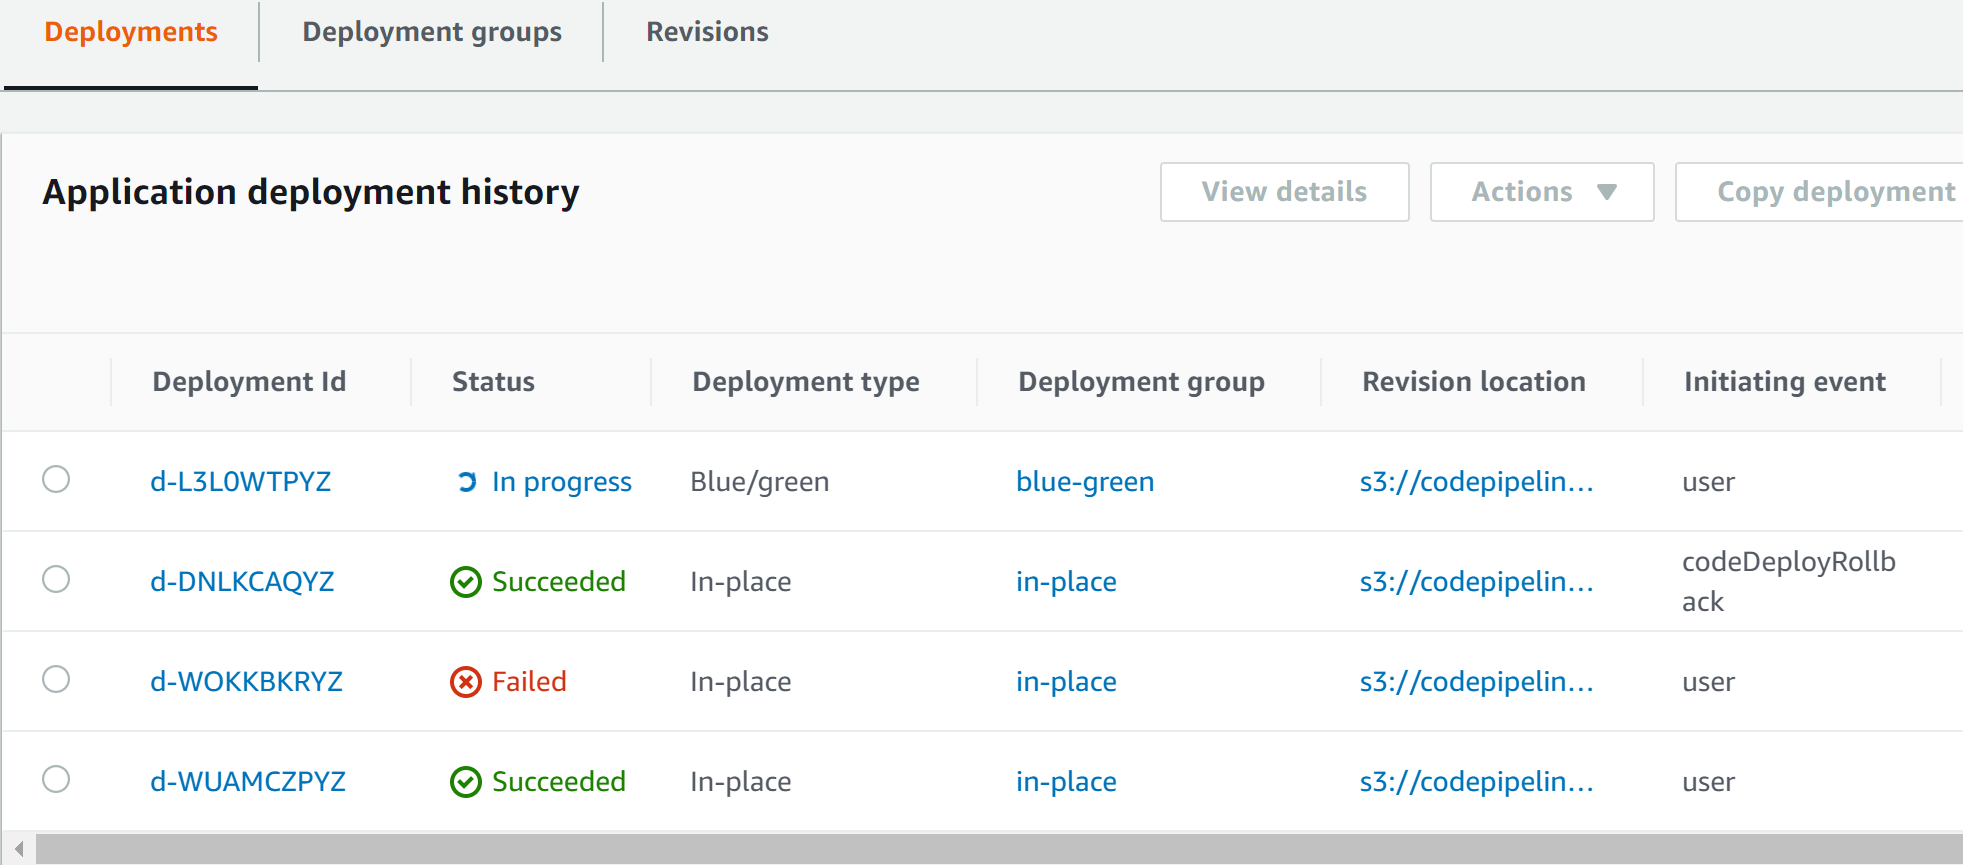
8. Click on CodeDeploy in the Production action and then click the Deployments tab.
Notice that there is an In Progress deployment for the Blue/green deployment group:
9. Click on the deployment ID of the In Progress deployment.
You are presented with the blue/green deployment details:
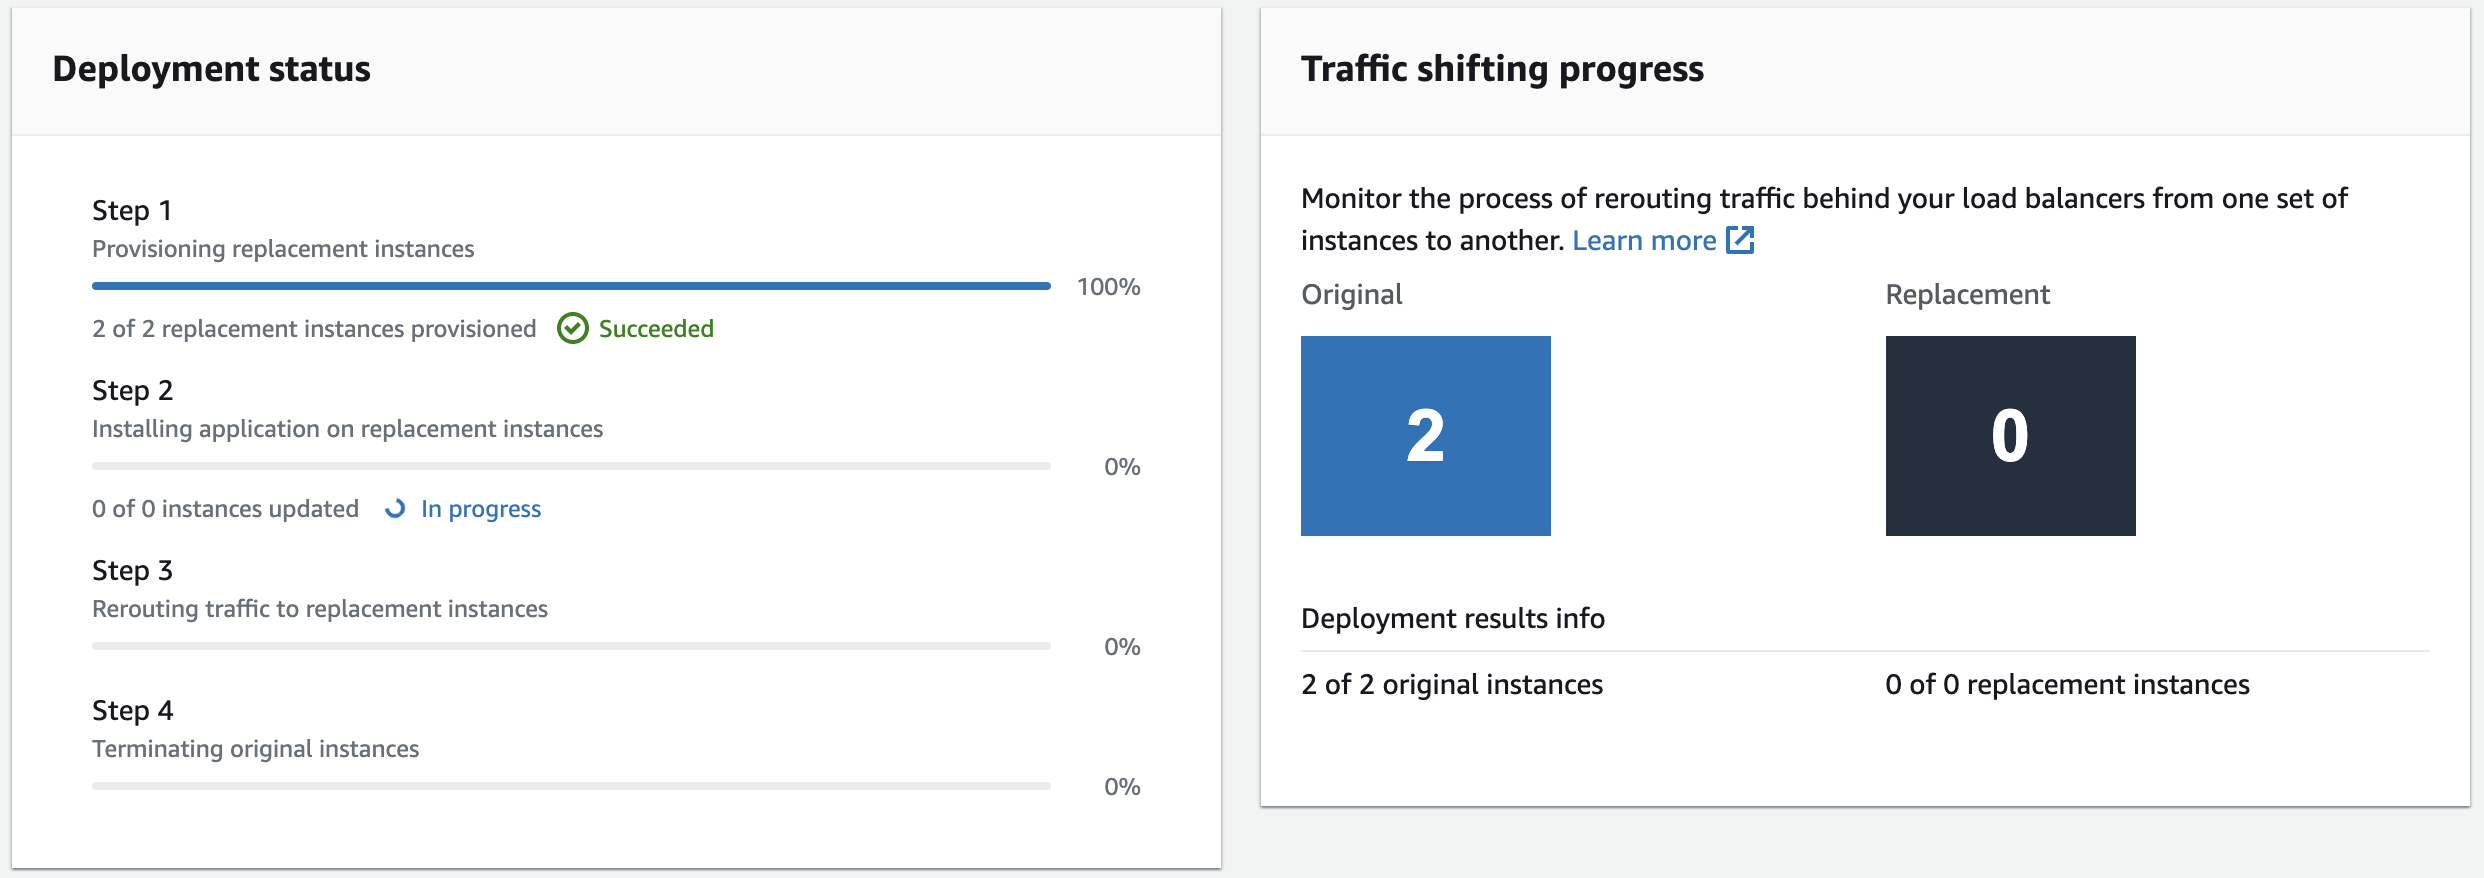
The steps taken to perform the deployment each have a progress bar:
- The replacement environment instances are provisioned.
- The new revision of the application is installed on the replacement instances
- Traffic is rerouted to the replacement instances
- The original instances are terminated (this step is skipped based on your configuration)
The first step is complete in the image above. You can verify that new instances are added by navigating to Services > Compute > EC2 > INSTANCES > Instances.
Note: AWS CodeDeploy automatic rollbacks for blue/green deployments work the same as for in-place deployments. That is, AWS CodeDeploy will create a new group of instances rather than use the existing instances running the last revision of the code. To make use of the existing instances, disable automatic rollbacks and modify the instances registered with the Elastic Load Balancer.
10. Watch the Status of the instances and the progress bars advance as time passes:
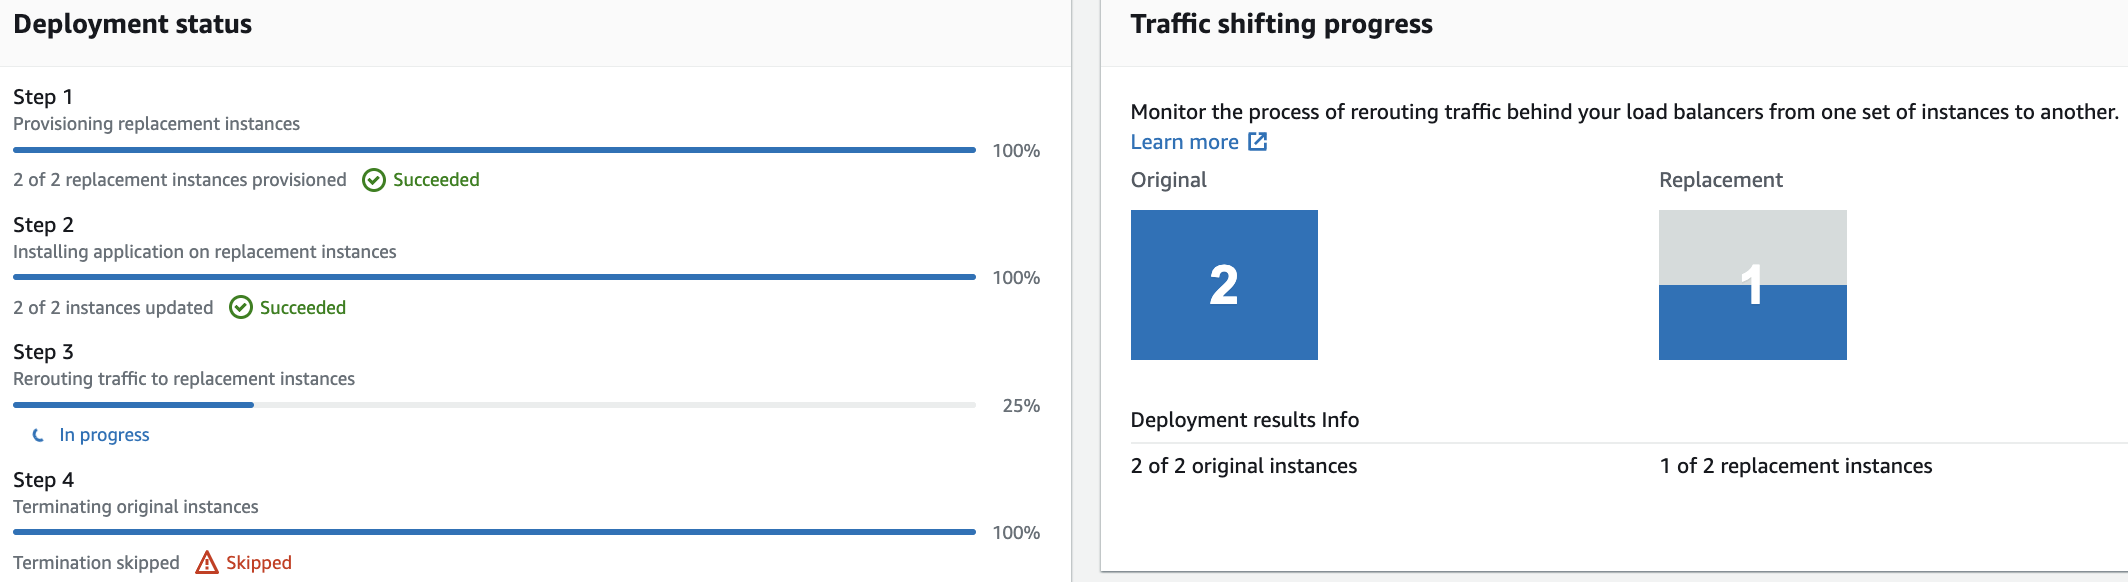
The above image depicts an interesting point in time when the first instance in the replacement instances receives traffic. This is due to the one at a time deployment configuration. Next, the second replacement instance receives traffic. Finally, the original instances stop receiving traffic.
11. Return to the browser with the accumulator app open and click refresh:
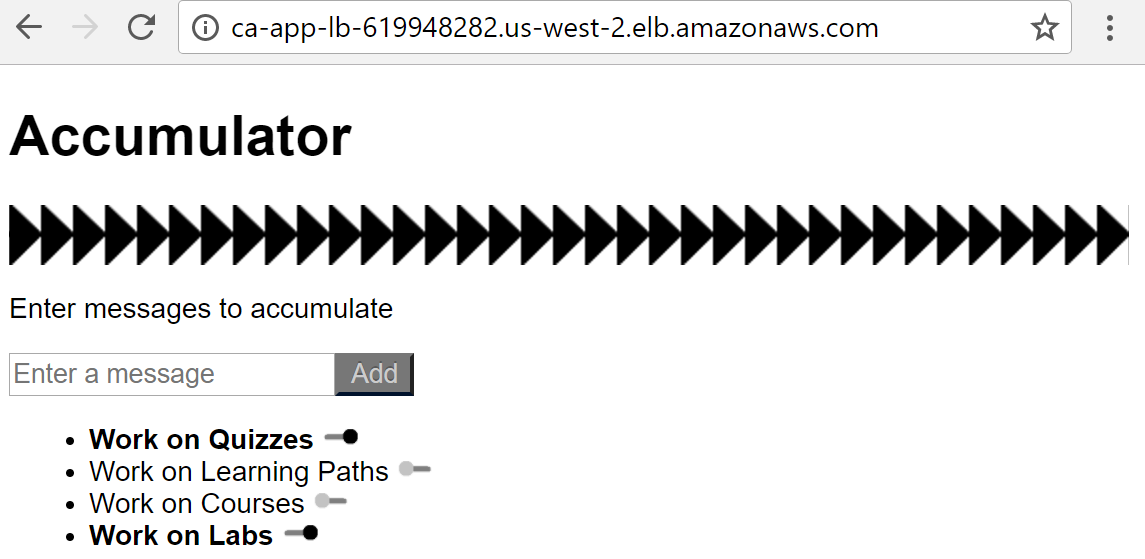
Notice the new toggle bars to emphasize messages in the accumulator. Also, notice the server IP addresses are not the same as before. This indicates that blue/green deployment was used since in-place deployment would maintain the server IP addresses.
Note: While the load balancer shifts traffic from the old to new instances, users of the app can connect to old and new instances at the same time. It is not instantaneous. It is worth considering this when upgrading to make sure your app can function correctly in this scenario.
Summary
In this lab step, you configured your continuous deployment pipeline to use blue/green deployments. You committed a new revision of the application code leading to the deployment event. You watched the steps involved in performing the blue/green deployment you configured. Lastly, you verified that the application deployed to new instances and the new feature became generally available.
In this lab, you used AWS CodePipeline and the related code suite tools to build and application. And you deployed it using the in-place and blue-green deployment methods.