
Build a Serverless Web Application
In this module, we’ll configure AWS Amplify to host the static resources for your web application with built-in continuous deployment. AWS Amplify Console simplifies the process of deploying and hosting full-stack web apps. Subsequent modules will add dynamic functionality using JavaScript to interact with remote RESTful APIs built with AWS Lambda and Amazon API Gateway.
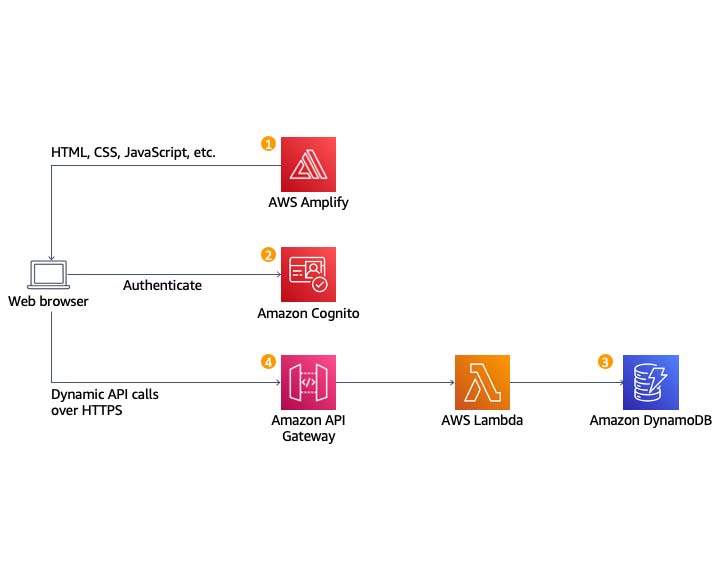
Architecture overview
The architecture for this module is straightforward. AWS Amplify Console will manage all your static web content, including HTML, CSS, JavaScript, images, and more. Your users will access the site via the public website URL provided by AWS Amplify Console, eliminating the need for running web servers or additional services.
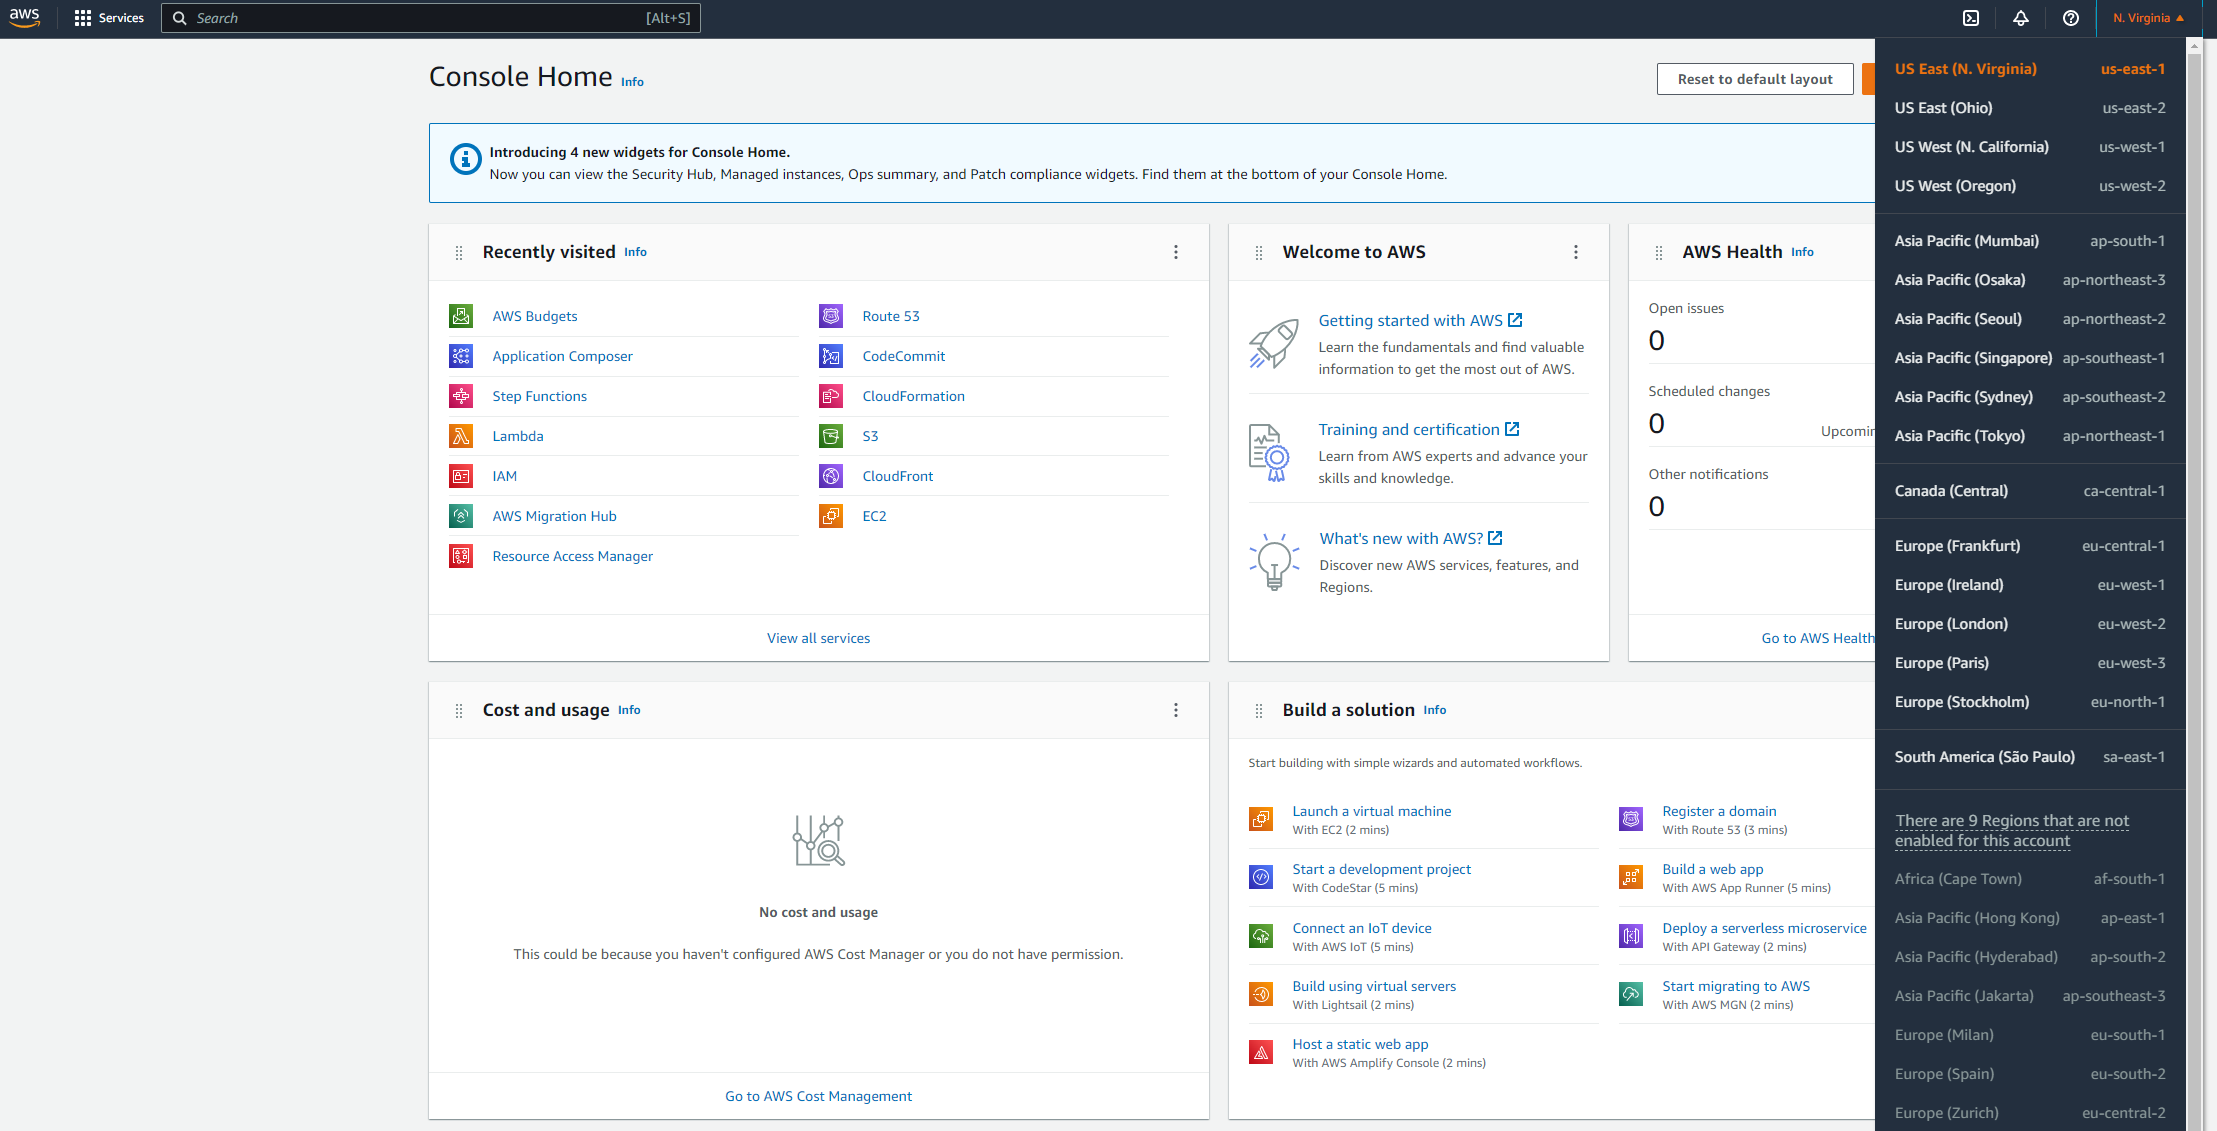
This web application can be deployed in any AWS Region that supports all the services used in this application, which include AWS Amplify, AWS CodeCommit, Amazon Cognito, AWS Lambda, Amazon API Gateway, and Amazon DynamoDB.
- US East (N. Virginia)
- US East (Ohio)
- US West (Oregon)
- EU (Frankfurt)
- EU (Ireland)
- EU (London)
- Asia Pacific (Tokyo)
- Asia Pacific (Seoul)
- Asia Pacific (Sydney)
- Asia Pacific (Mumbai)
Select the Region from the dropdown in the upper right corner of the AWS Management Console.
We have two options to manage the source code for this module: AWS CodeCommit (included in the AWS Free Tier) or GitHub. In this project I will use CodeCommit to store the application code.
- install AWS CLI. The installation instructions vary depending on what operating system you’re using.
- Open the AWS CodeCommit console.
- Choose Create Repository.
- Enter wildrydes-site for the Repository name.
- Choose Create.
- Once repository is created, set up an IAM user with Git credentials in the IAM console. Follow the instructions for Step 1 through Step 3 on the Setup for HTTPS users using Git credentials page of the AWS CodeCommit User Guide.
Important Note: When setting up your user in the IAM console, you will need to set up and save two sets of credentials to refer back to.- You must create Access keys in the IAM > Security Credentials tab. Download the Access Key and Secret Access Key IDs or copy and save them in a secure location.
- You must also generate HTTPS Git credentials for AWS CodeCommit. Download or save these generated credentials as well.
- In the terminal window you used to install AWS CLI, enter the command: aws configure
- Enter the AWS Access Key ID and Secret Access Key you created in Step 6.
- For Default region name enter the Region you initially selected to create your CodeCommit repository in.
- Leave Default output format blank, and press enter.
The following code block is an example of what you will see in your terminal window.
% aws configure
AWS Access Key ID [****************]: #####################
AWS Secret Access Key [****************]: ###################
Default region name [us-east-1]: us-east-1
Default output format [None]: - If you have a Linux, macOS or UNIX machine, see the Step 3: Set up the credential helper instructions for Linux, macOS, or UNIX.
- If you have a Windows machine see the Step 3: Set up the credential helper instructions for Windows.
git config --global credential.helper '!aws codecommit credential-helper $@'
git config --global credential.UseHttpPath true
12. Navigate back to the AWS CodeCommit console and select the wildrydes-site repository.
13. Select Clone HTTPS from the Clone URL dropdown to copy the HTTPS URL.

14. From your terminal window run git clone and paste the HTTPS URL of the repository.
The following code block is an example of what you will see in your terminal window:
$ git clone https://git-codecommit.us-east-1.amazonaws.com/v1/repos/wildrydes-site
Cloning into ‘wildrydes-site’...
Username for ‘https://git-codecommit.us-east-1.amazonaws.com/v1/repos/wildrydes-site’: Enter the HTTPS Git credentials for AWS CodeCommit username you generated in Step 6
Password for ‘https://username@git-codecommit.us-east-1.amazonaws.com/v1/repos/wildrydes-site’: Enter the HTTPS Git credentials for AWS CodeCommit password you generated in Step 6
warning: You appear to have cloned an empty repository.
There will be a warning that you appear to have cloned an empty repository, this is expected.
Once you’ve used either AWS CodeCommit or GitHub.com to create your git repository and clone it locally, you need to copy the website content from an existing, publicly-accessible S3 bucket associated with this tutorial and add the content to your repository.
- Change directory into your repository and copy the static files from S3 using the following commands (make sure you change the Region in the following command to copy the files from the S3 bucket to the Region you selected at the beginning of this tutorial):
cd wildrydes-site
aws s3 cp s3://wildrydes-us-east-1/WebApplication/1_StaticWebHosting/website ./ –recursive - Add, commit, and push the git files.
The following code block is an example of what you will see in your terminal window:
$ git add .
$ git commit -m "new files"
$ git push

Counting objects: 95, done.
Compressing objects: 100% (94/94), done.
Writing objects: 100% (95/95), 9.44 MiB | 14.87 MiB/s, done.
Total 95 (delta 2), reused 0 (delta 0)
To https://git-codecommit.us-east-1.amazonaws.com/v1/repos/wildrydes-site
* [new branch] master -> masterNext you’ll use the AWS Amplify Console to deploy the website you’ve just committed to git. The Amplify Console takes care of the work of setting up a place to store your static web application code and provides a number of helpful capabilities to simplify both the lifecycle of that application as well as enable best practices.
- Launch the AWS Amplify console.
- Choose Get Started.
- Under the Amplify Hosting Host your web app header, choose Get Started.
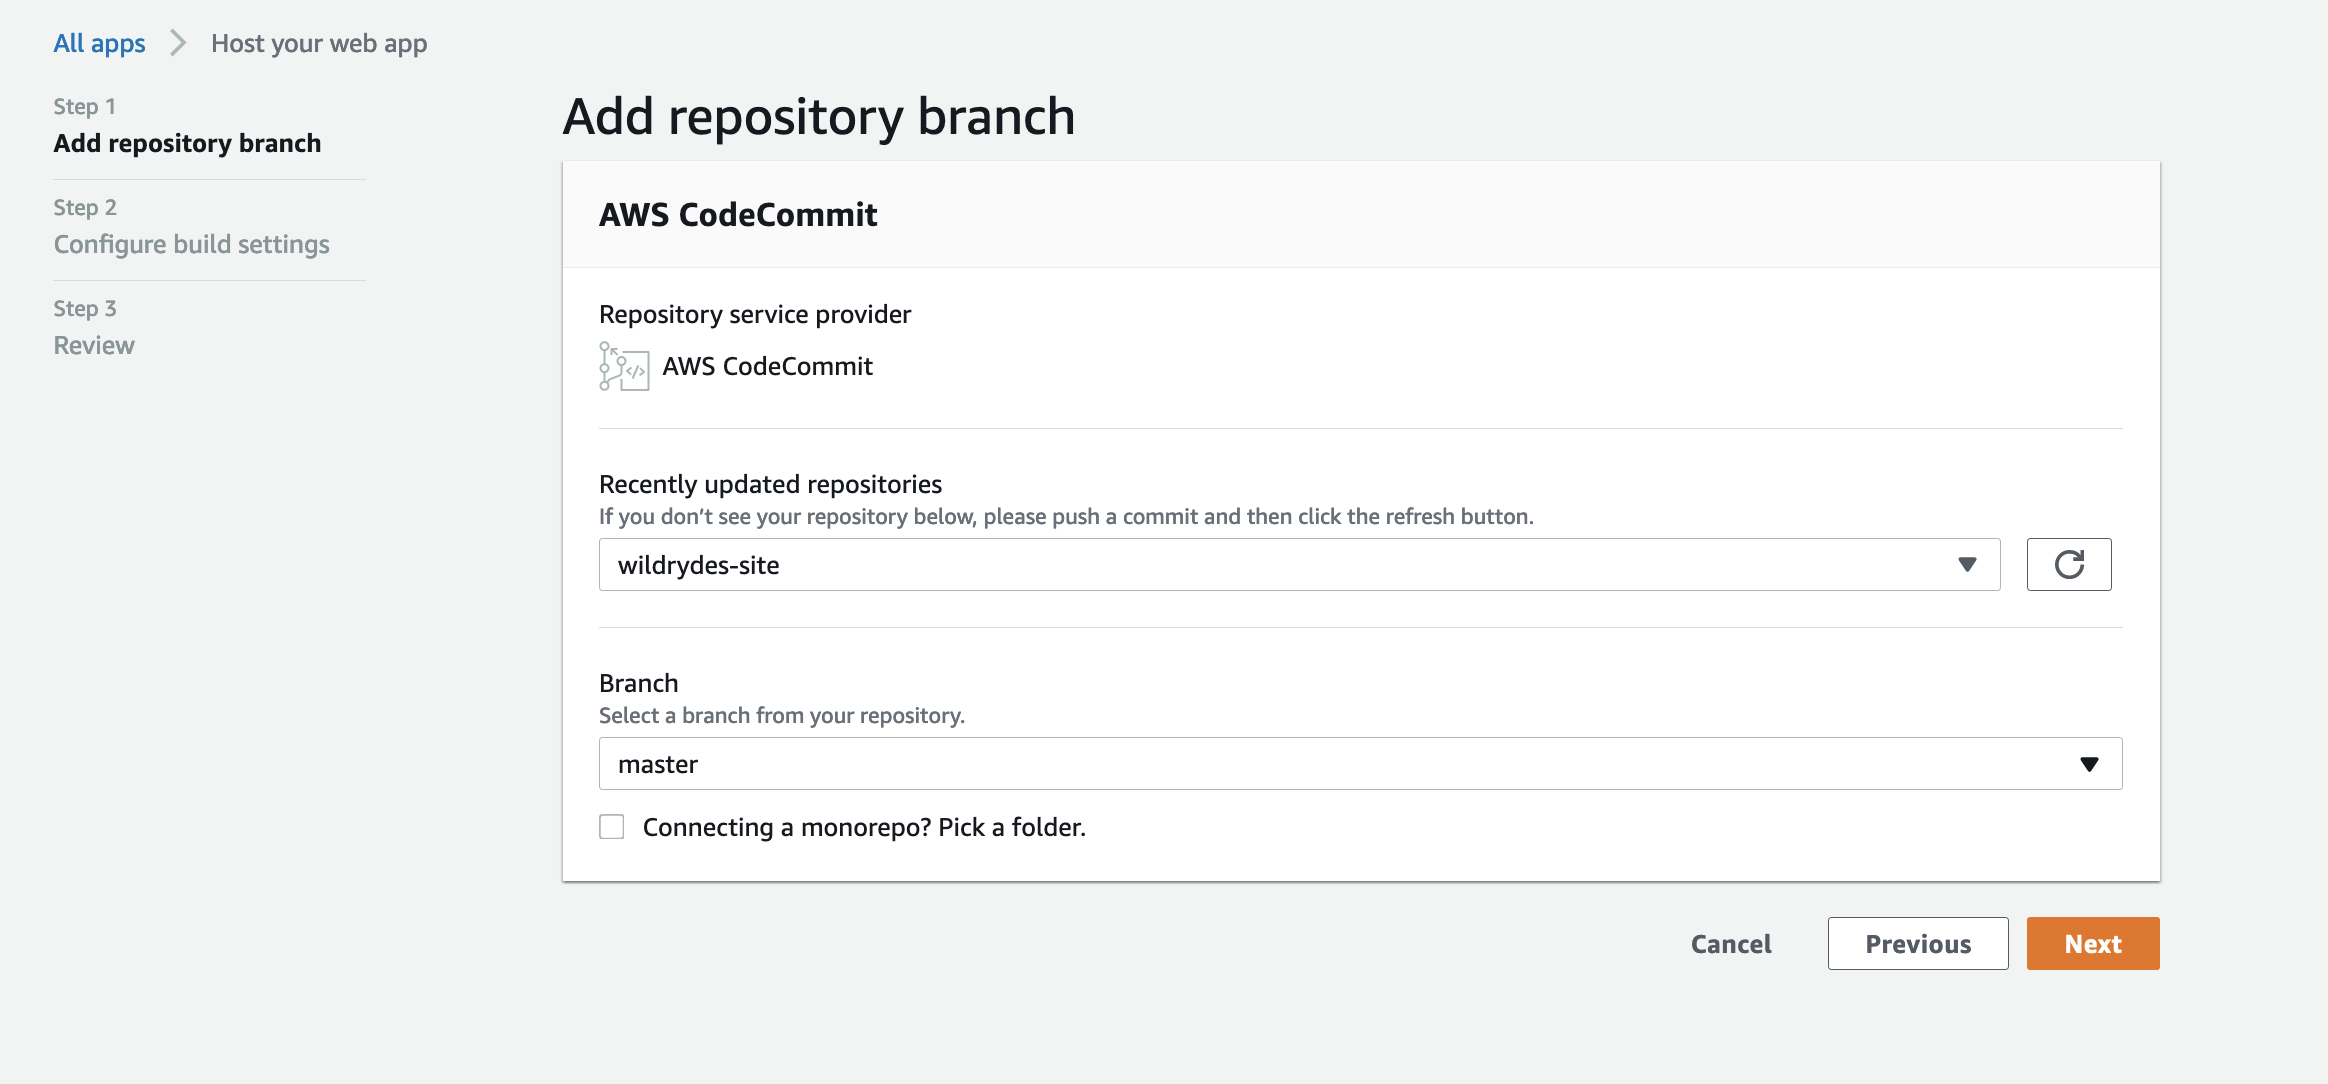
- On the Get started with Amplify Hosting page, select AWS CodeCommit and choose Continue.
- On the Add repository branch step, select wildrydes-site from the Select a repository dropdown.
- If you used GitHub, you’ll need to authorize AWS Amplify to your GitHub account.
- In the Branch dropdown select master and choose Next.

8. On the Build settings page, leave all the defaults, select Allow AWS Amplify to automatically deploy all files hosted in your project root directory and choose Next.
9. On the Review page select Save and deploy.
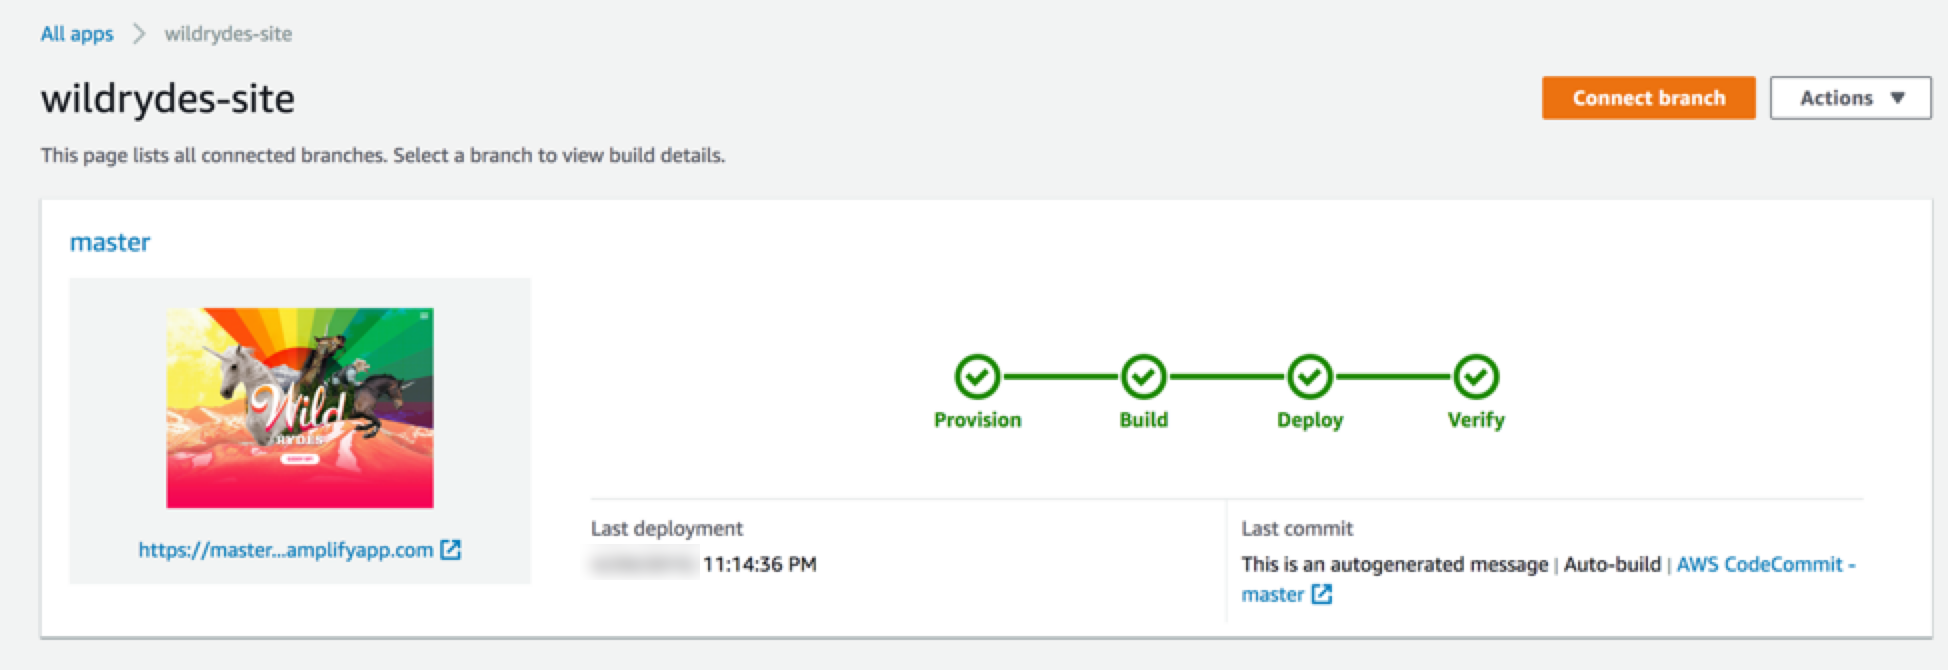
10. The process takes a couple of minutes for Amplify Console to create the necessary resources and to deploy your code.
Once completed, select the site image, or the link underneath the thumbnail to launch your Wild Rydes site. If you select the link for master you’ll see the build and deployment details related to your branch.

The AWS Amplify console will rebuild and redeploy the app when it detects changes to the connected repository. Make a change to the main page to test out this process.
- On your local machine, navigate to the the wildrydes-site folder and open the index.html file in a text editor of your choice.
- Modify the title line with the following text: <title>Wild Rydes – Rydes of the Future!</title>
- Save the file.
- In your terminal window, add, commit your change, and push the change to the git repository again. Amplify Console will begin to build the site again soon after it notices the update to the repository. It will happen pretty quickly! Head back to the AWS Amplify console to watch the process.
The following code block is an example of what you will see in your terminal window:
$ git add index.html
$ git commit -m "updated title"
[master dfec2e5] updated title
 1 file changed, 1 insertion(+), 1 deletion(-)

$ git push
Counting objects: 3, done.
Compressing objects: 100% (3/3), done.
Writing objects: 100% (3/3), 315 bytes | 315.00 KiB/s, done.
Total 3 (delta 2), reused 0 (delta 0)
remote: processing
To https://git-codecommit.us-east-1.amazonaws.com/v1/repos/wildrydes-site
   2e9f540..dfec2e5  master -> master
5. Once Amplify has completed the re-deployment, re-open the Wild Rydes site and notice the tab title change.
In this module, you’ll create an Amazon Cognito user pool to manage user accounts and deploy pages for user registration, email verification, and sign-in.
Architecture overview
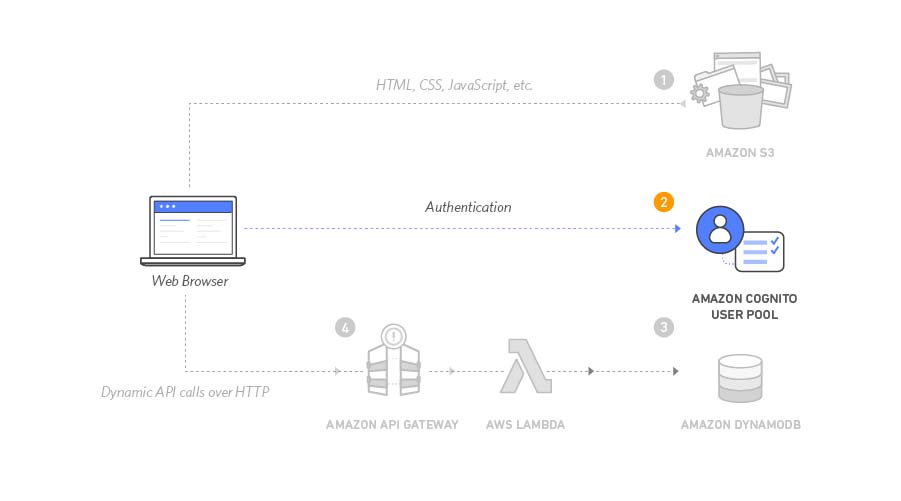
When users visit the website, they’ll first register a new user account, providing an email address and password. After registration, Amazon Cognito sends a confirmation email with a verification code. Users can confirm their account by entering the code on the site. Once confirmed, users can sign in. The website uses JavaScript to interact with Amazon Cognito, authenticate users with the Secure Remote Password protocol (SRP), and receive JSON Web Tokens (JWTs) for authentication in the next module.
Amazon Cognito provides two different mechanisms for authenticating users. You can use Cognito User Pools to add sign-up and sign-in functionality to your application or use Cognito Identity Pools to authenticate users through social identity providers such as Facebook, Twitter, or Amazon, with SAML identity solutions, or by using your own identity system. For this module you’ll use a user pool as the backend for the provided registration and sign-in pages.
- In the Amazon Cognito console, choose Create user pool.
- On the Configure sign-in experience page, in the Cognito user pool sign-in options section, select User name. Keep the defaults for the other settings, such as Provider types and do not make any User name requirements selections. Choose Next.
- On the Configure security requirements page, keep the Password policy mode as Cognito defaults. You can choose to configure multi-factor authentication (MFA) or choose No MFA and keep other configurations as default. Choose Next.
- On the Configure sign-up experience page, keep everything as default. Choose Next.
- On the Configure message delivery page, for Email provider, confirm that Send email with Amazon SES – Recommended is selected. In the FROM email address field, select an email address that you have verified with Amazon SES, following the instructions in Verifying an email address identity in the Amazon Simple Email Service Developer Guide.
Note: If you don’t see the verified email address populating in the dropdown, ensure that you have created a verified email address in the same Region you selected at the beginning of the tutorial. - On the Integrate your app page, name your user pool: WildRydes. Under Initial app client, name the app client: WildRydesWebApp and keep the other settings as default.
- On the Review and create page, choose Create user pool.
- On the User pools page, select the User pool name to view detailed information about the user pool you created. Copy the User Pool ID in the User pool overview section and save it in a secure location on your local machine.
- Select the App Integration tab and copy and save the Client ID in the App clients and analytics section of your newly created user pool.
The js/config.js file contains settings for the user pool ID, app client ID and Region. Update this file with the settings from the user pool and app you created in the previous steps and upload the file back to your bucket.
- From your local machine, open the wildryde-site/js/config.js file in a text editor of your choice.
- Update the cognito section of the file with the correct values for the User pool ID and App Client ID you saved in Steps 8 and 9 in the previous section. The userPoolID is the User pool ID from the User pool overview section, and the userPoolClientID is the App Client ID from the App Integration > App clients and analytics section of Amazon Cognito.
- The value for region should be the AWS Region code where you created your user pool. For example, us-east-1 for the N. Virginia Region, or us-west-2 for the Oregon Region. If you’re not sure which code to use, you can look at the Pool ARN value on the User pool overview. The Region code is the part of the ARN immediately after arn:aws:cognito-idp:.
The updated config.js file should look like the following code. Note that the actual values for your file will be different:
window._config = {
    cognito: {
        userPoolId: 'us-west-2_uXboG5pAb', // e.g. us-east-2_uXboG5pAb
        userPoolClientId: '25ddkmj4v6hfsfvruhpfi7n4hv', // e.g. 25ddkmj4v6hfsfvruhpfi7n4hv
        region: 'us-west-2' // e.g. us-east-2
    },
    api: {
        invokeUrl: '' // e.g. https://rc7nyt4tql.execute-api.us-west-2.amazonaws.com/prod',
    }
};
4. Save the modified file.
5. In your terminal window, add, commit, and push the file to your Git repository to have it automatically deploy to Amplify Console.
The following code block is an example of what you will see in your terminal window:
$ git add .
$ git commit -m "new_config"
$ git push- In a Finder window or Windows File Explorer, navigate to the wildrydes-site folder you copied to your local machine in Module 1.
- Open /register.html, or choose the Giddy Up! button on the homepage (index.html page) of your site.
- Complete the registration form and choose Let’s Ryde. You can use your own email or enter a fake email. Make sure to choose a password that contains at least one upper-case letter, a number, and a special character. Don’t forget the password you entered for later. You should see an alert that confirms that your user has been created.
- Confirm your new user using one of the two following methods:
- If you used an email address you control, you can complete the account verification process by visiting /verify.html under your website domain and entering the verification code that is emailed to you. Please note, the verification email may end up in your spam folder. For real deployments we recommend configuring your user pool to use Amazon Simple Email Service to send emails from a domain you own.
- If you used a dummy email address, you must confirm the user manually through the Cognito console.
- In the Amazon Cognito console, select the WildRydes user pool.
- In the Users tab, you should see a user corresponding to the email address that you submitted through the registration page. Choose that username to view the user detail page.
- In the Actions dropdown, select Confirm account to finalize the account creation process.
- In the Confirm account for user pop-up, choose Confirm.
- After confirming the new user using either the /verify.html page or the Cognito console, visit /signin.html and log in using the email address and password you entered during the registration step.
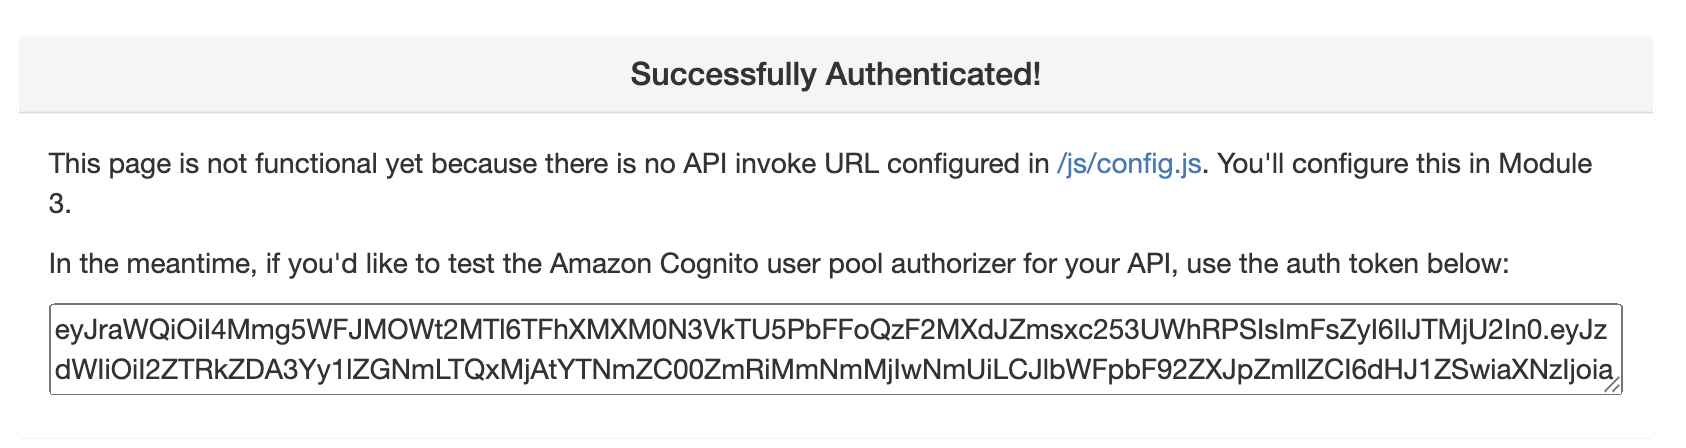
- If successful you should be redirected to /ride.html. You should see a notification that the API is not configured.
Important: Copy and save the auth token in order to create the Amazon Cognito user pool authorizer in the next module.
In this module, we’ll utilize AWS Lambda and Amazon DynamoDB to create a backend process for handling user requests in our web application.
Architecture overview
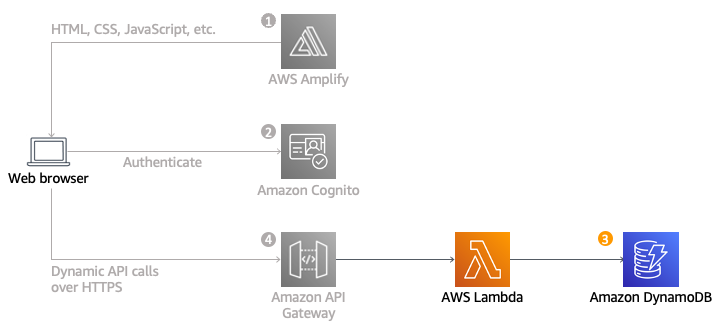
We will implement a Lambda function that processes user requests for unicorn rides. The Lambda function will select a unicorn from the fleet, record the request in a DynamoDB table, and provide details about the dispatched unicorn back to the frontend application.
In this module, we will use Amazon API Gateway to expose the Lambda function we built in the previous module as a RESTful API. This API will be accessible on the public Internet and secured using the Amazon Cognito user pool created earlier.
Architecture overview
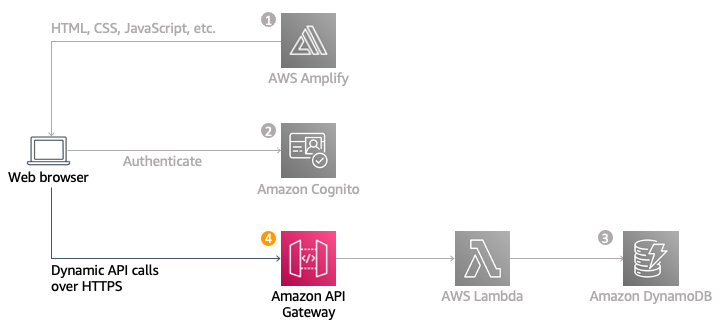
We will integrate the API Gateway component with existing components to create a fully functional web application. The static website, deployed in the first module, already has pages configured to interact with the API built in this module.