
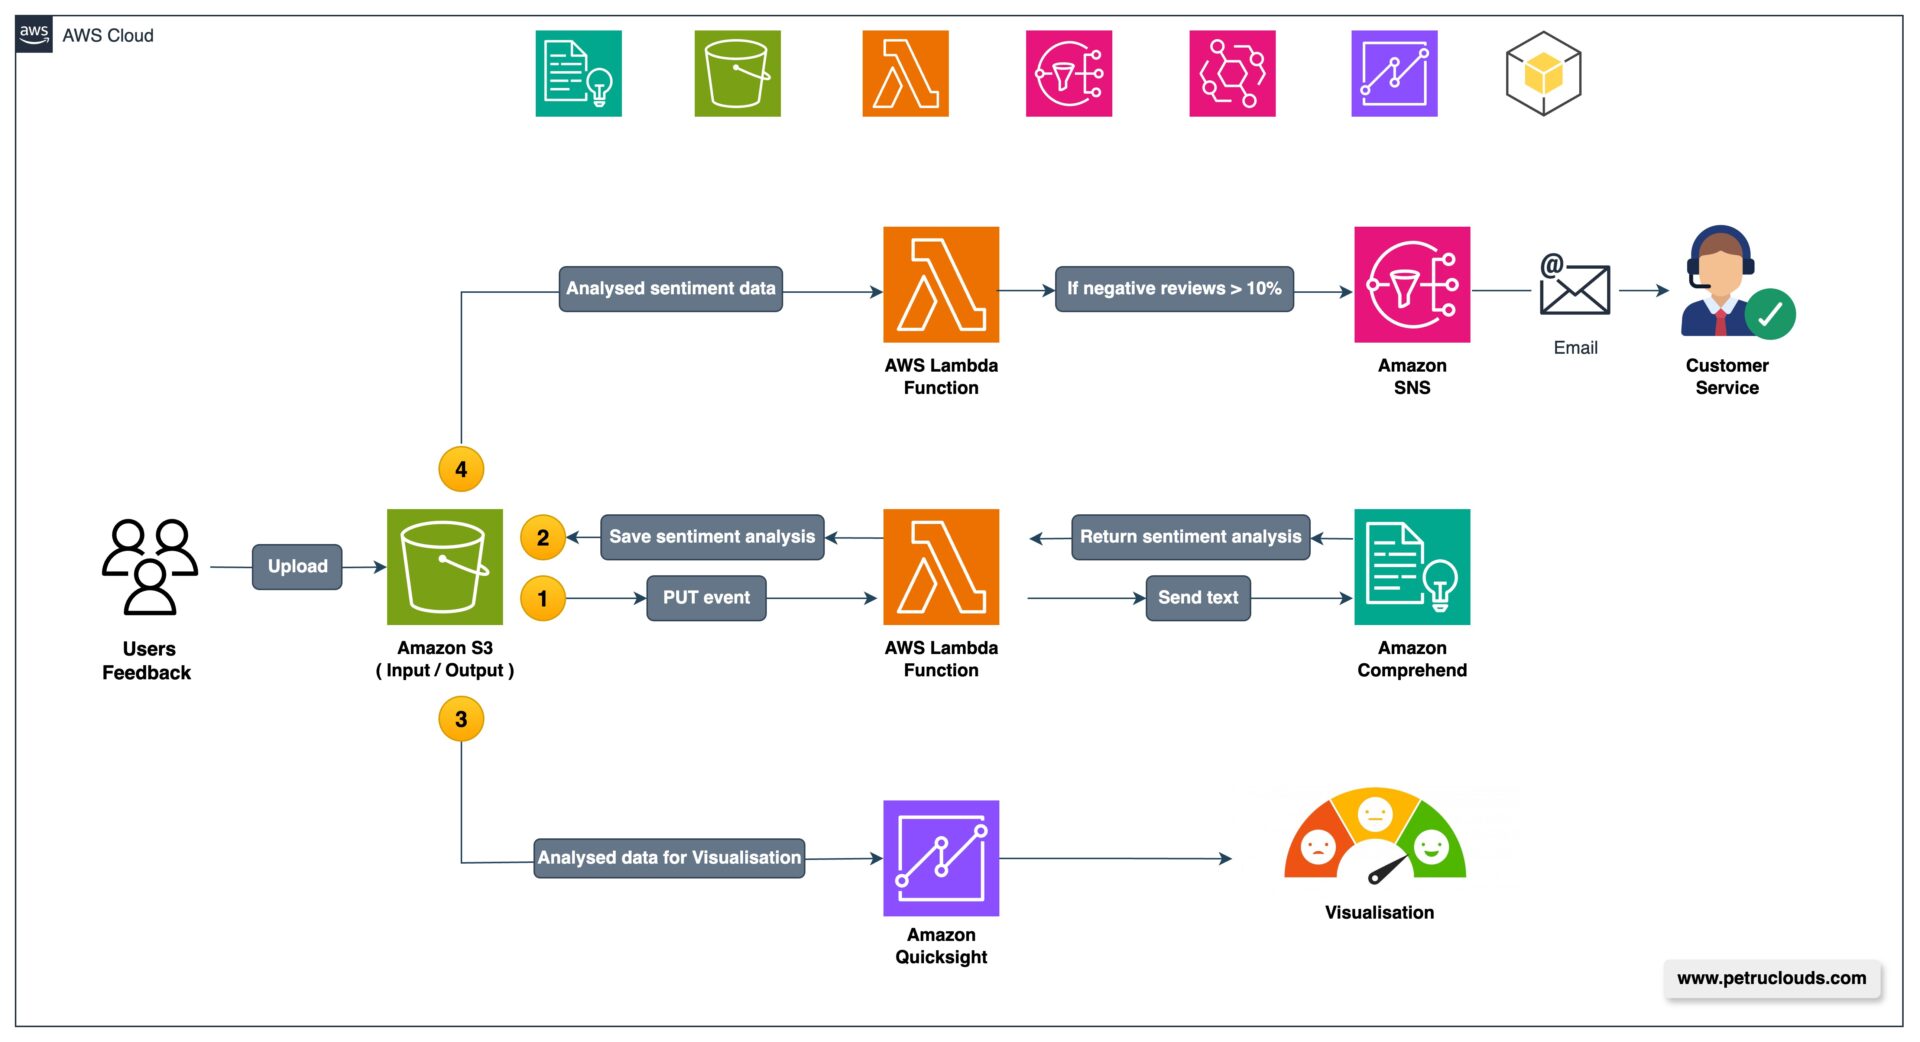
Analysing Customer Sentiment with AWS Comprehend
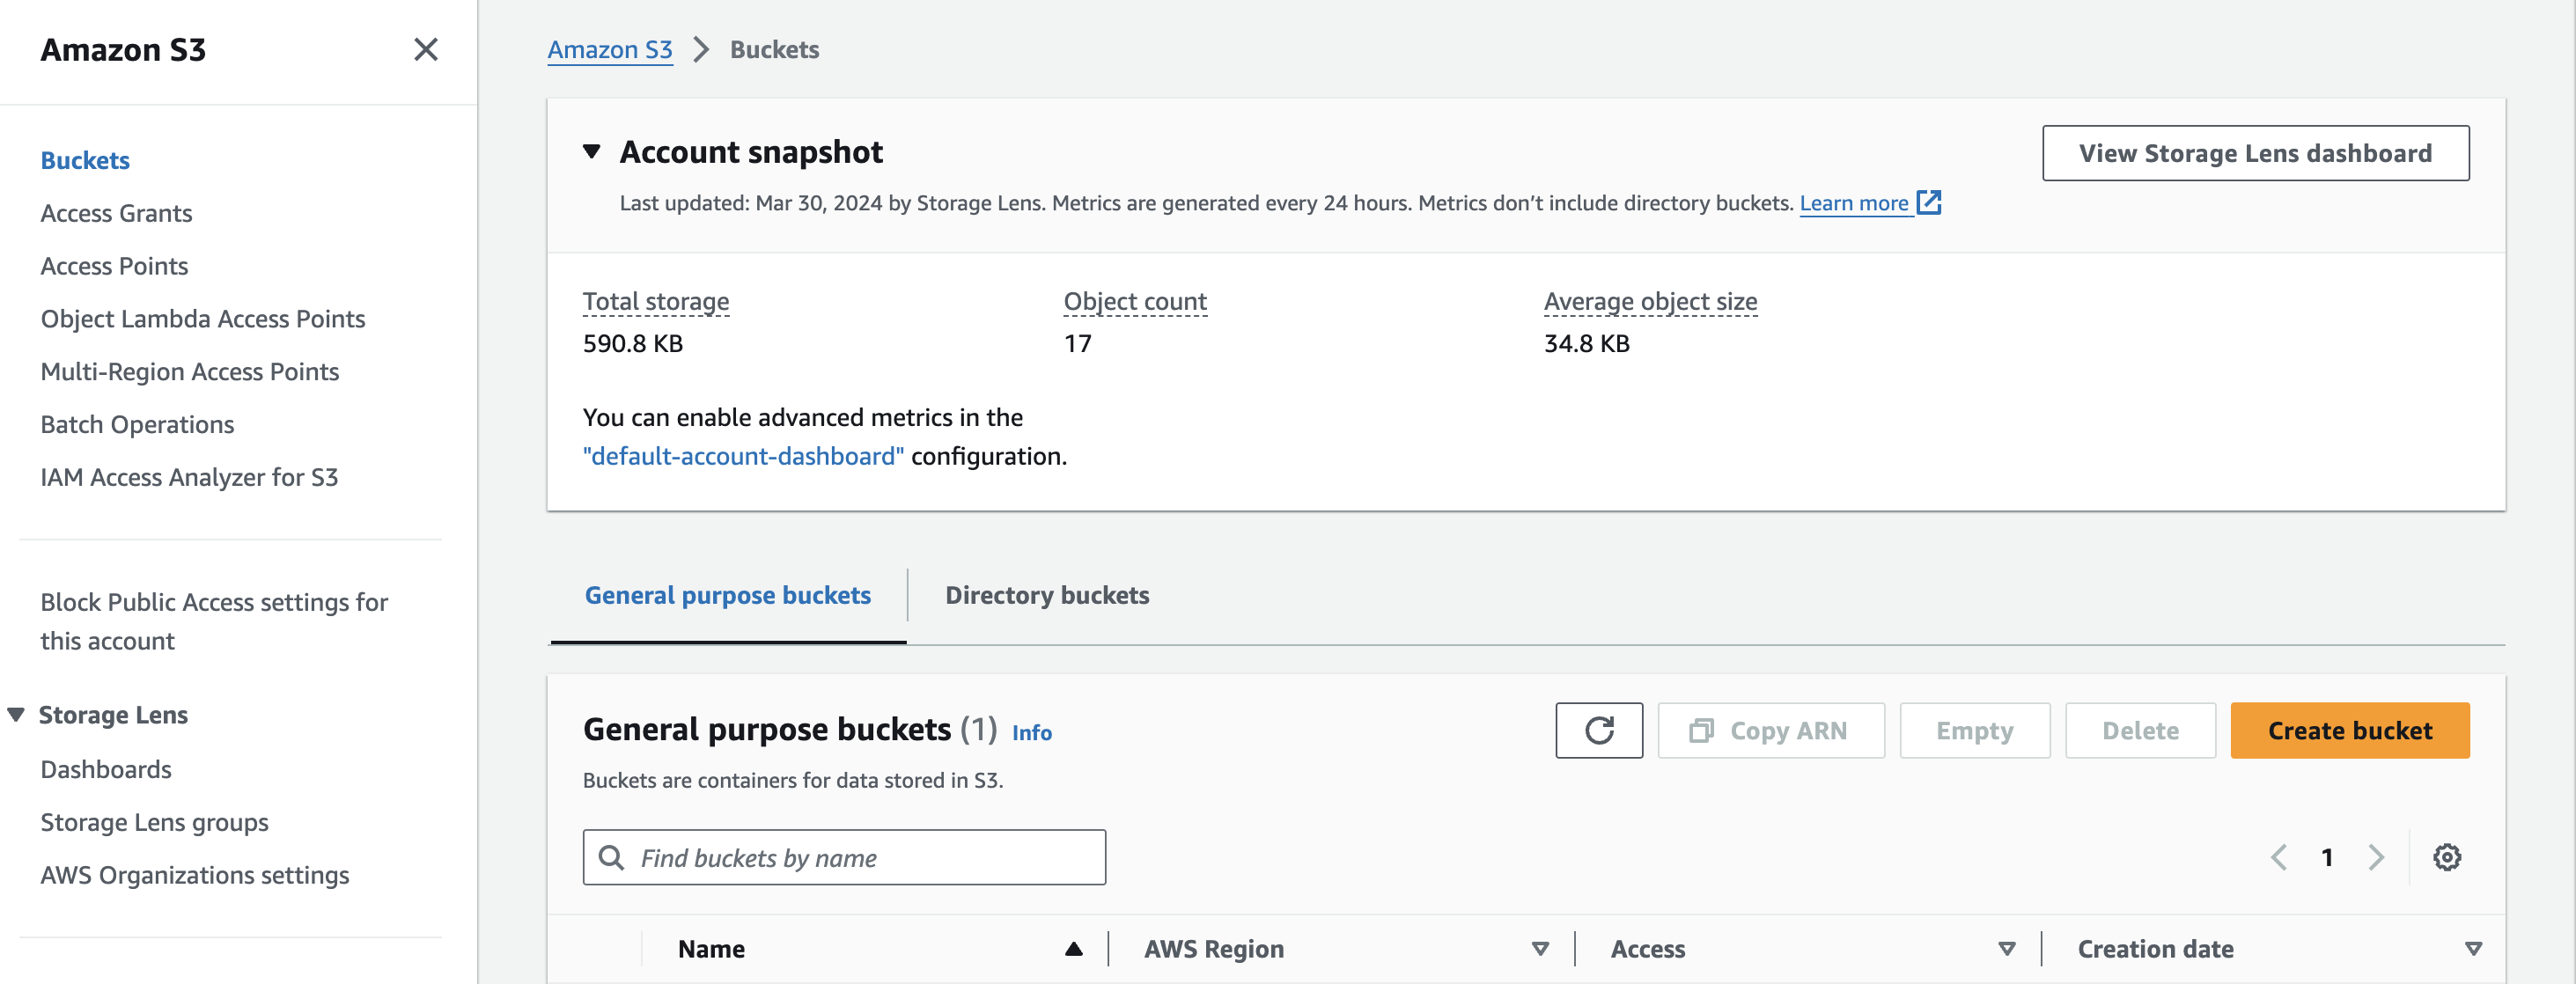
- Open the Amazon S3 console.
- Click on “Create bucket”.
- Enter a unique bucket name and select the desired region.
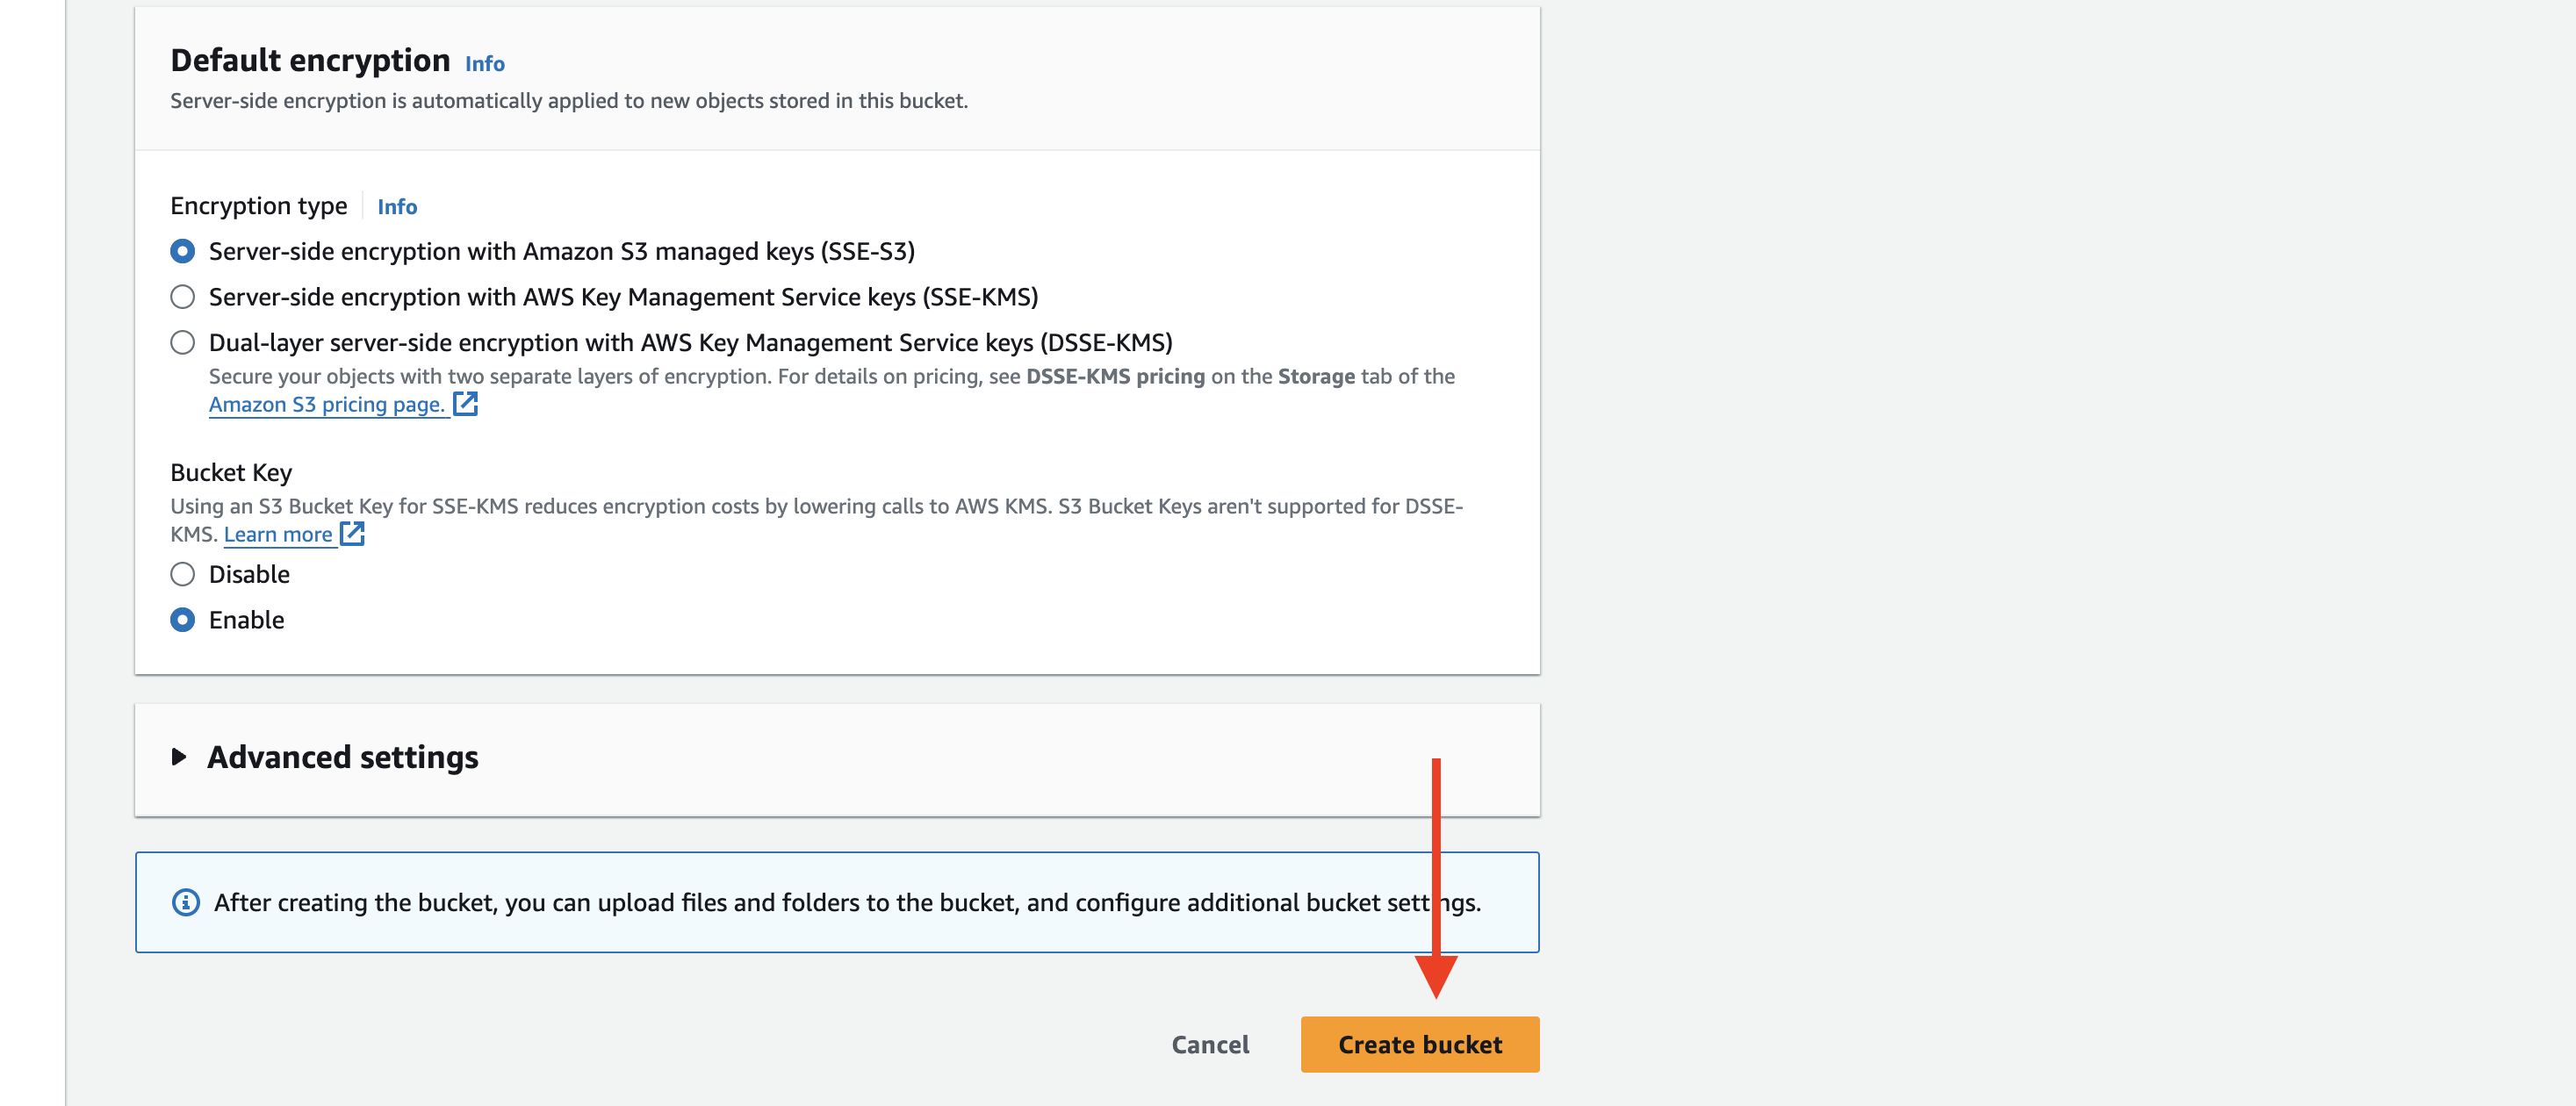
- Configure the bucket settings as per your requirements (e.g., block public access, versioning).
- Click on “Create bucket”.
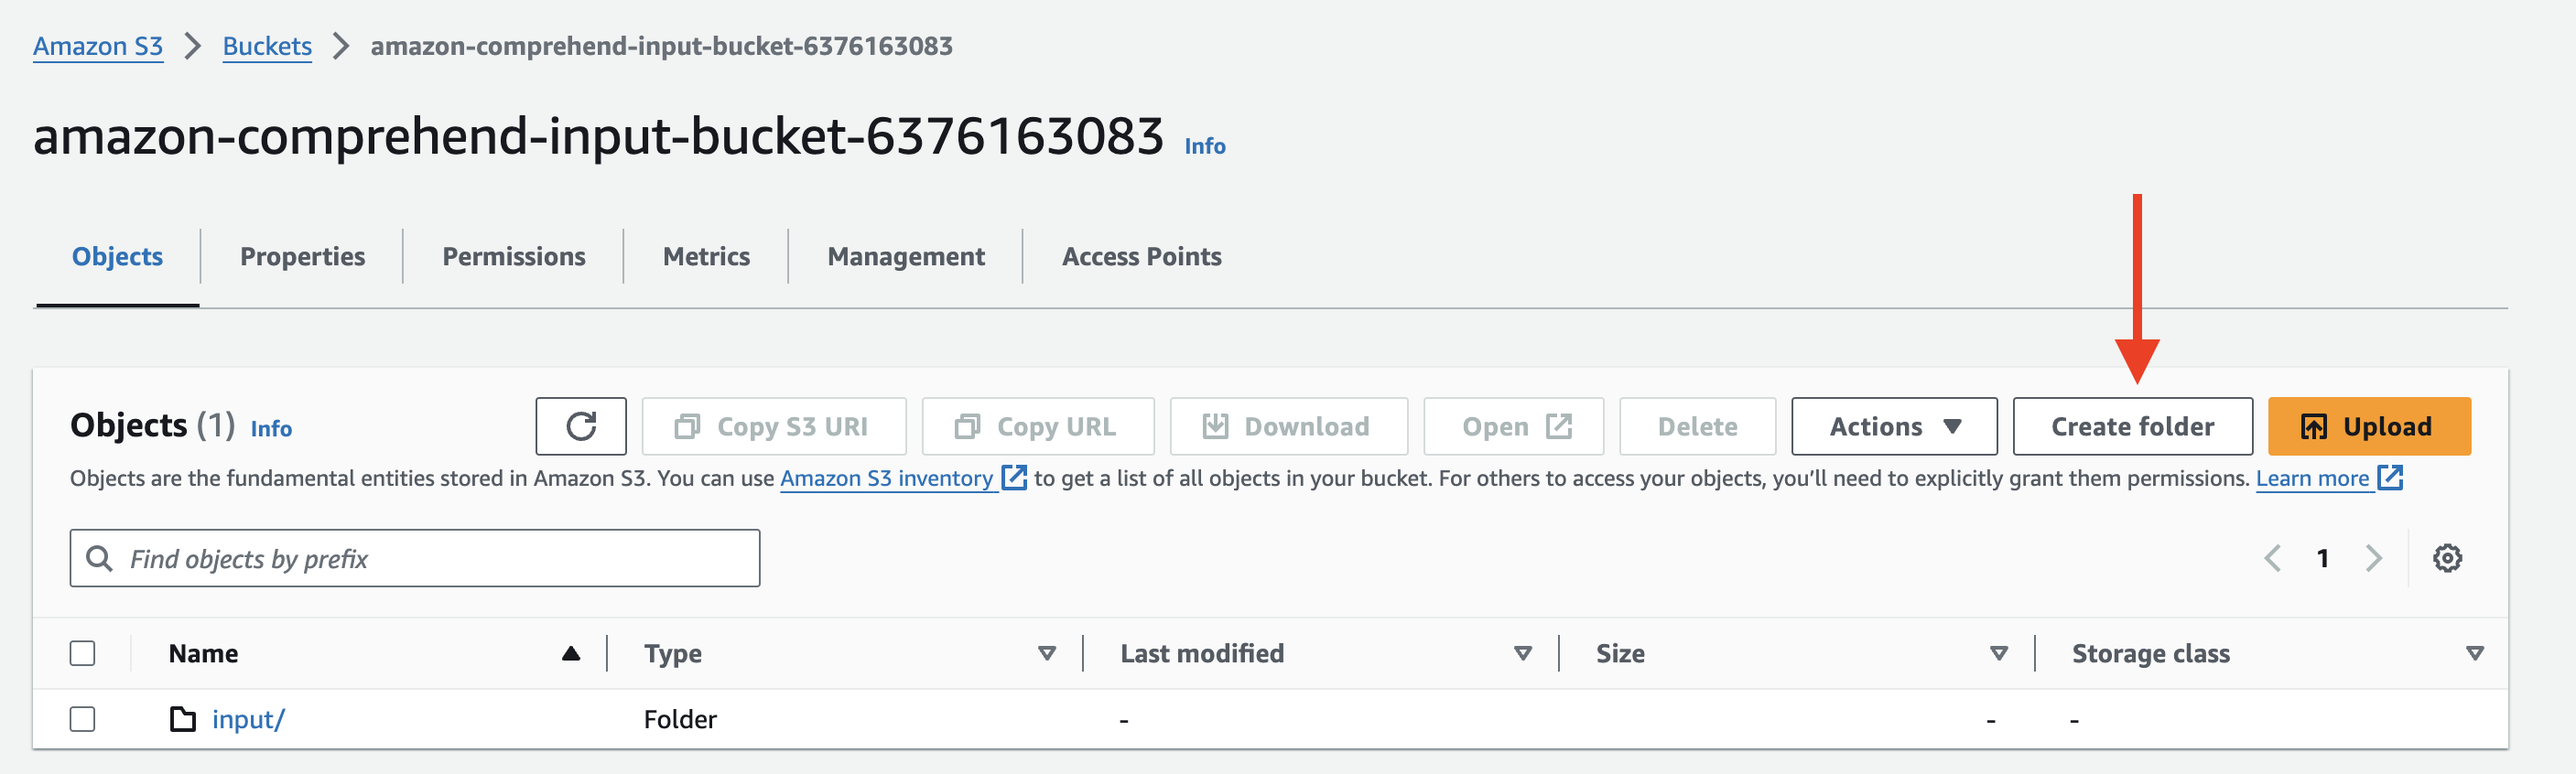
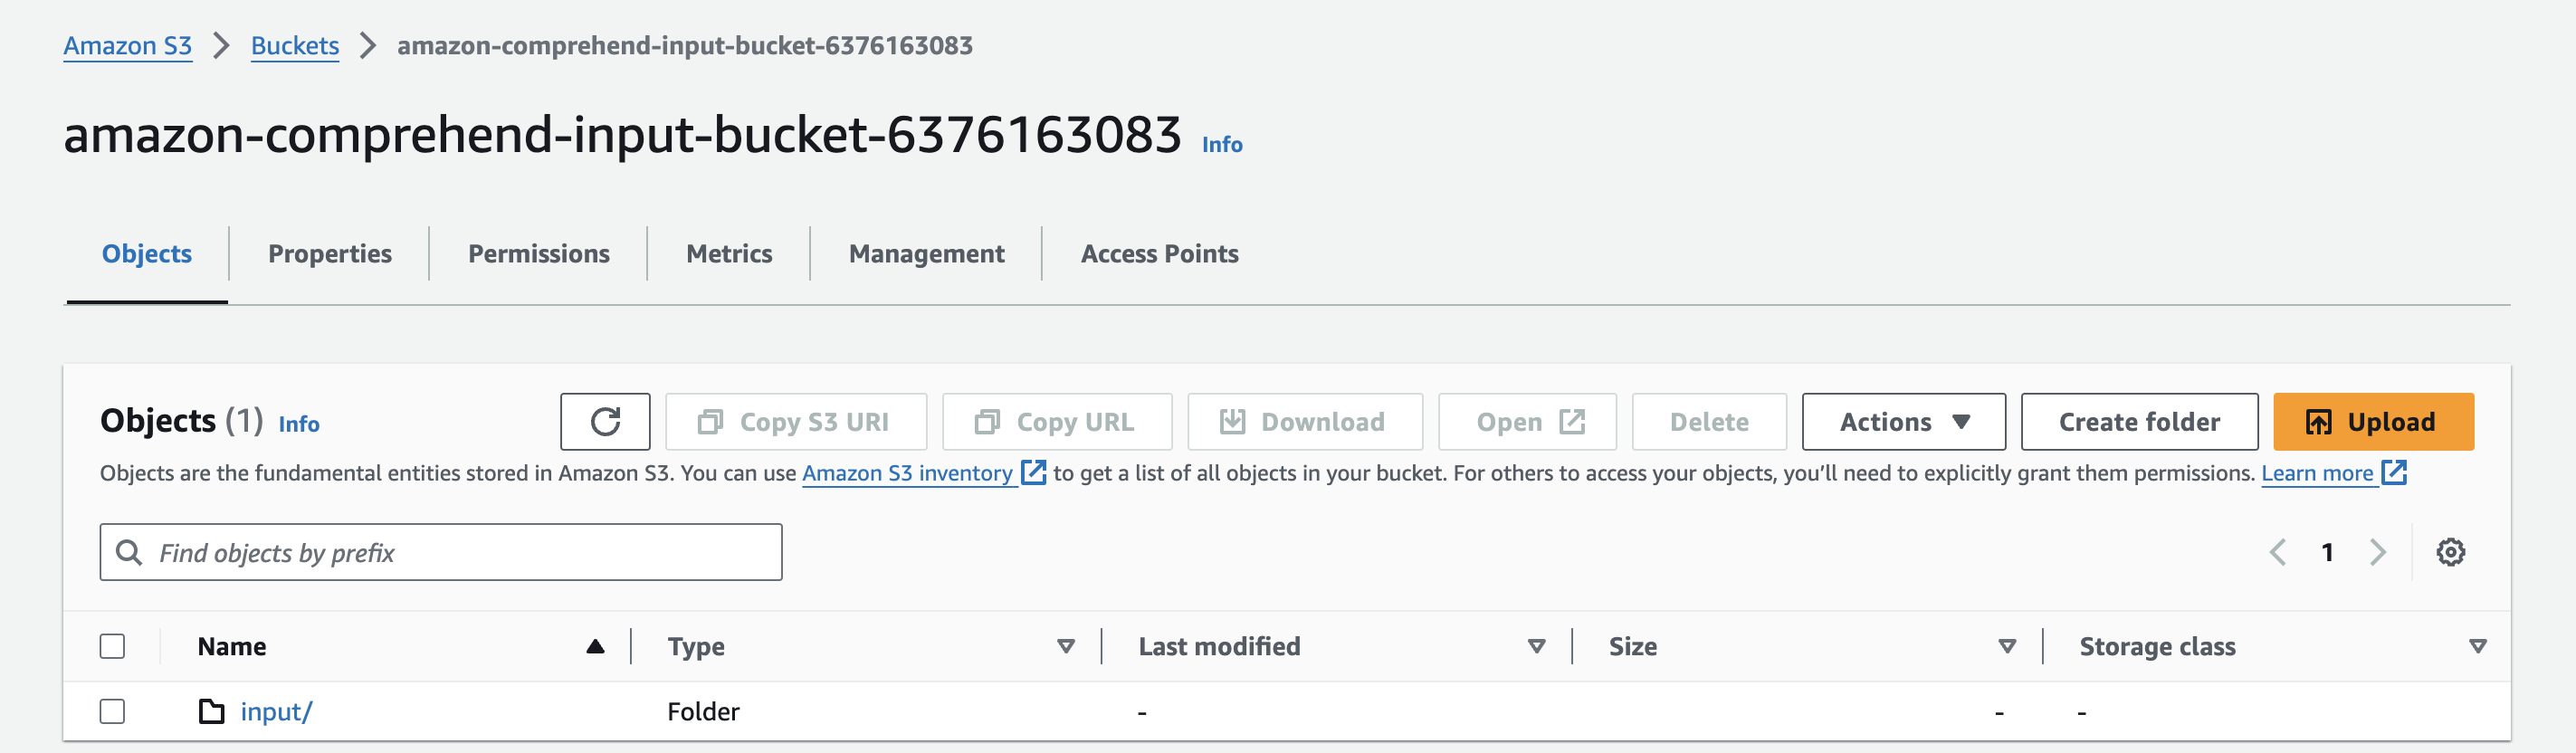
Let’s create separate folders for input and output data to streamline our analysis process.
- Open the IAM console.
- Click on “Roles” in the left sidebar and then click “Create role”.

- Select “AWS service” and choose “Lambda” as the use case.
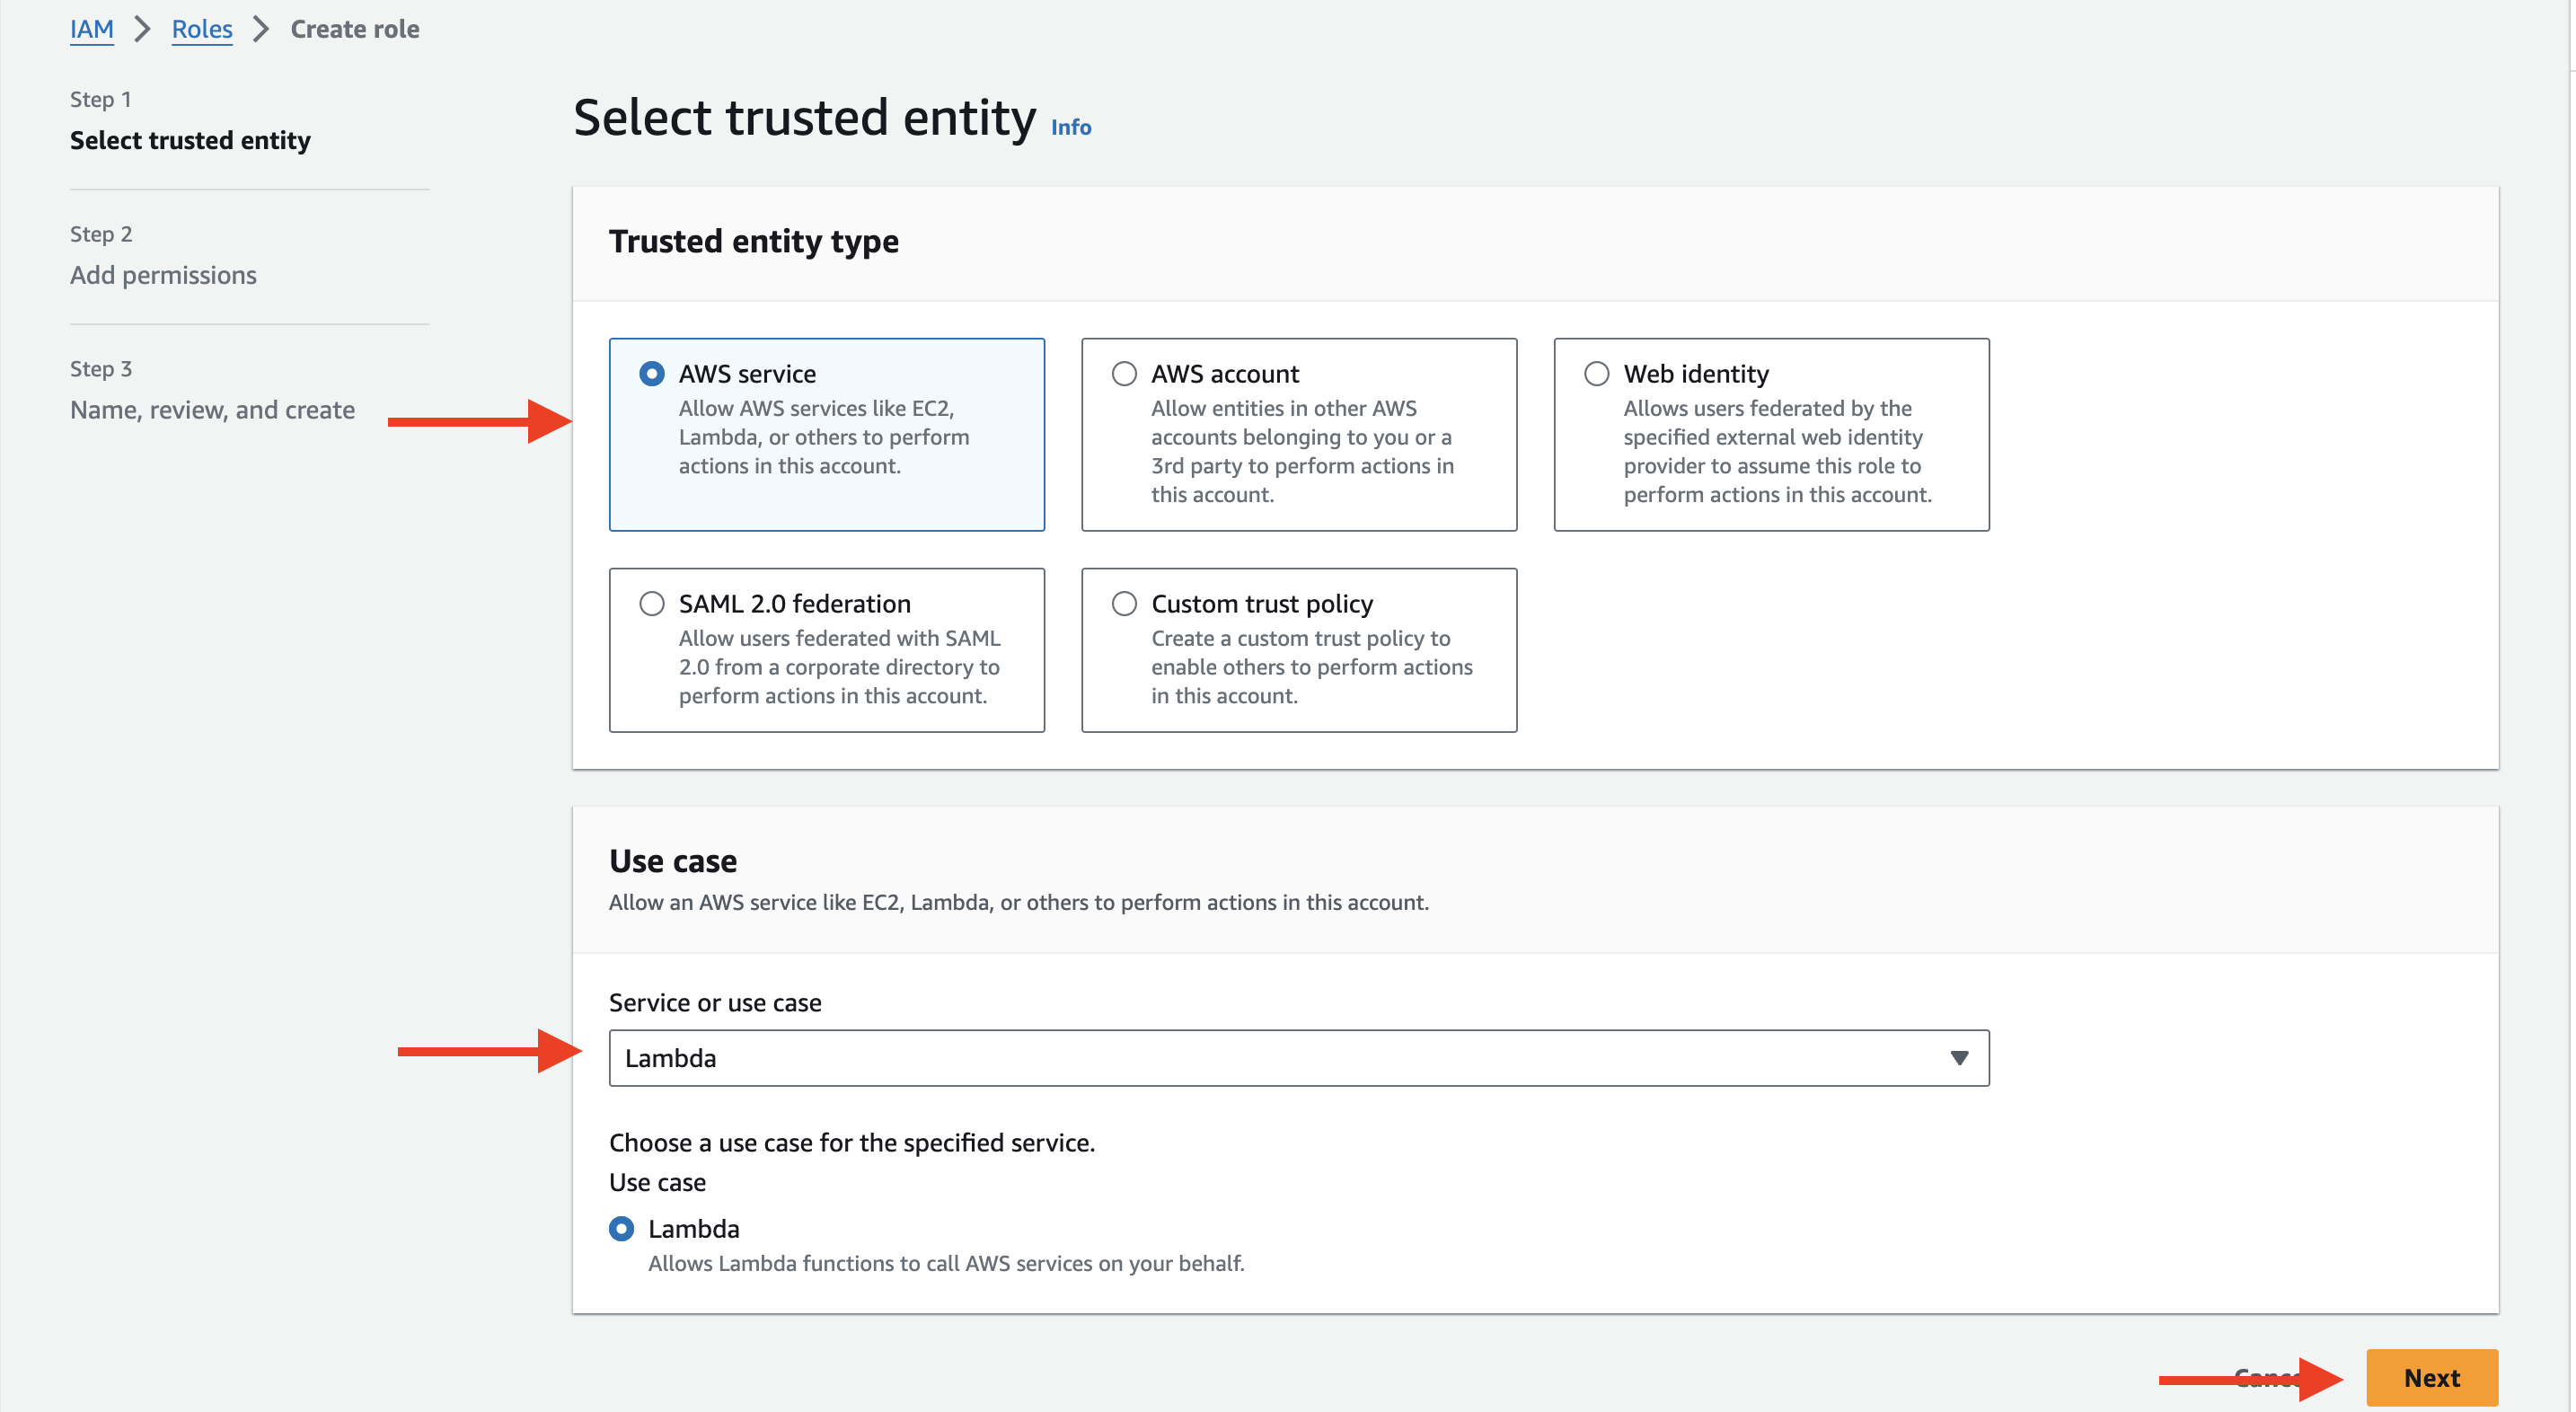
- Click “Next: Permissions”.
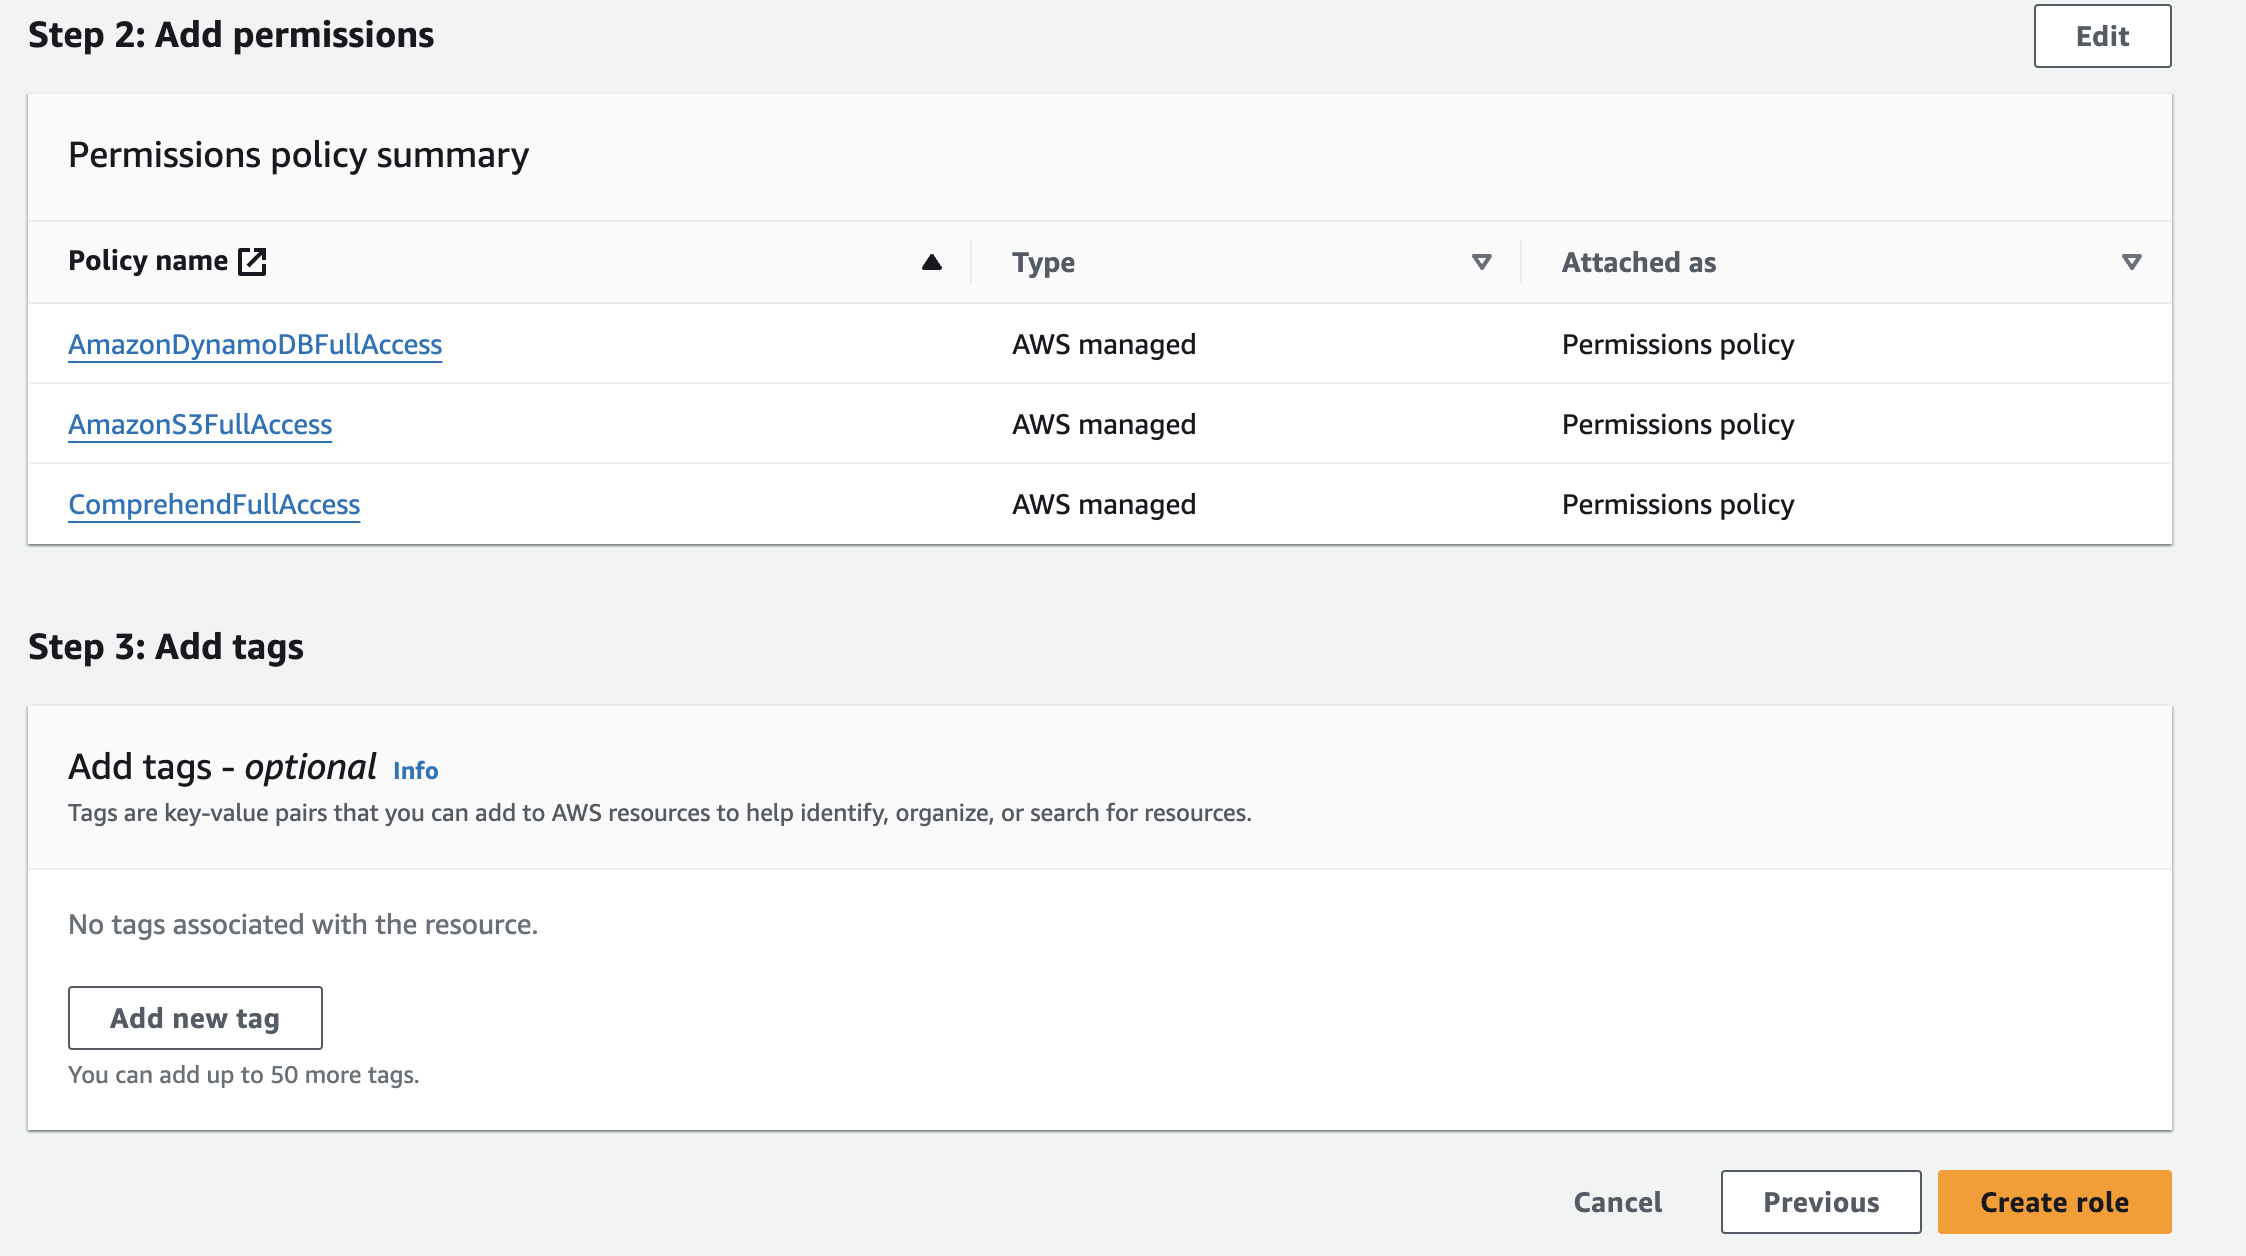
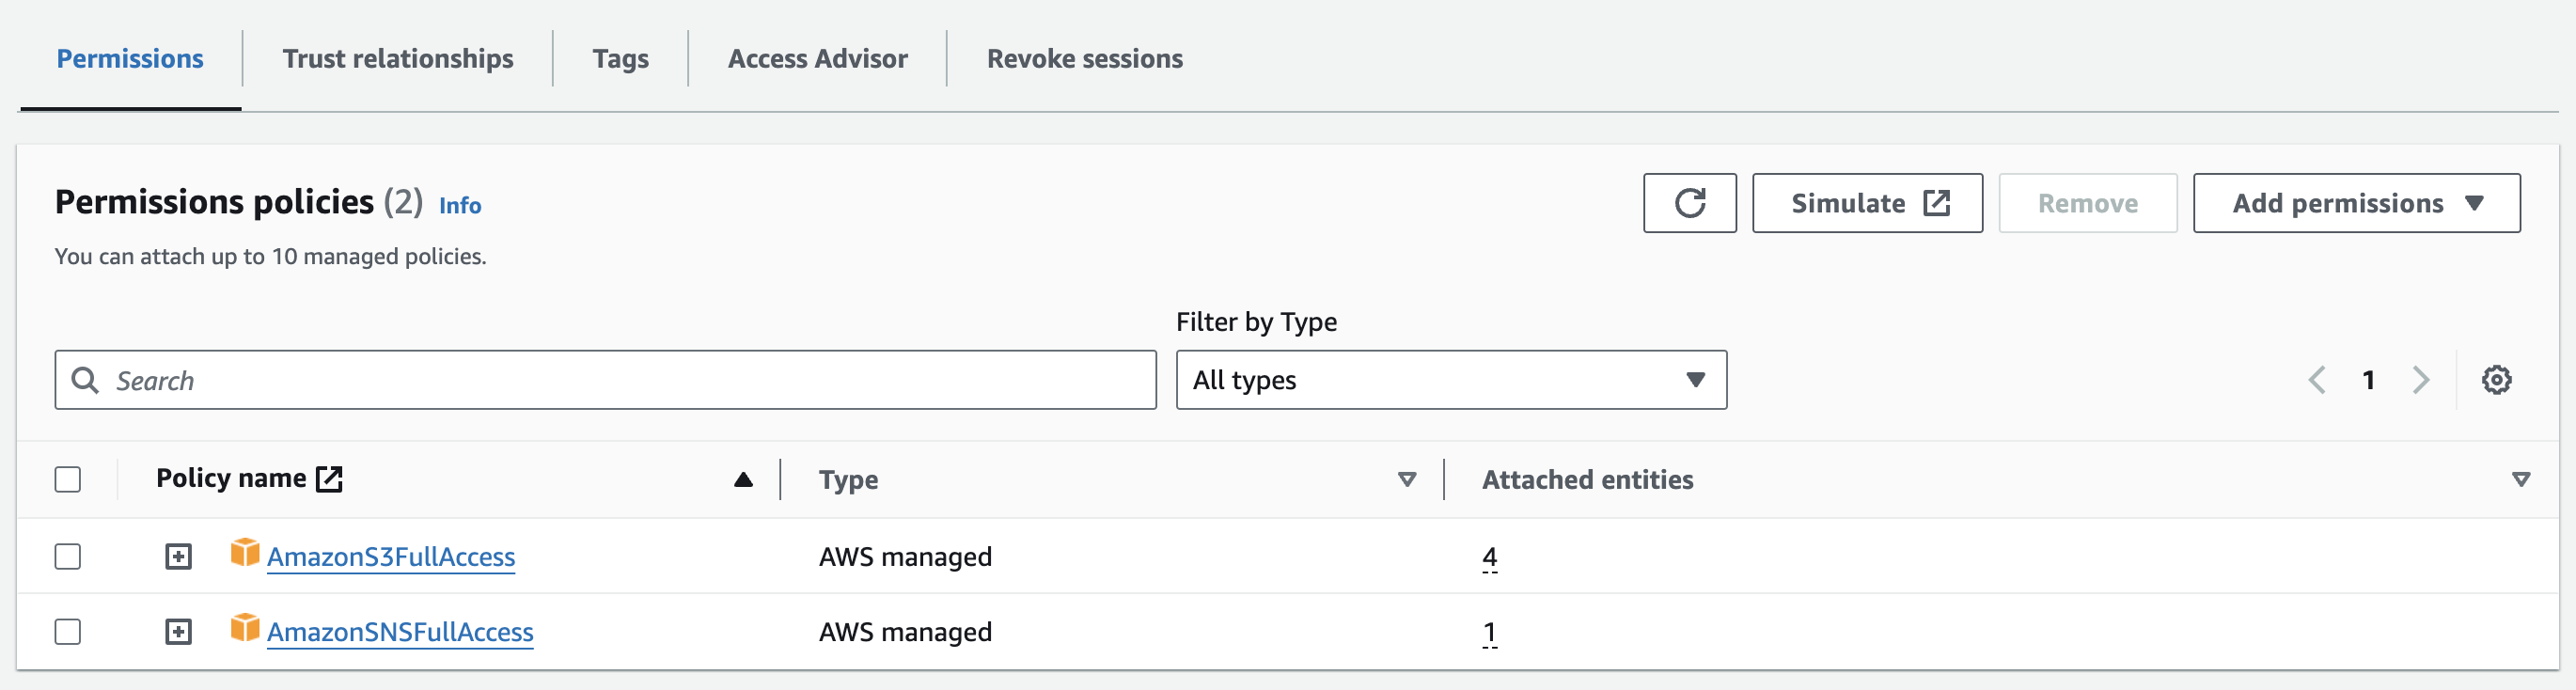
- Attach the necessary permissions policies (e.g., AmazonS3FullAccess, ComprehendFullAccess).
- Click “Next: Tags” and optionally add tags.
- Click “Next: Review”, provide a role name, and click “Create role”.
Now let’s create IAM permissions for Comprehend
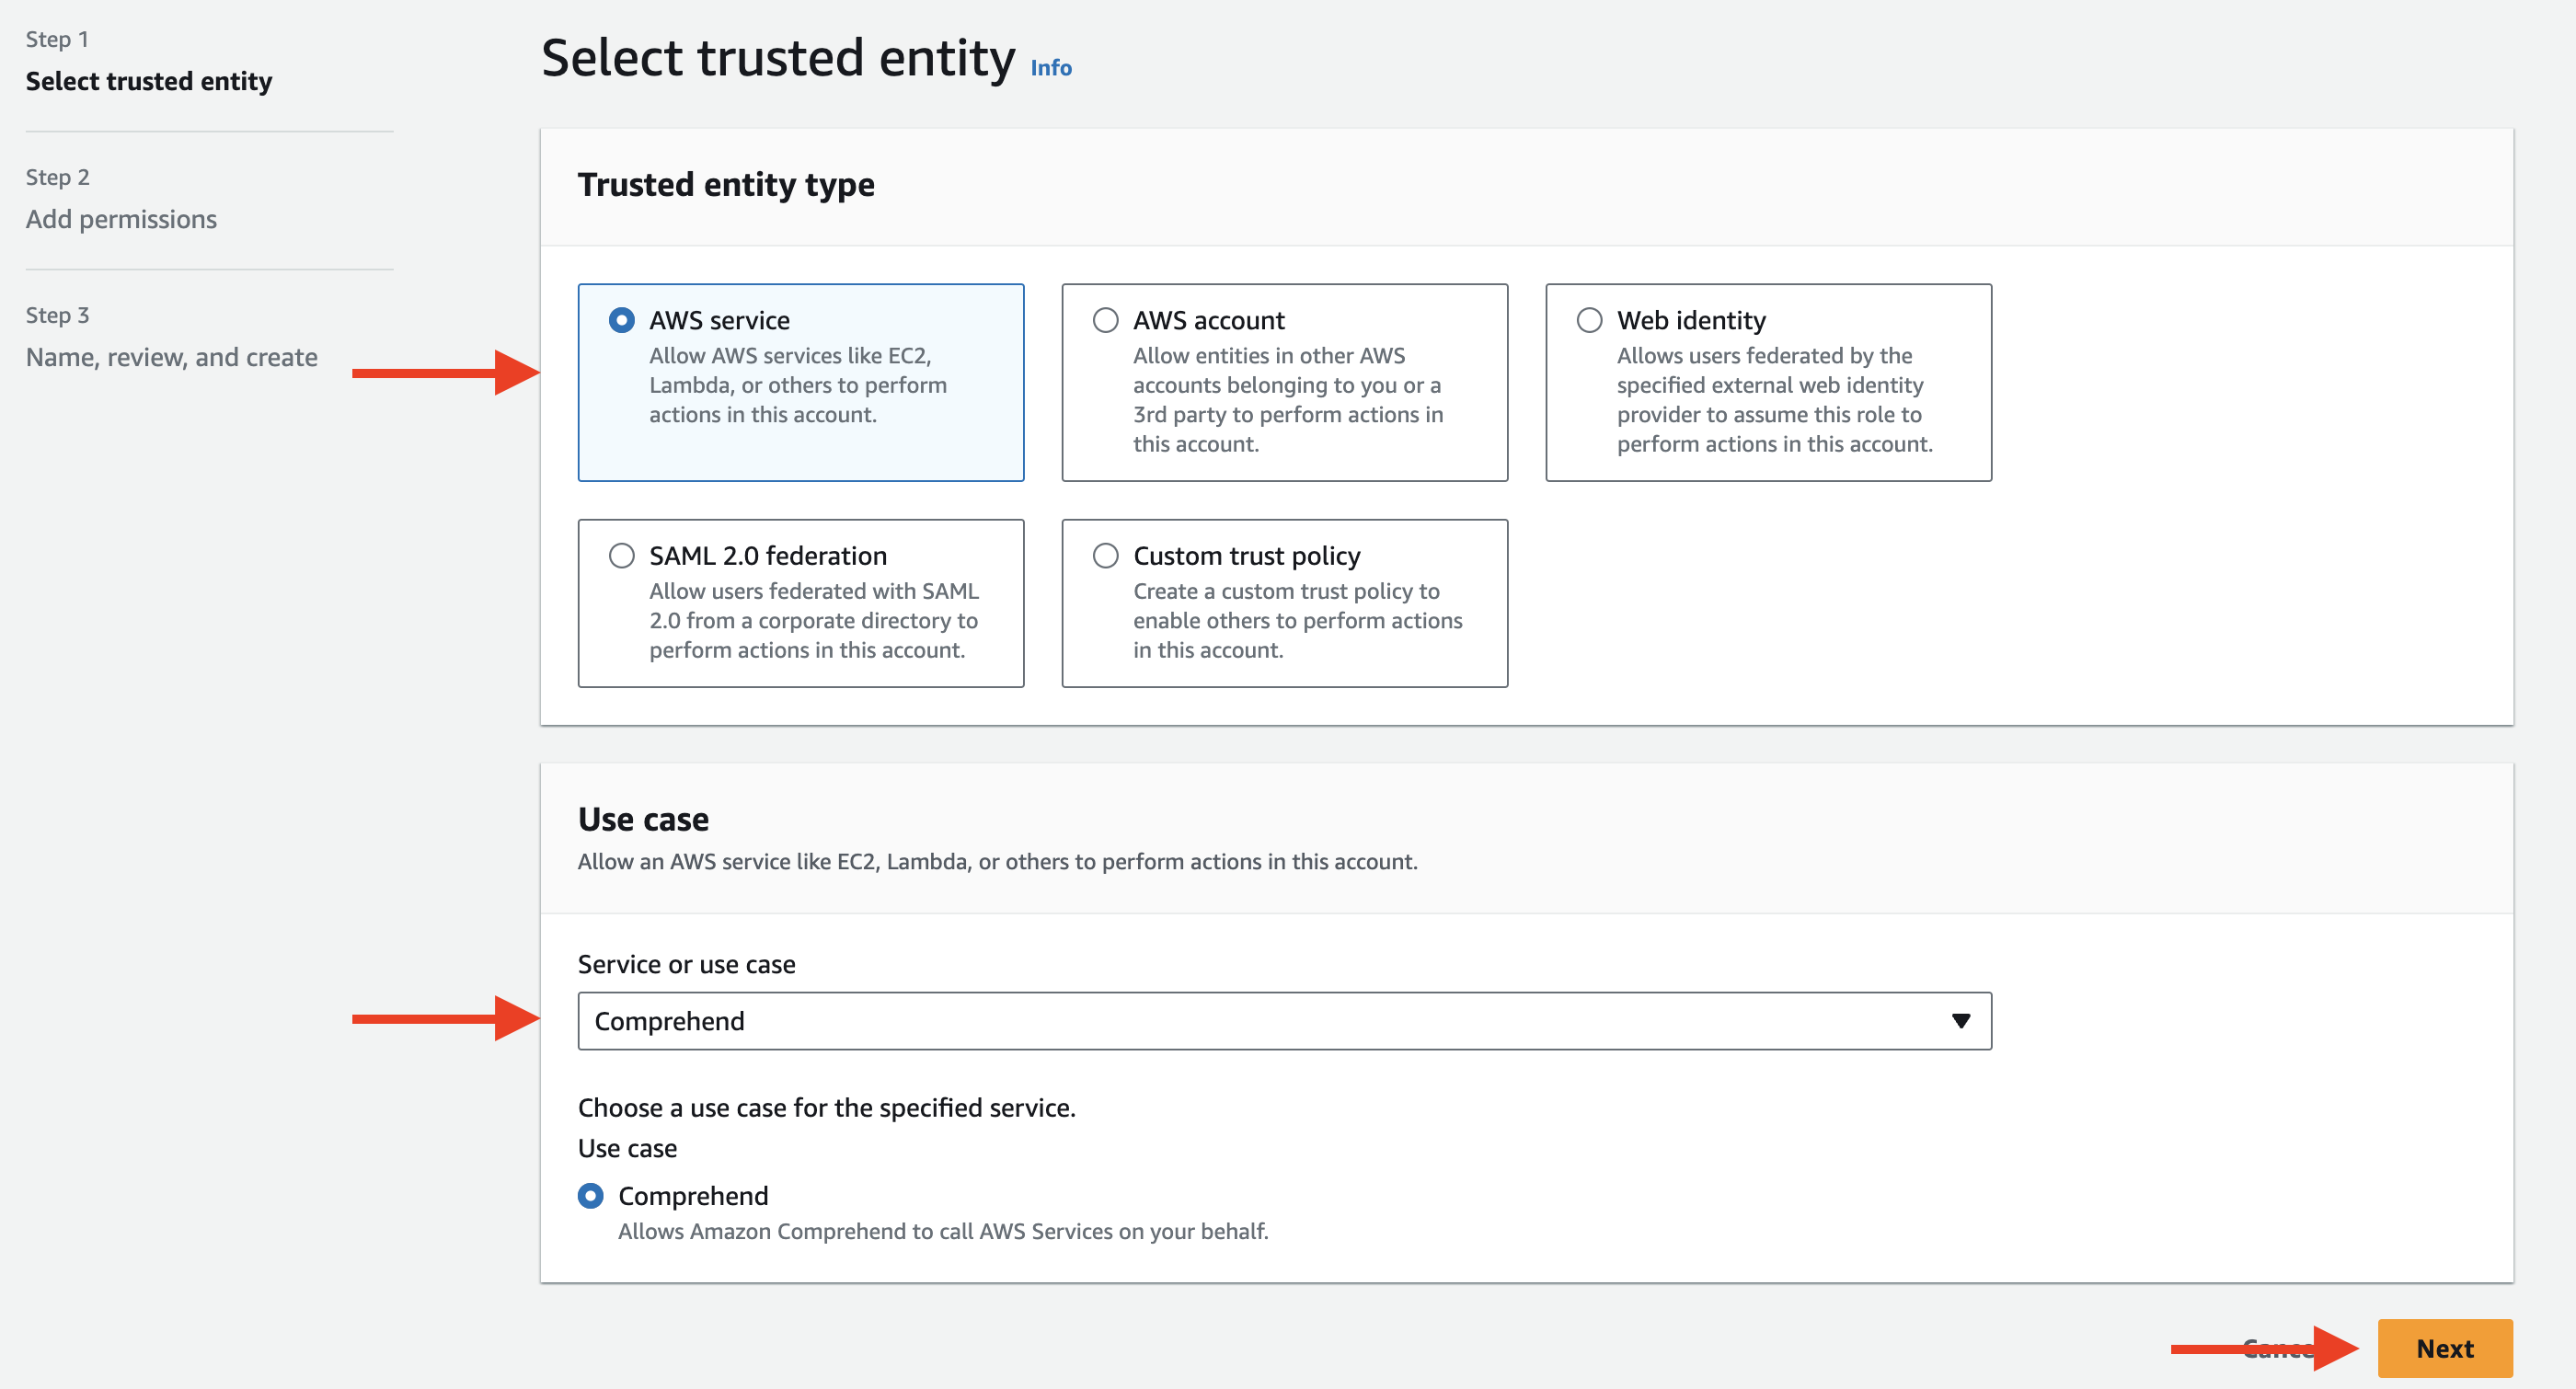
Here is the IAM role for Comprehend access to S3 also we will need the ARN for our Lambda function.
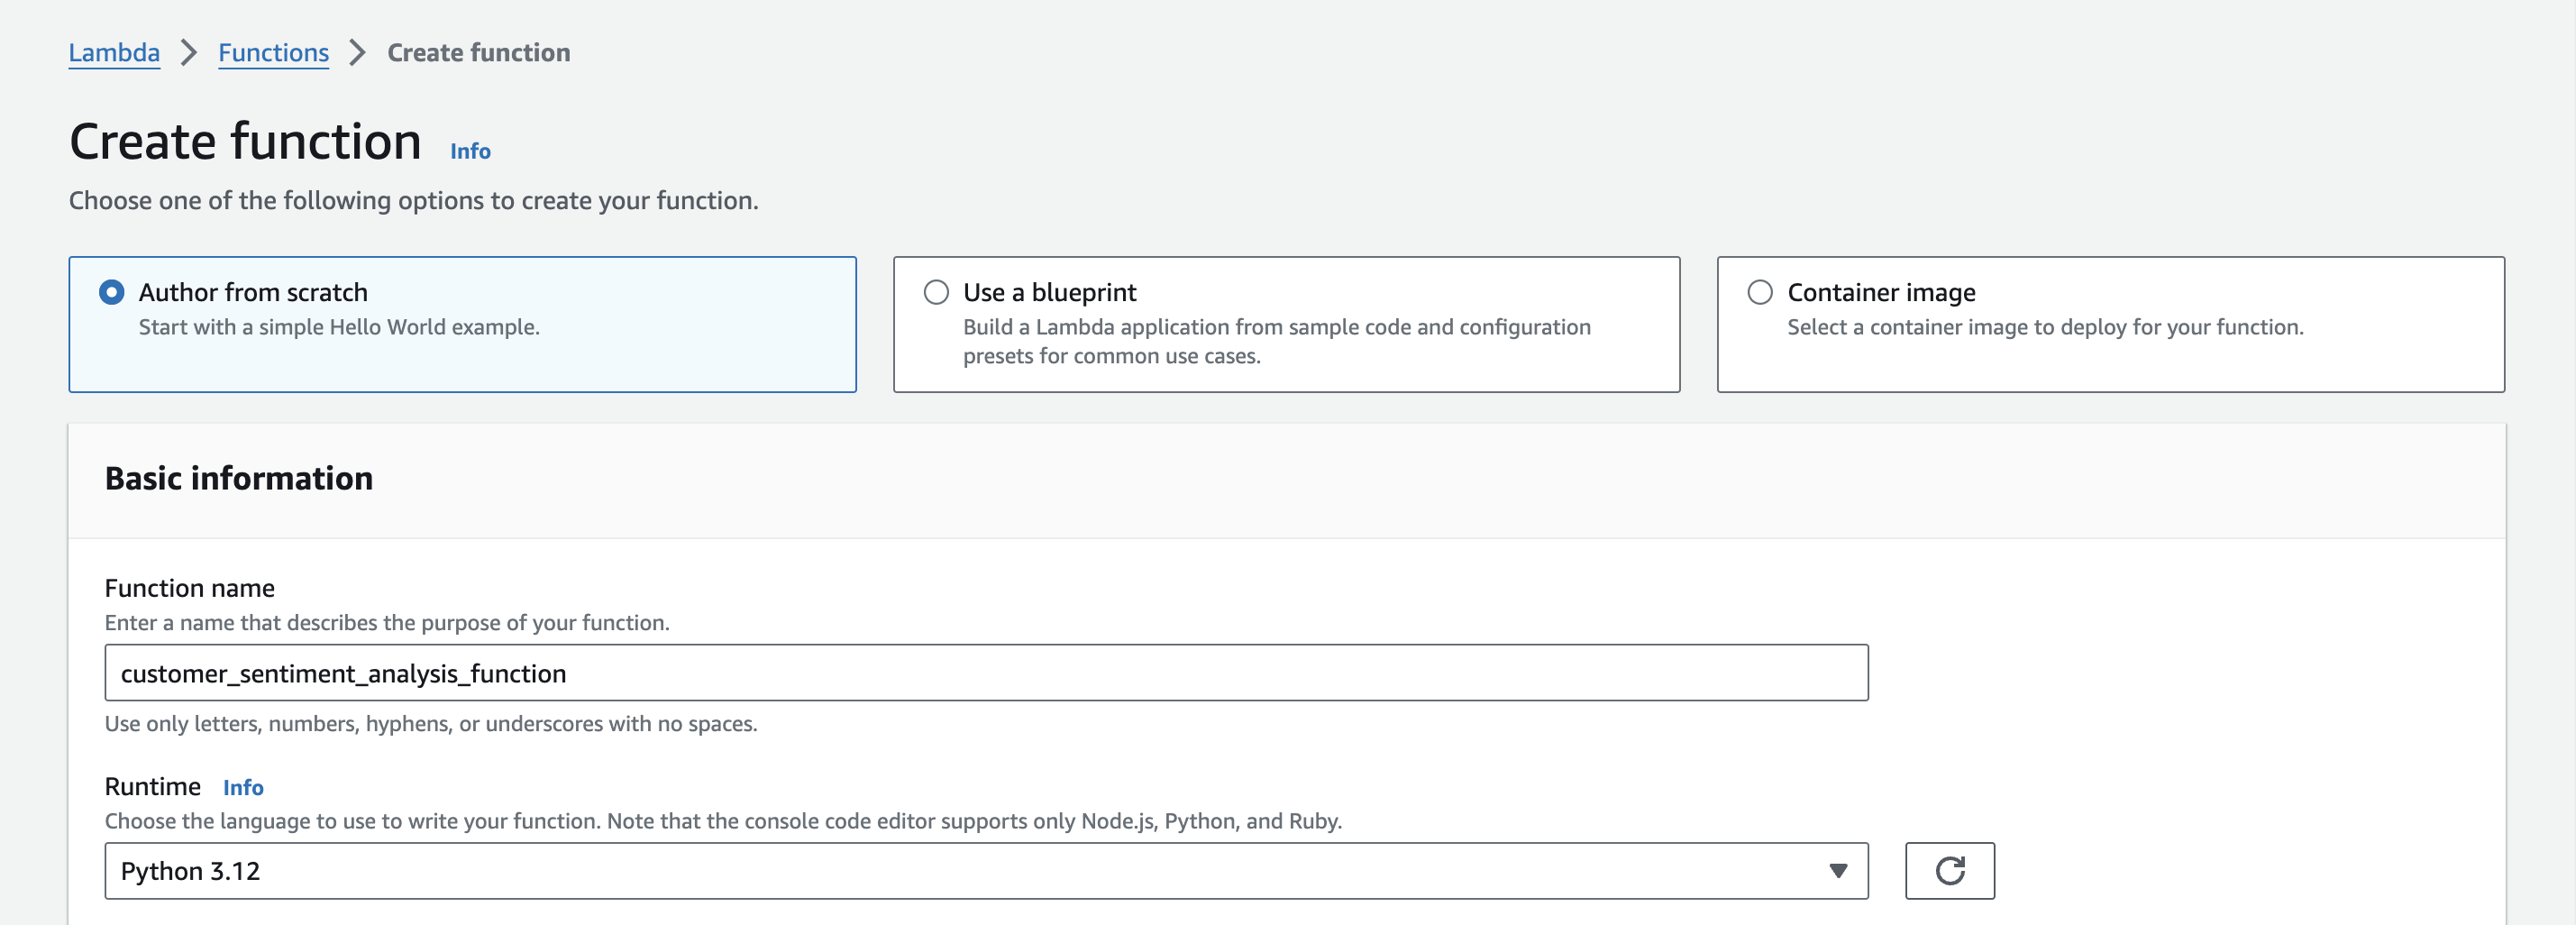
- Open the AWS Lambda console.
- Click on “Create function”.
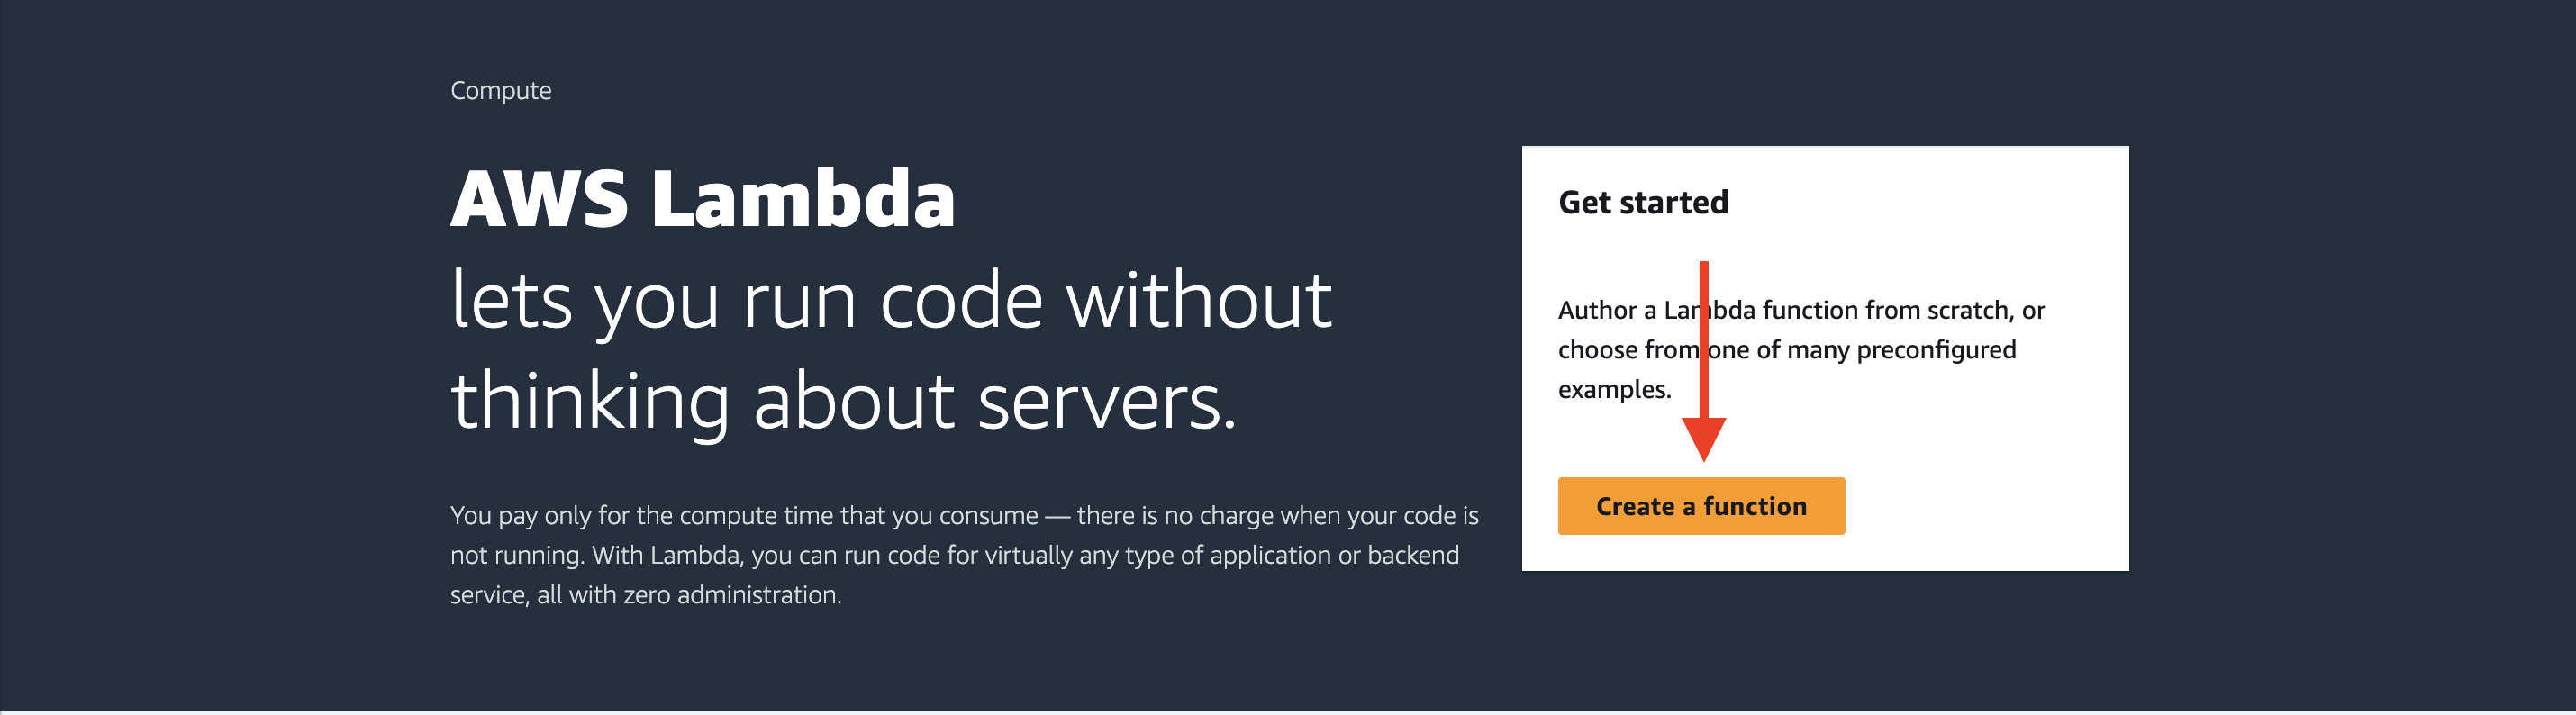
- Choose “Author from scratch”.
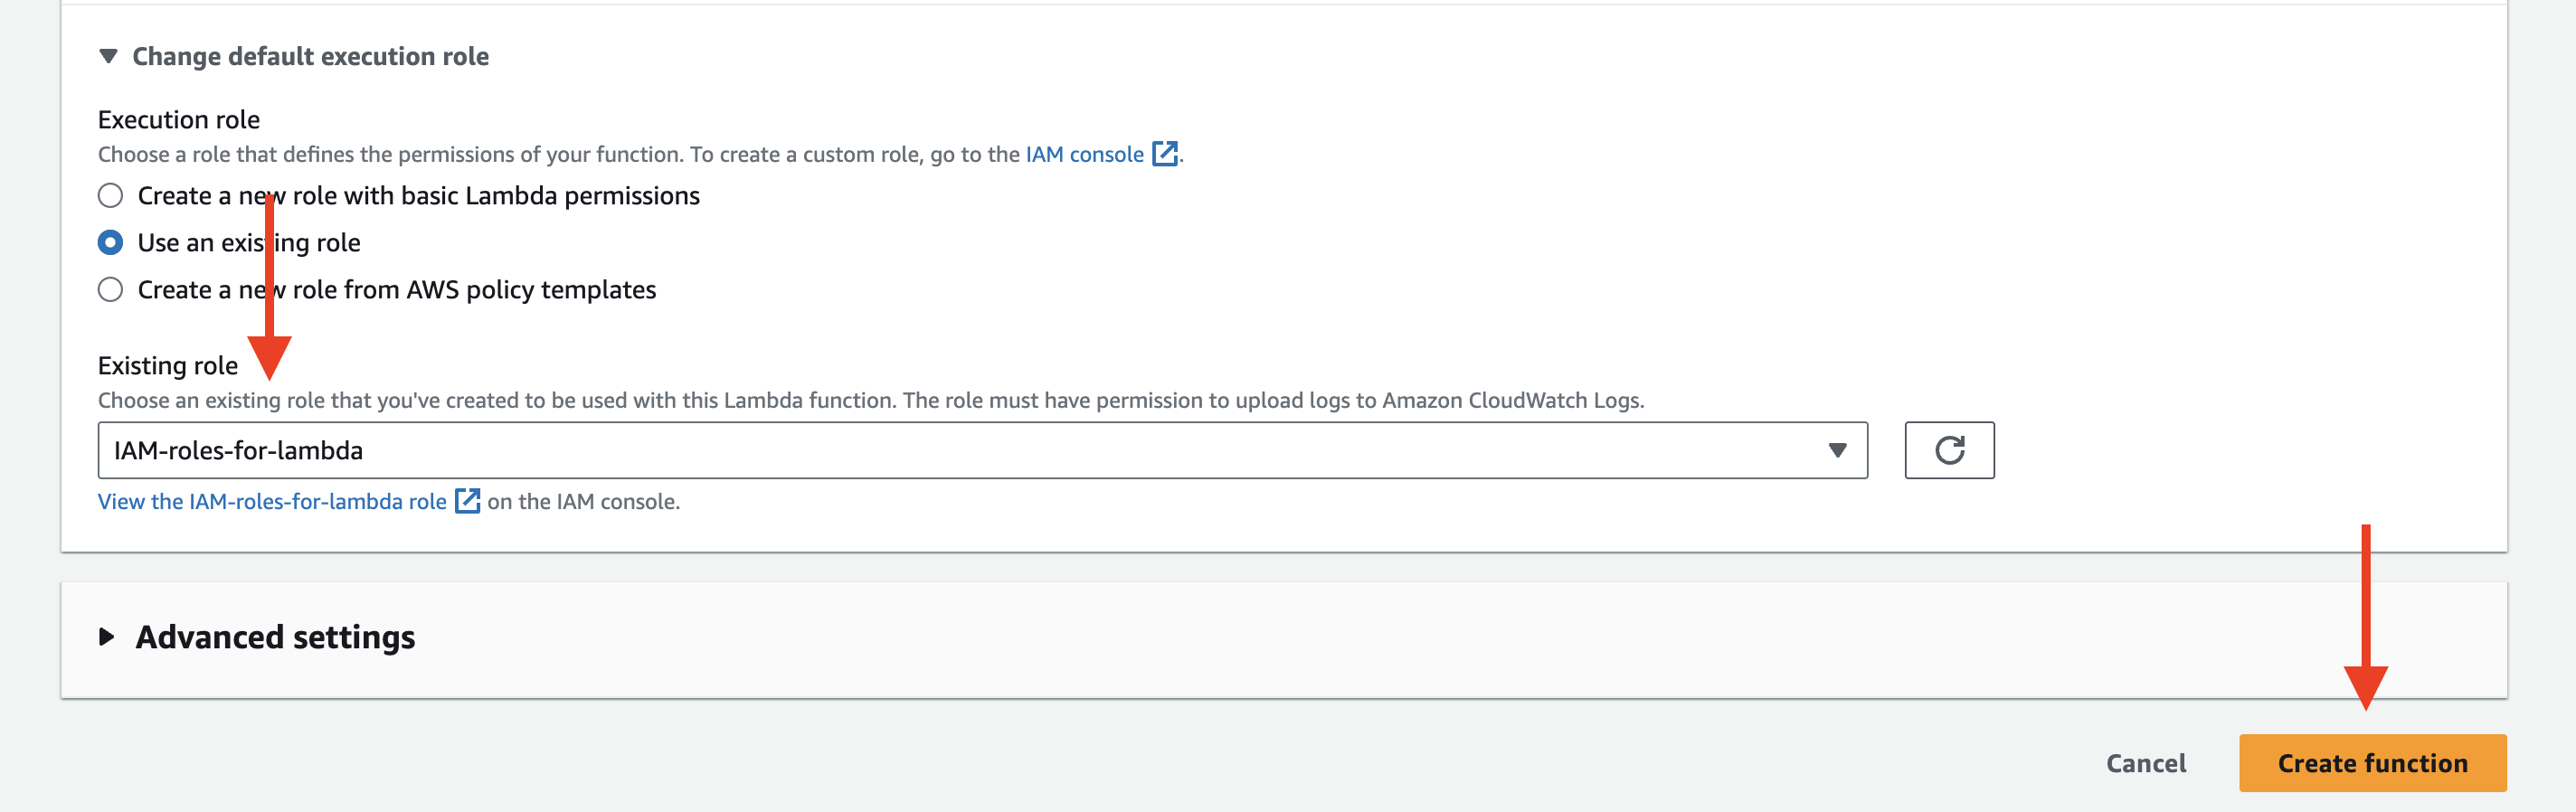
- Enter a function name, select the desired runtime (e.g., Python), and choose the IAM role created in Step 2.
- Click “Create function”.
- In the function code editor, paste your Lambda function code.
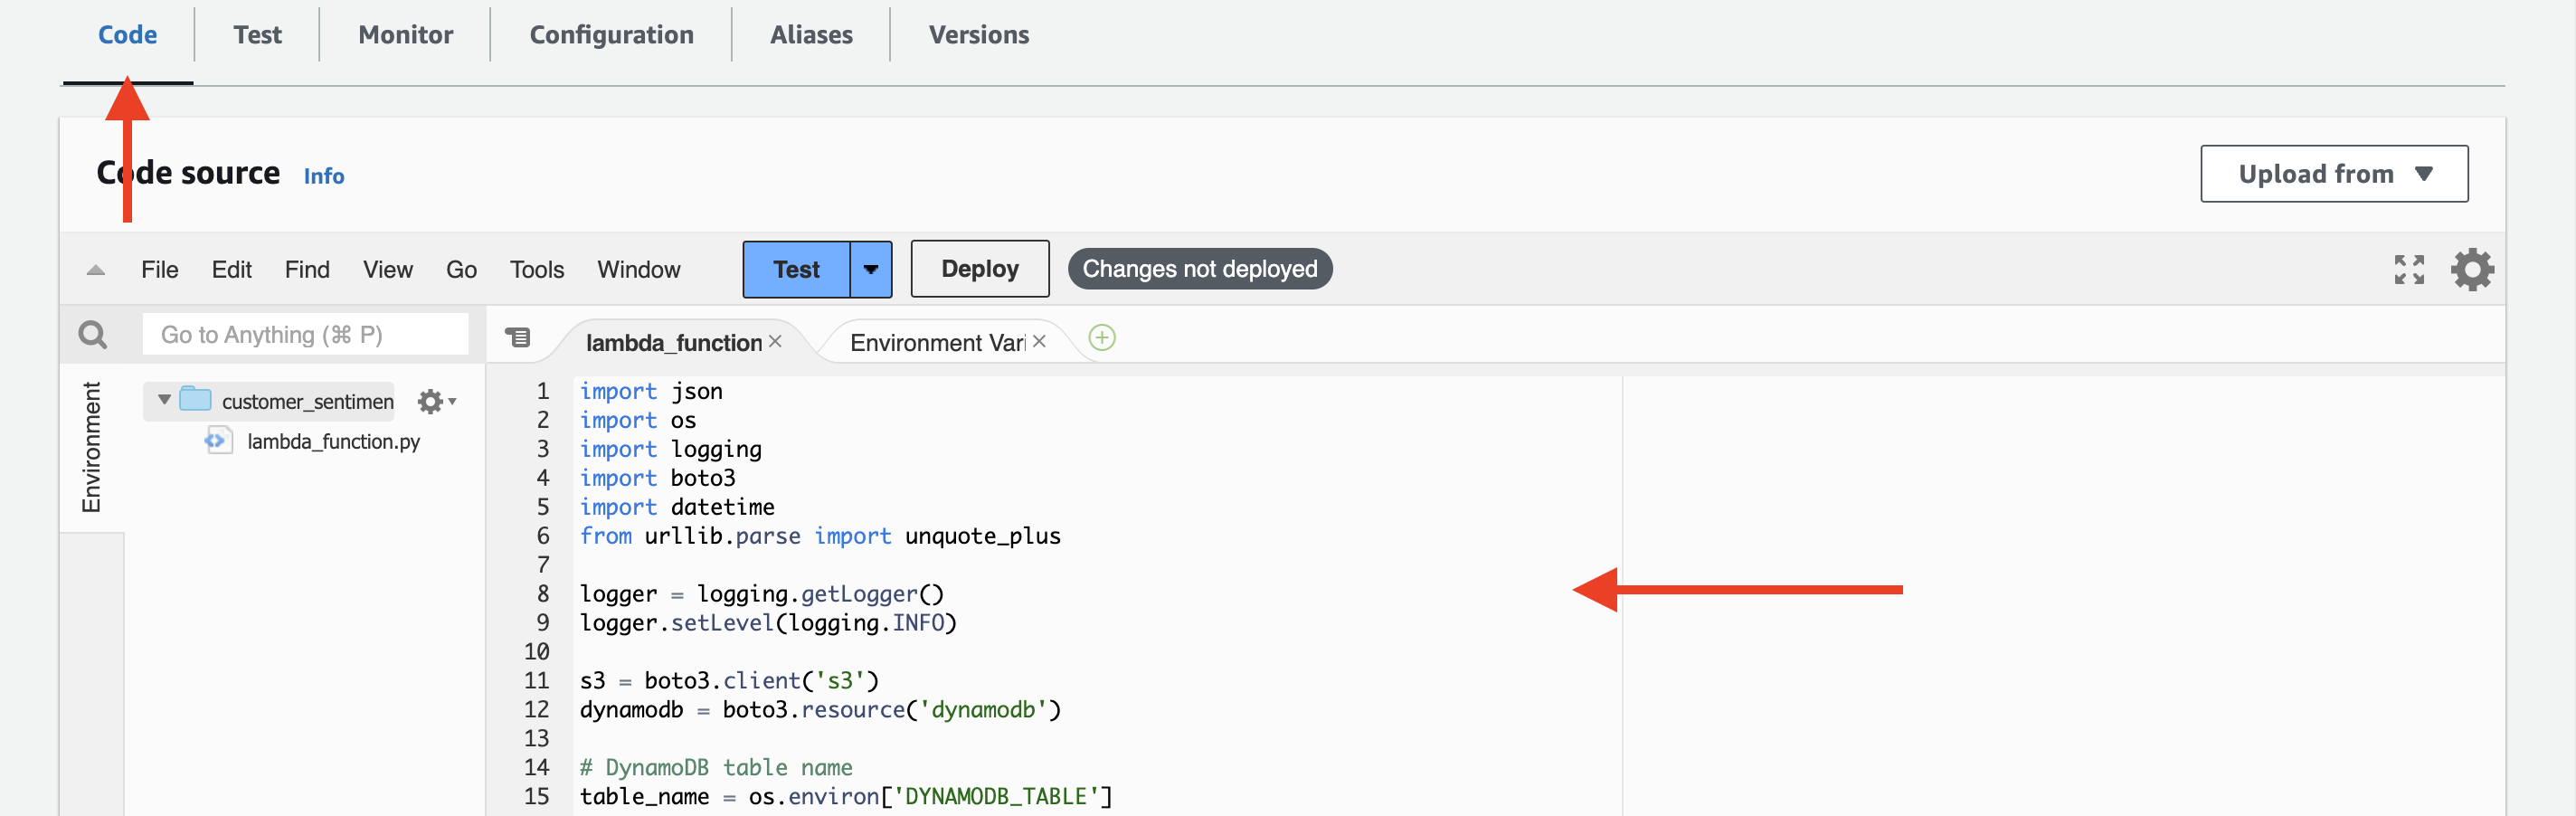 Here is the entire lambda function:
import json
import os
import logging
import boto3
from urllib.parse import unquote_plus

logger = logging.getLogger()
logger.setLevel(logging.INFO)

s3 = boto3.client('s3')
comprehend = boto3.client('comprehend')

output_bucket = os.environ['OUTPUT_BUCKET']

def lambda_handler(event, context):
    logger.info(event)

    for record in event['Records']:
        bucket = record['s3']['bucket']['name']
        key = unquote_plus(record['s3']['object']['key'])

        try:
            # Get the input file from S3
            response = s3.get_object(Bucket=bucket, Key=key)
            file_content = response['Body'].read().decode('utf-8')

            # Split the file content into individual reviews
            reviews = file_content.strip().split('\n')

            # Process each review
            sentiment_results = []
            for review in reviews:
                # Check if the review has a customer ID
                if '\t' in review:
                    customer_id, review_text = review.split('\t', 1)
                else:
                    customer_id = ''
                    review_text = review

                # Use Amazon Comprehend to detect sentiment
                sentiment_response = comprehend.detect_sentiment(Text=review_text, LanguageCode='en')

                # Extract the relevant sentiment data
                sentiment = sentiment_response['Sentiment']
                positive_score = sentiment_response['SentimentScore']['Positive']
                negative_score = sentiment_response['SentimentScore']['Negative']
                neutral_score = sentiment_response['SentimentScore']['Neutral']
                mixed_score = sentiment_response['SentimentScore']['Mixed']

                # Prepare the sentiment result
                sentiment_result = {
                    'CustomerId': customer_id,
                    'ReviewText': review_text,
                    'Sentiment': sentiment,
                    'PositiveScore': positive_score,
                    'NegativeScore': negative_score,
                    'NeutralScore': neutral_score,
                    'MixedScore': mixed_score
                }
                sentiment_results.append(sentiment_result)

            # Save the sentiment results to S3
            output_key = f"output/{os.path.splitext(os.path.basename(key))[0]}.json"
            s3.put_object(Body=json.dumps(sentiment_results), Bucket=output_bucket, Key=output_key)

            logger.info(f"Sentiment analysis completed for {key}. Results saved to {output_key}")

        except Exception as e:
            logger.error(f"Error processing {key}: {str(e)}")

    return {
        'statusCode': 200,
        'body': json.dumps('Sentiment analysis completed')
    }
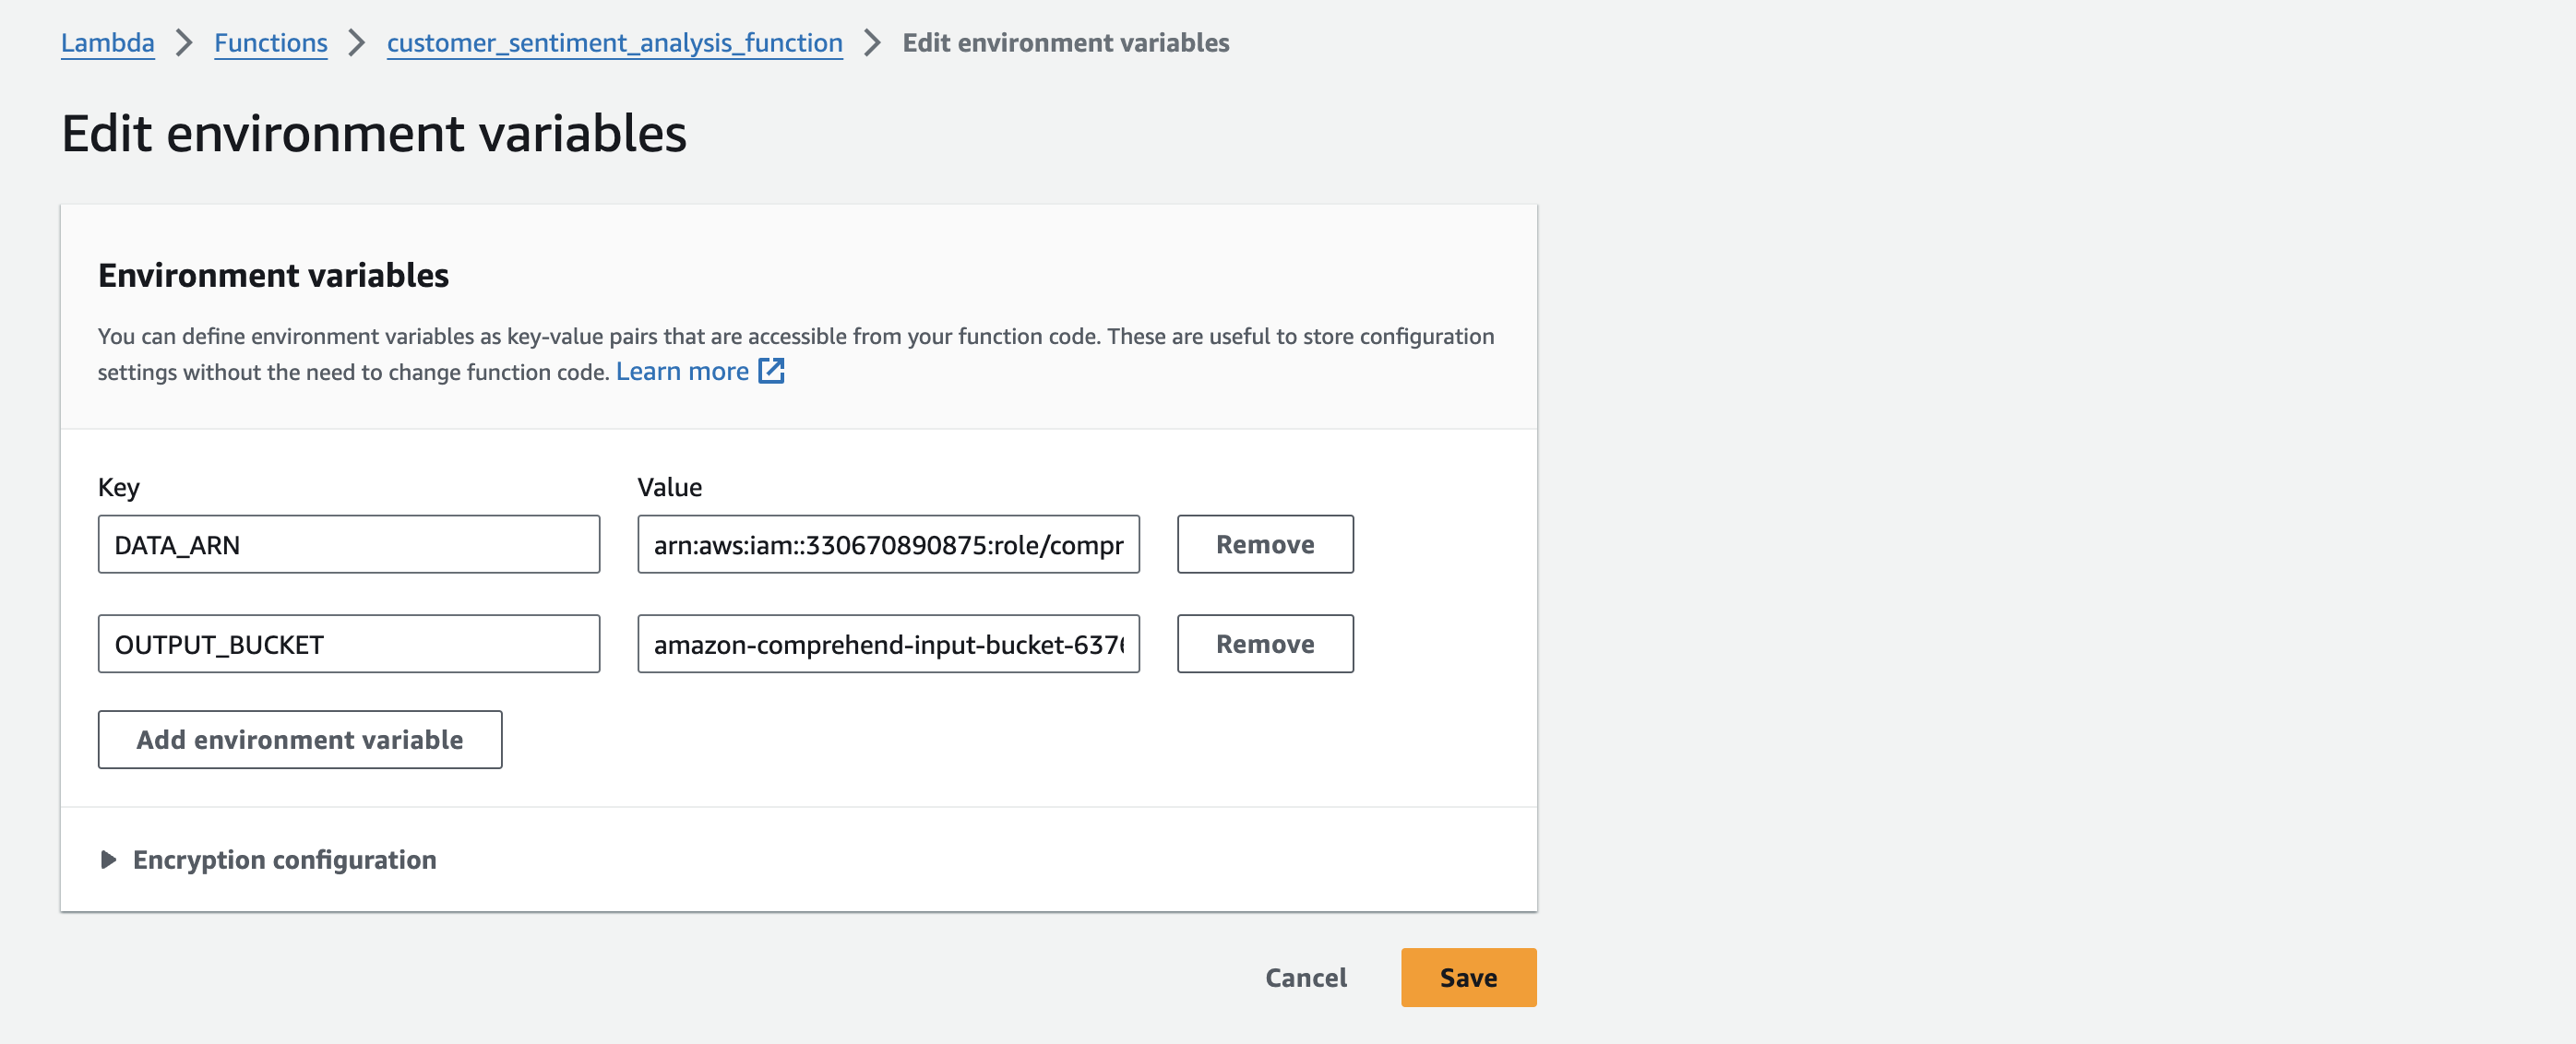
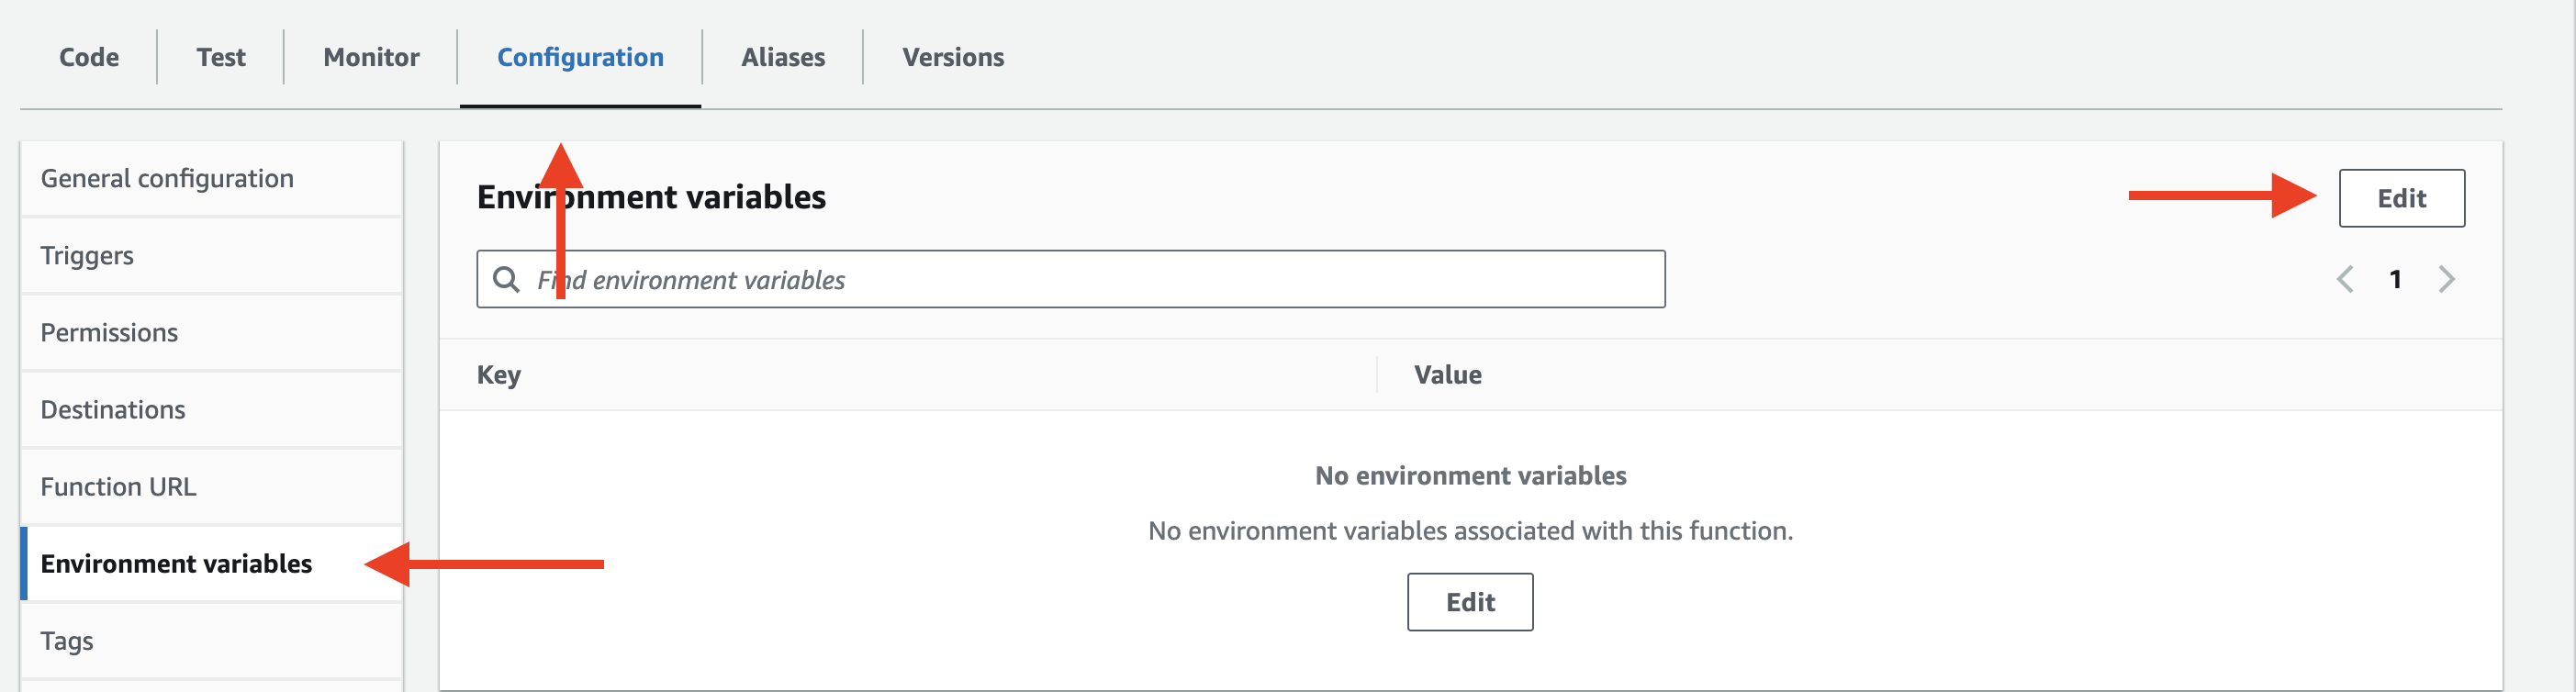
- Configure the function’s environment variables.
-
-
- Open the AWS Lambda console.
- Select your Lambda function.
- Go to the “Configuration” tab.
- In the “Environment variables” section, click on “Edit”.
- Add a new environment variable with the key
OUTPUT_BUCKETandOUTPUT_FOLDERand the value set to the name of your S3 Bucket and output/ folder. - Click “Save”.

-
- Click “Deploy” to save the changes.
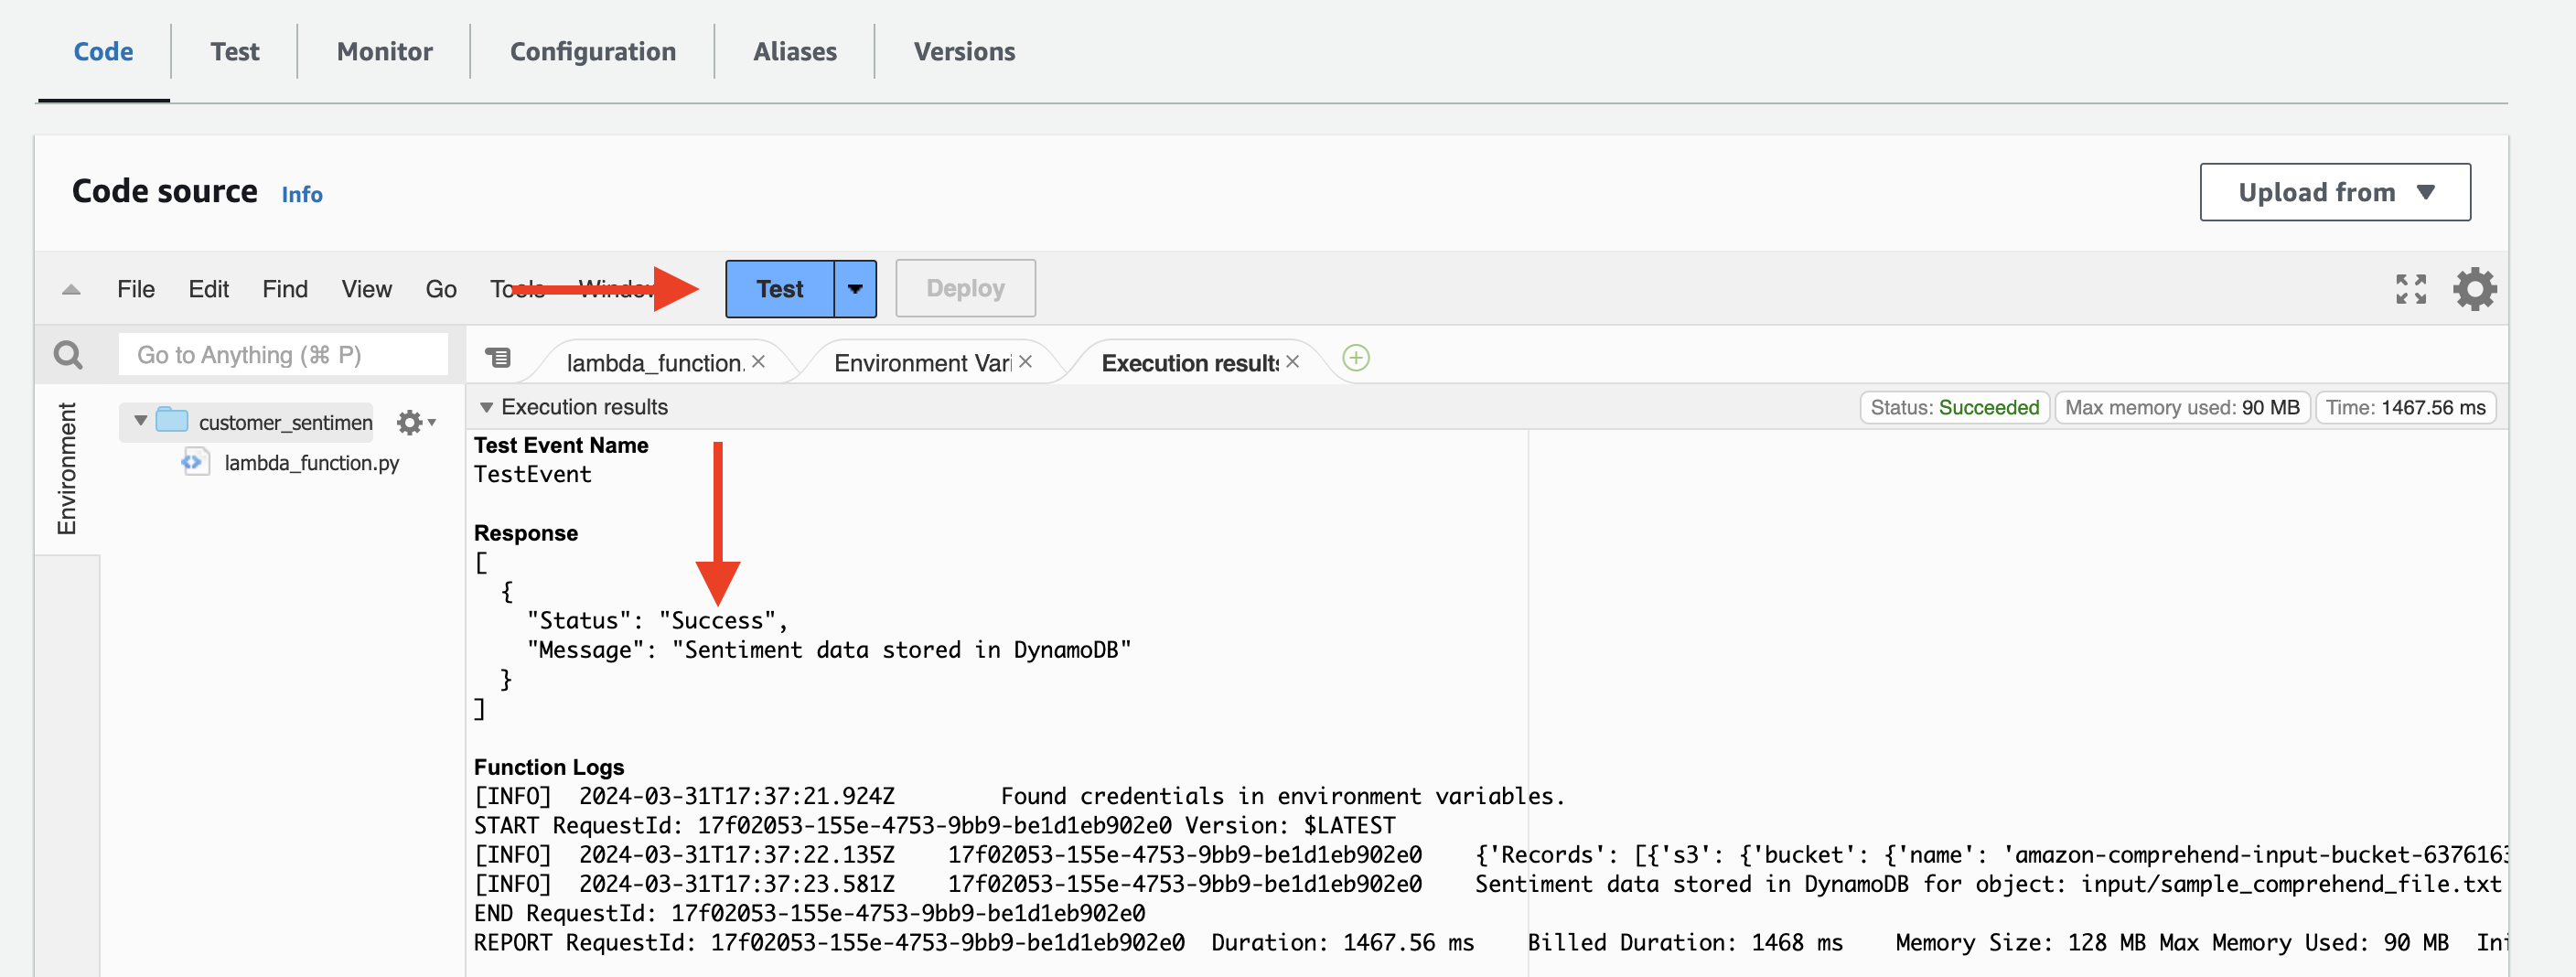
Now let’s test our Lambda function to make sure it works as intended:
- Encoding: Ensure that the input files are encoded in UTF-8 format to avoid any character encoding issues.
- File Size: The Lambda function can process files of various sizes, but keep in mind the maximum execution time and memory limits of Lambda. If processing large files, consider increasing the Lambda function timeout and memory allocation accordingly.
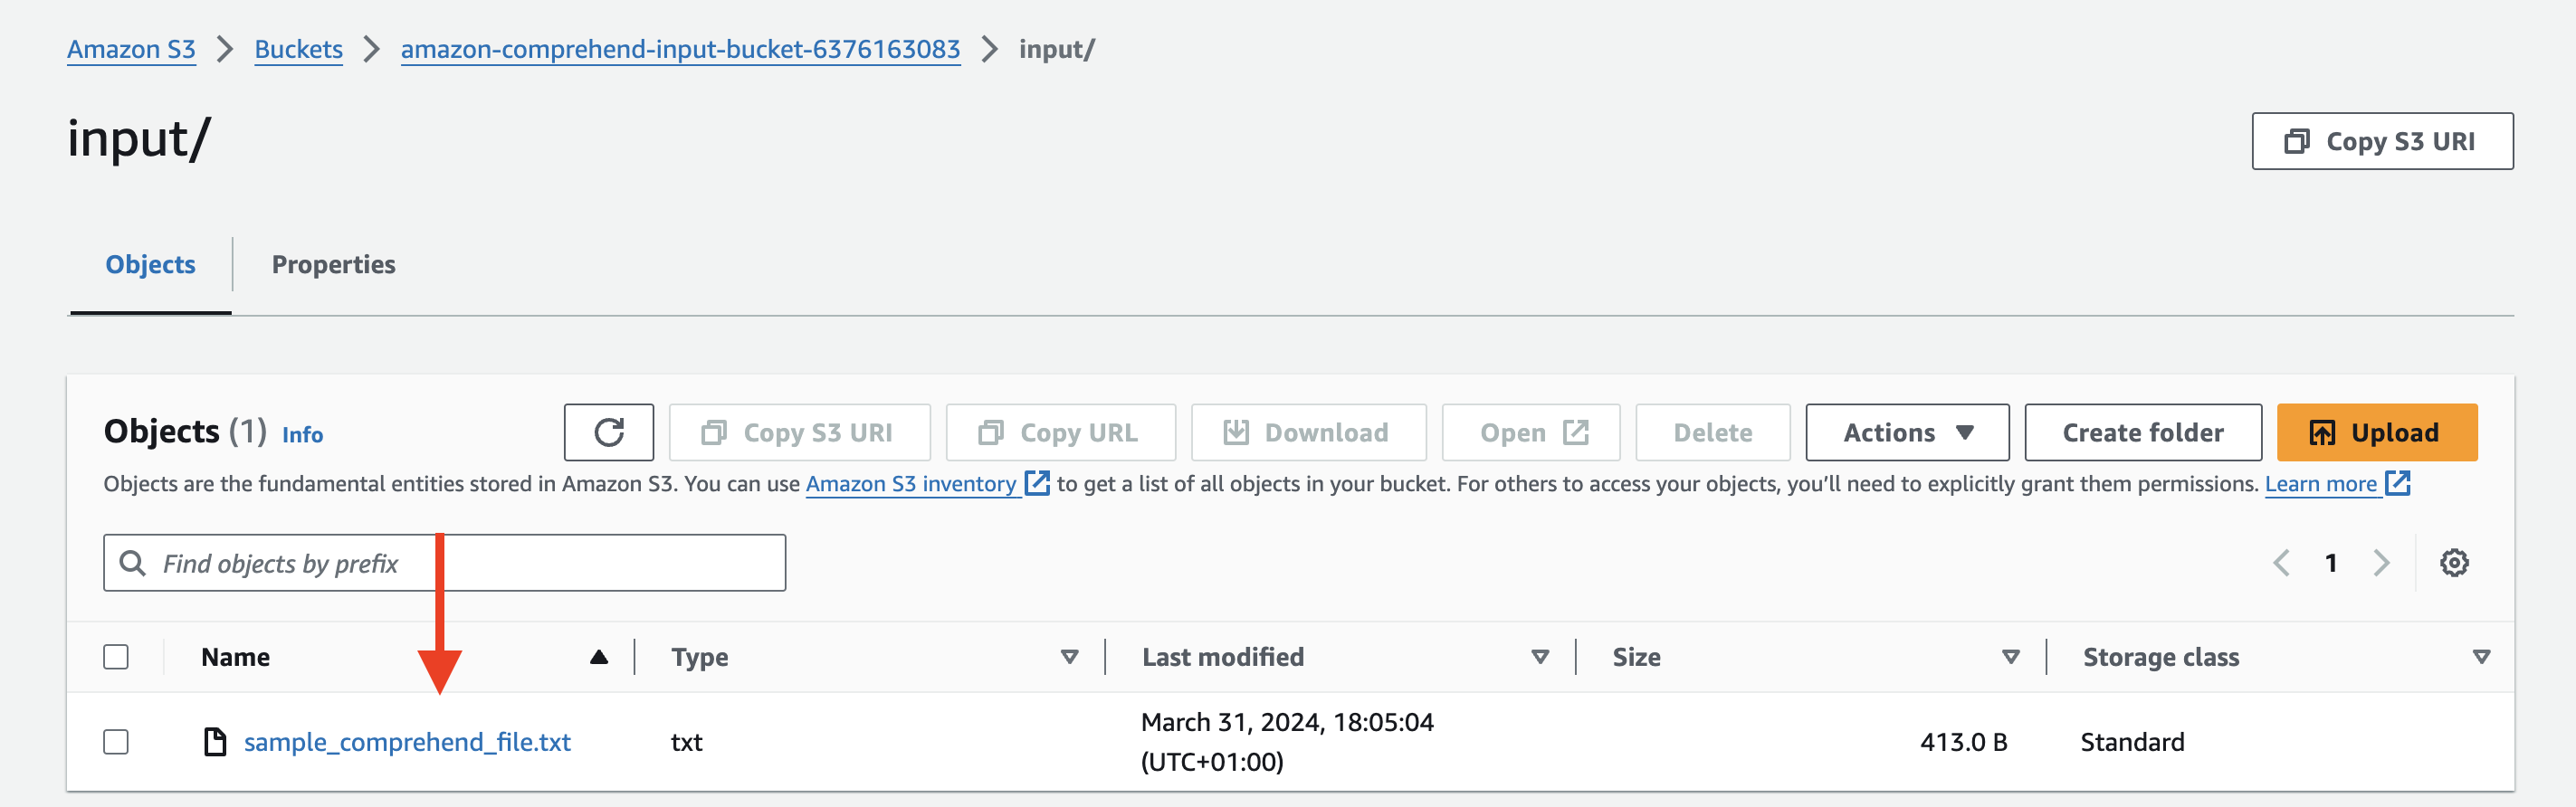
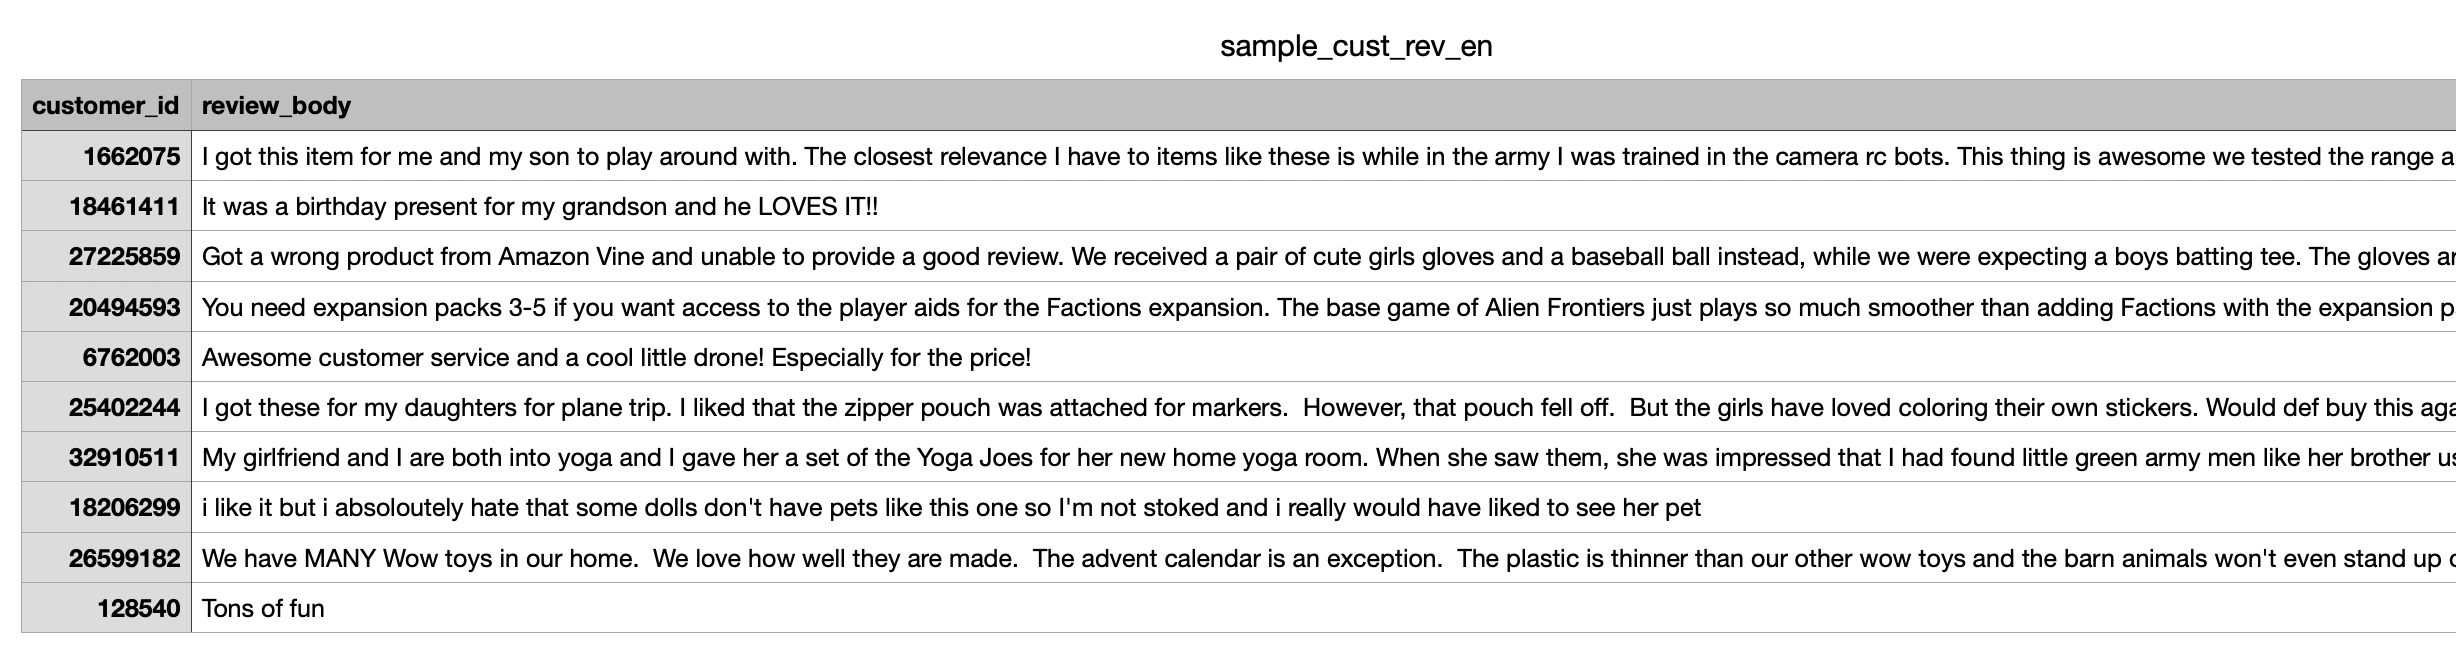
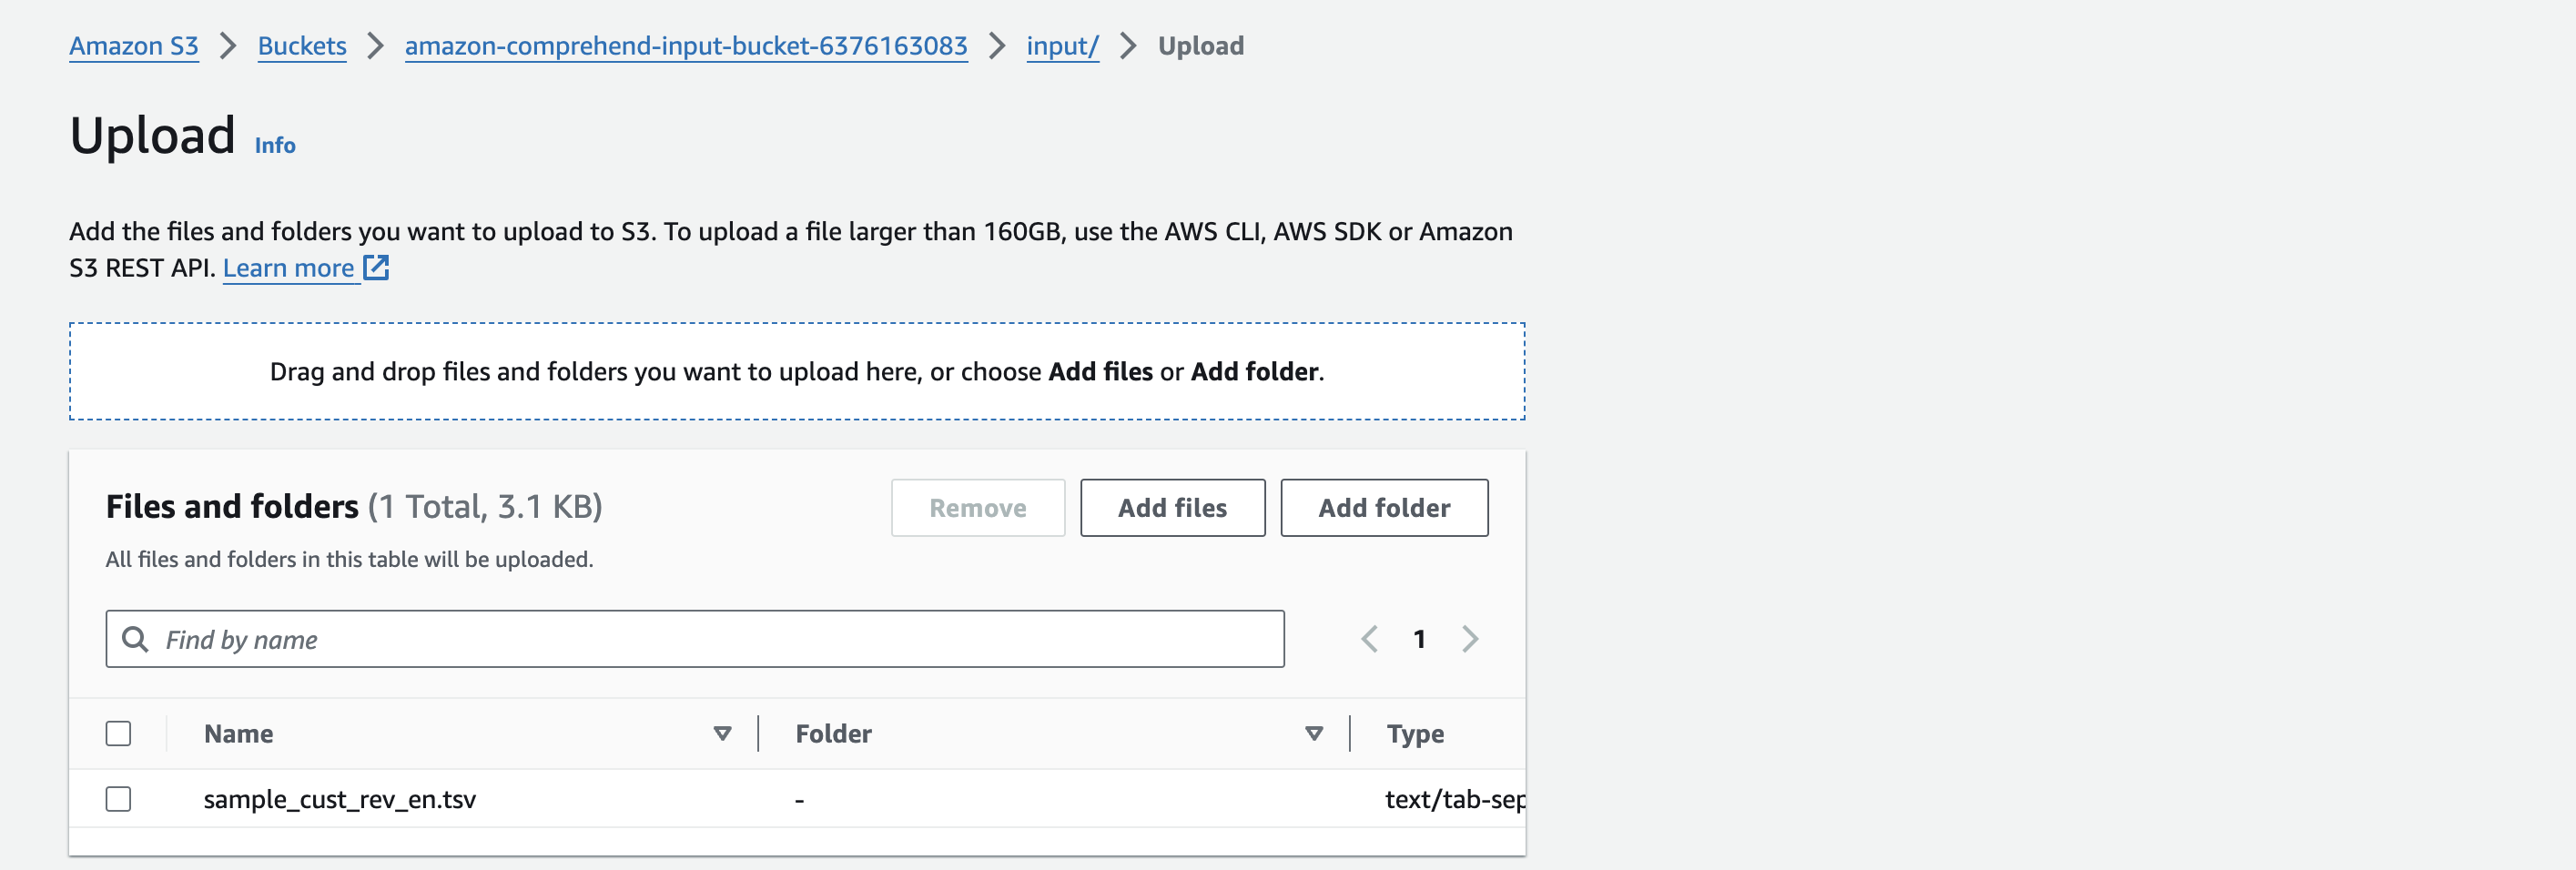
First will upload a text file with a review in my bucket created earlier in folder input.
To test your Lambda function, follow these steps:
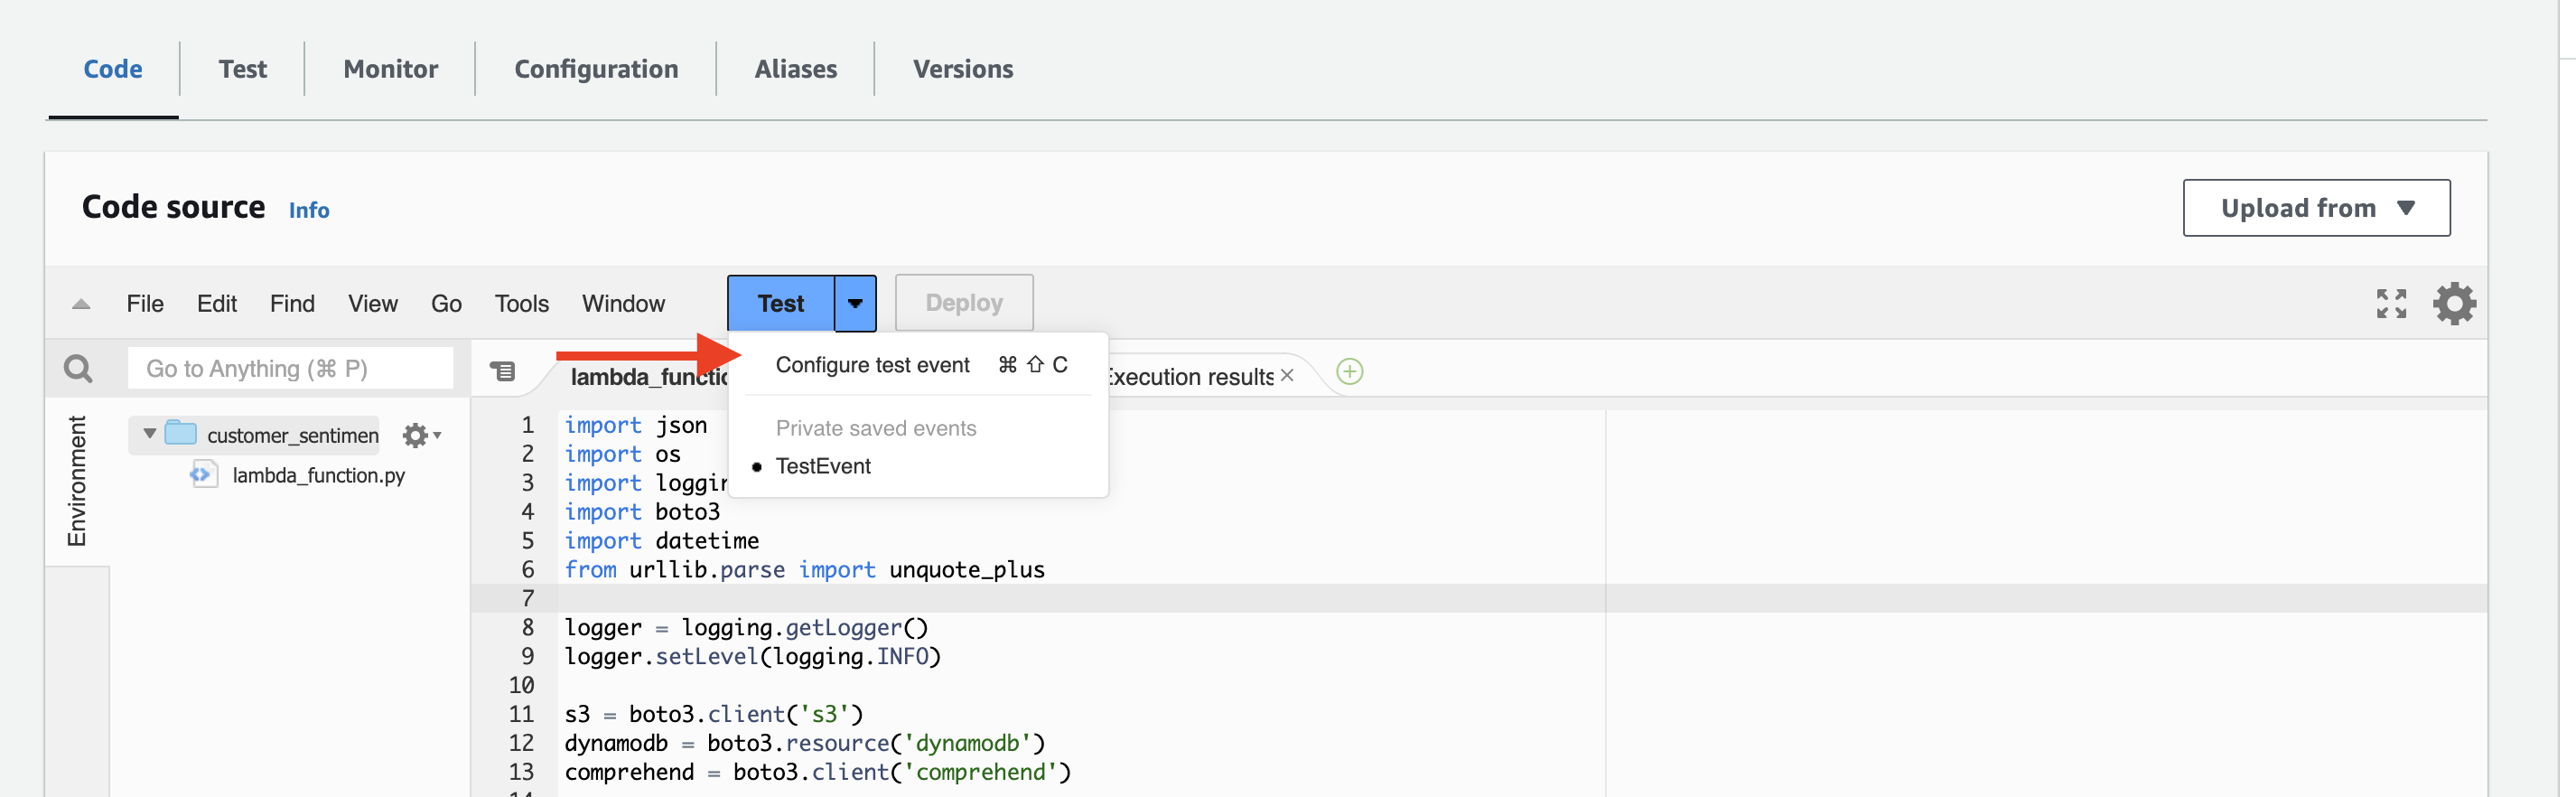
Write the name event, bucket name and object key where your file with review is located!!!
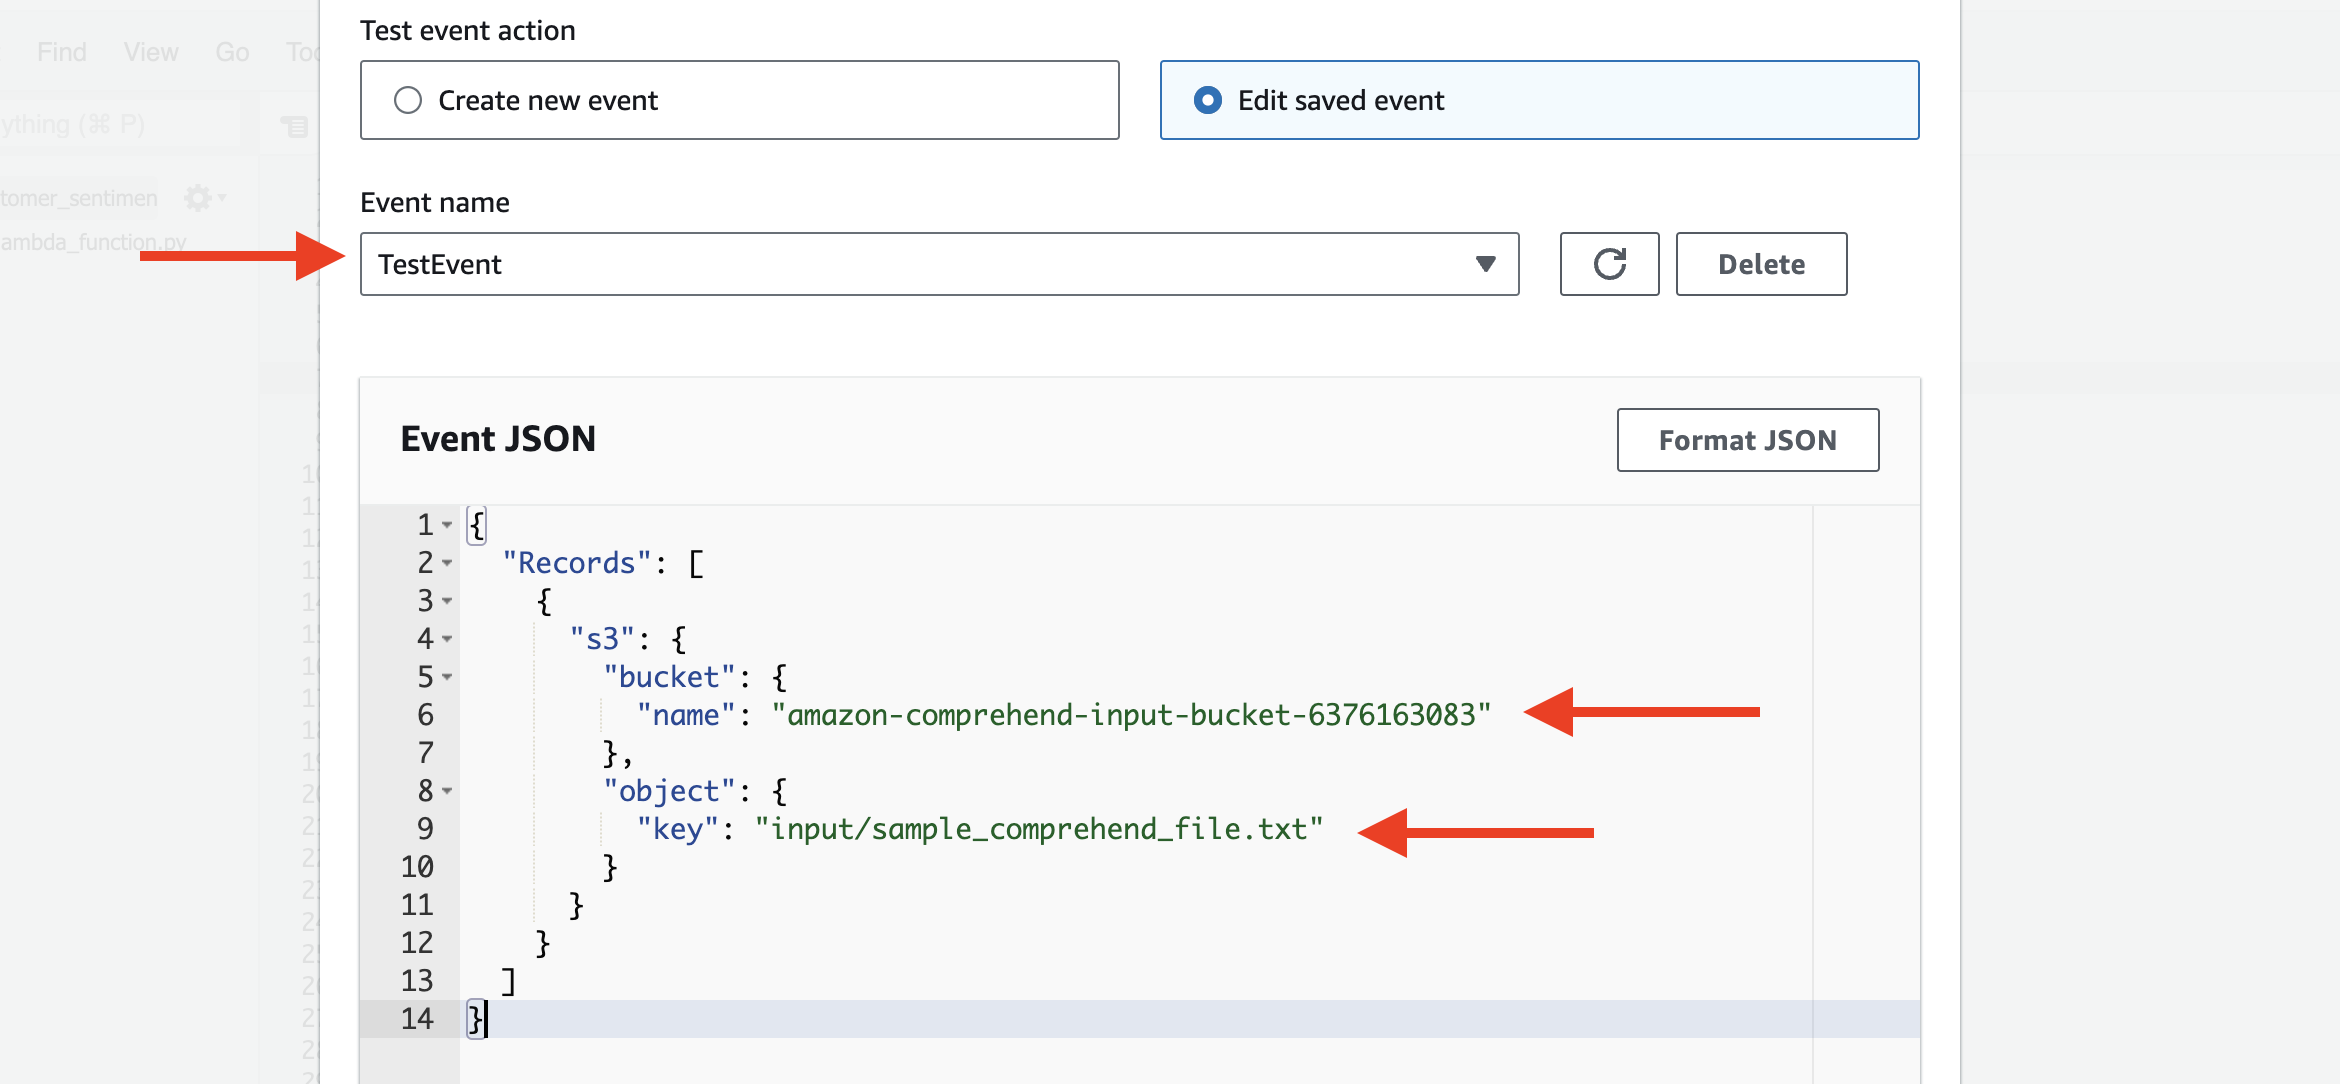
{
  "Records": [
    {
      "s3": {
        "bucket": {
          "name": "amazon-comprehend-input-bucket-6376163083"
        },
        "object": {
          "key": "input/sample_comprehend_file.txt"
        }
      }
    }
  ]
}
Click save and Test
Check if the results are in the S3 output folder. We have a JSON file ready for further analysis.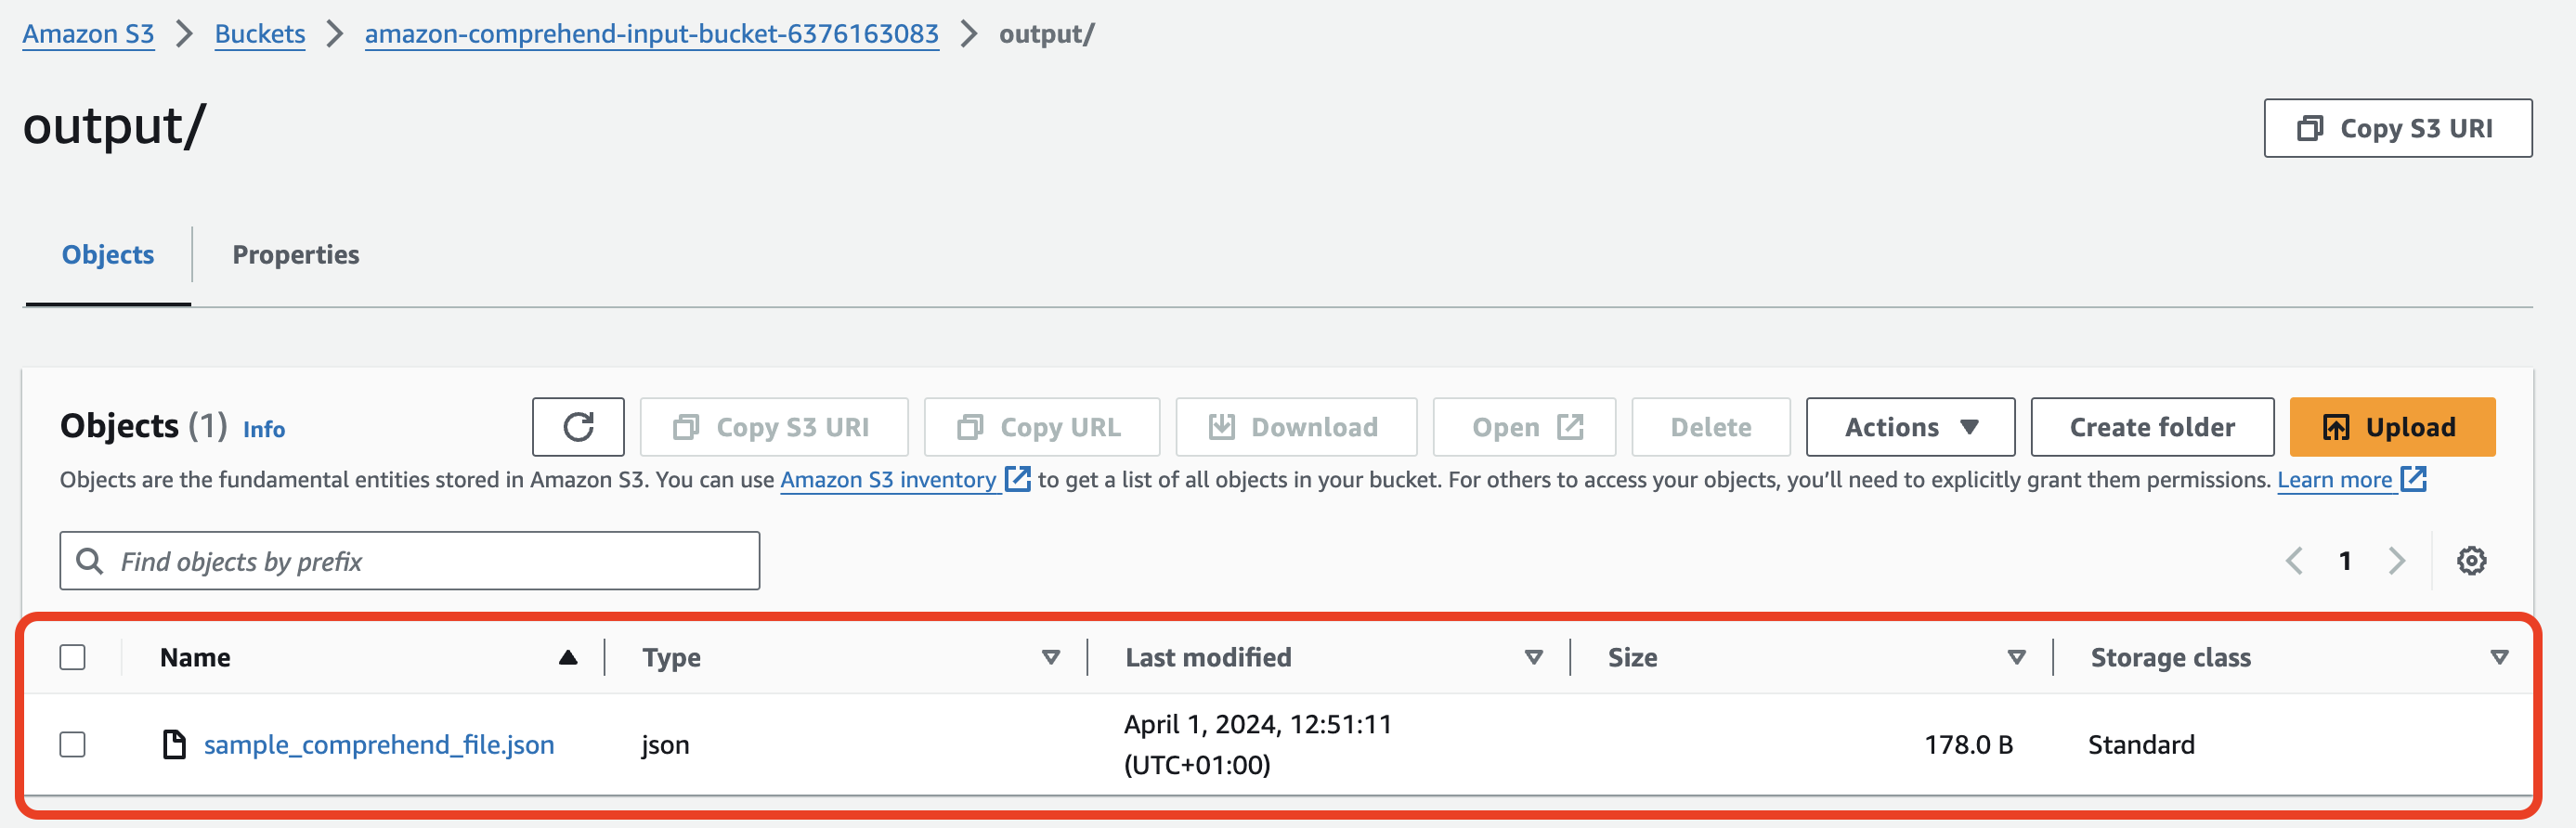
To access the analyst results, please download the JSON file and open it.

Let’s add an S3 trigger to our Lambda function that will enable automatic sentiment analysis whenever new objects are uploaded to our S3 bucket. This way, we can seamlessly process new text files without manually invoking the Lambda function each time.
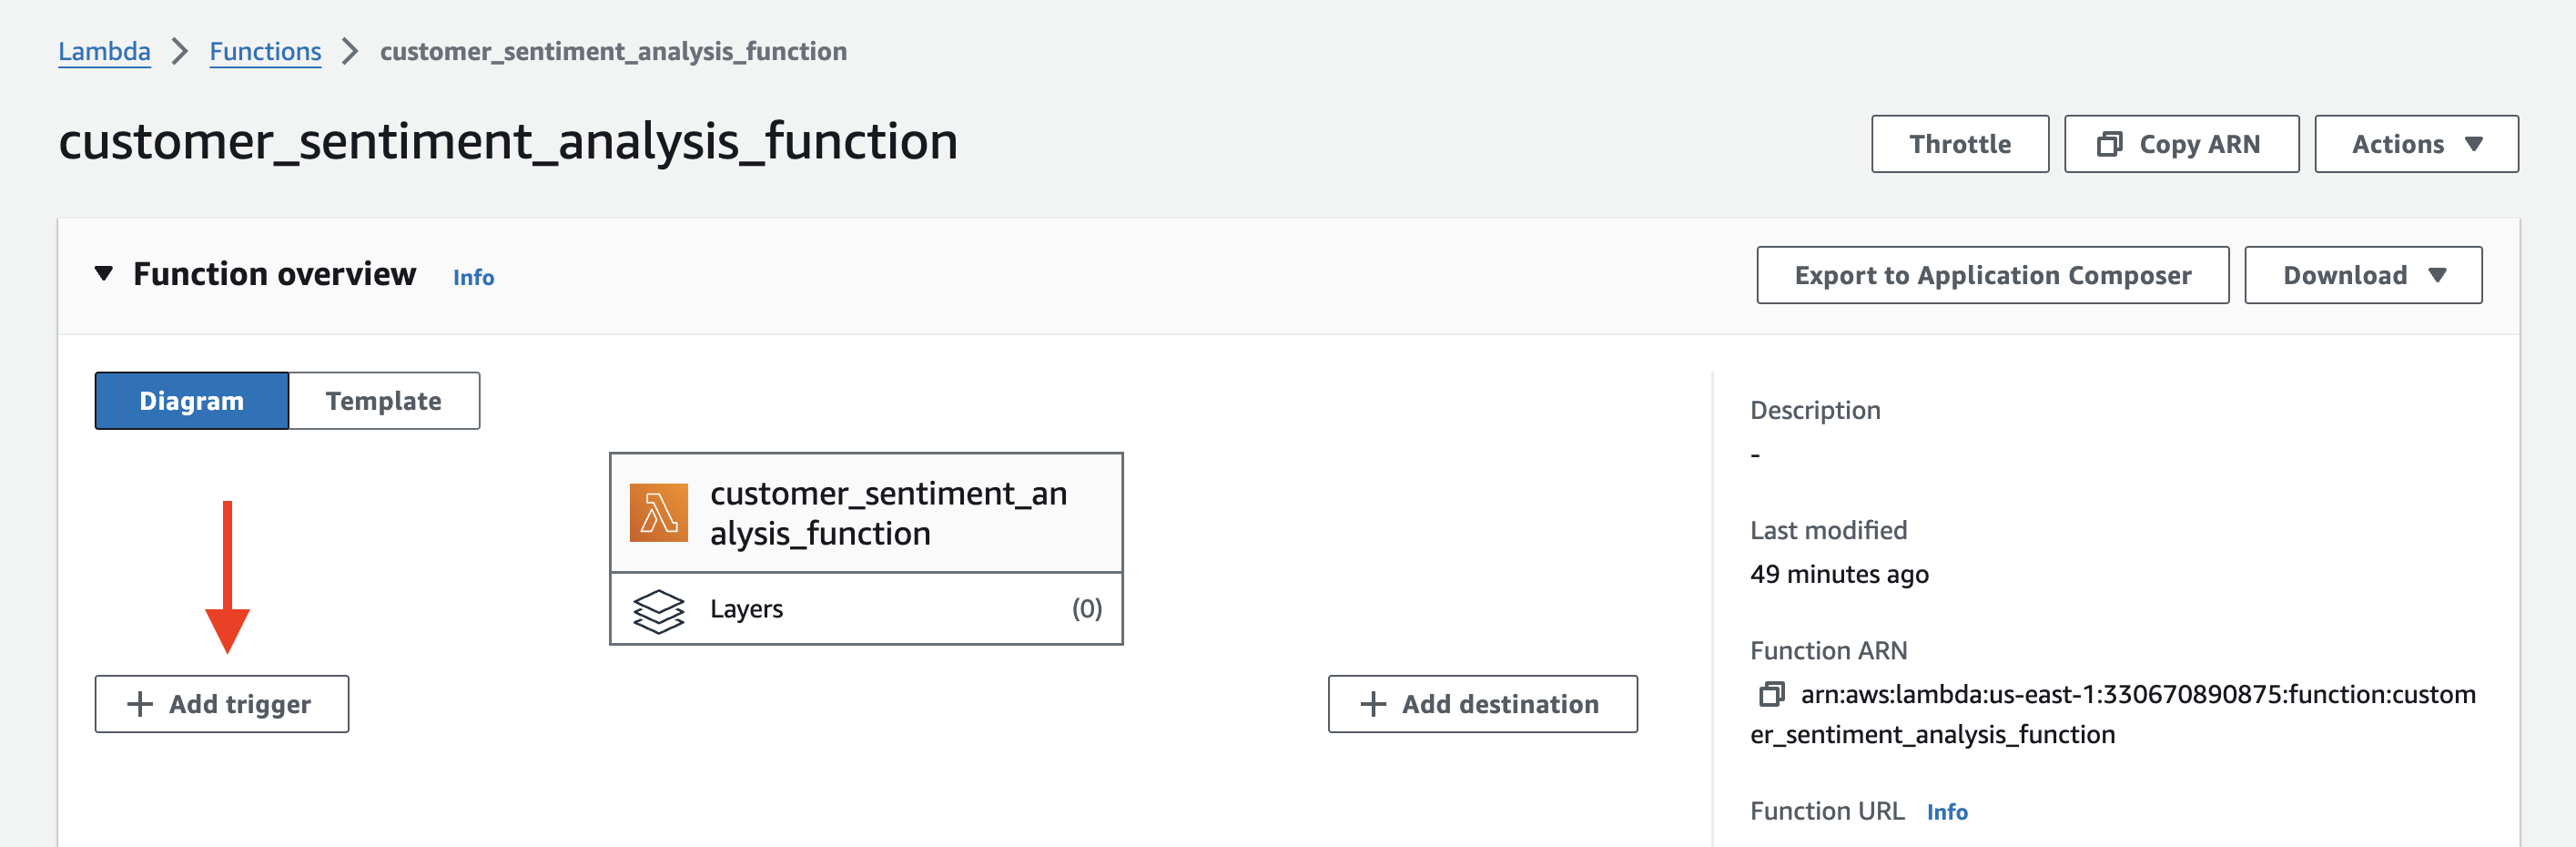
To set up an S3 trigger for your Lambda function, follow these steps:
- Open the AWS Lambda console.
- Select your Lambda function.
- In the “Designer” section, click on “Add trigger”.
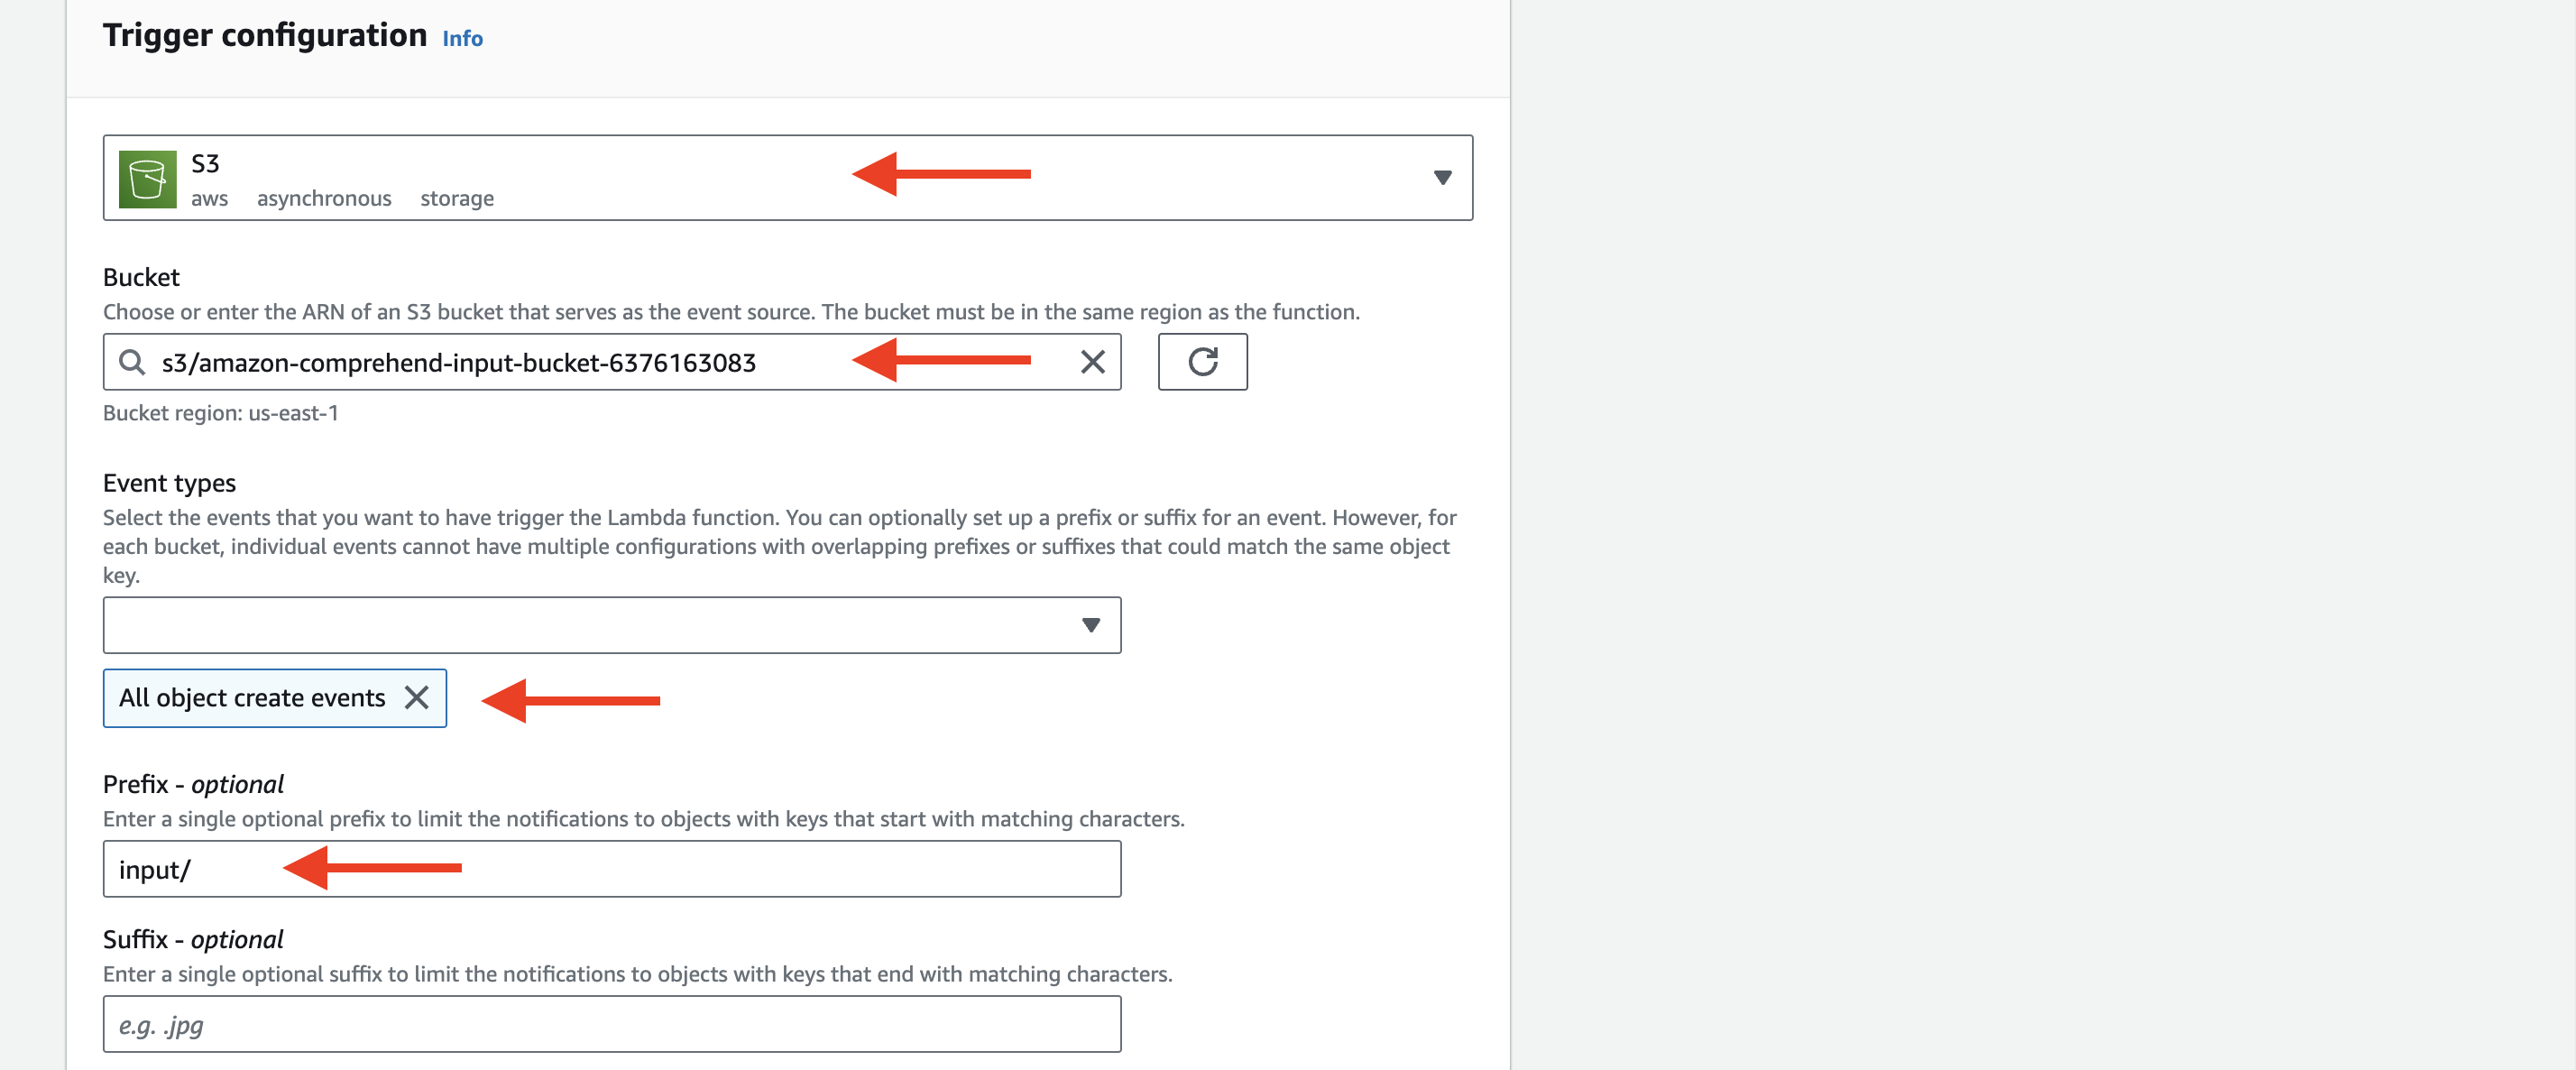
- In the “Trigger configuration” dropdown, select “S3”.
- Configure the S3 trigger:
- Bucket: Select the S3 bucket where you will upload the text files for sentiment analysis.
- Event type: Choose the event type that should trigger the Lambda function. For example, you can select “All object create events” to trigger the function whenever a new object is created in the bucket.
- Prefix (optional): If you want to limit the trigger to a specific directory within the bucket, specify the prefix. For example, if you want to trigger the function only for objects uploaded to the “input/” directory, set the prefix to “input/”.
- Suffix (optional): If you want to limit the trigger to objects with a specific file extension, specify the suffix. For example, if you want to trigger the function only for “.txt” files, set the suffix to “.txt”.
6. Click on “Add” to save the S3 trigger configuration.
Now is the time to test our implementation. For this, I will upload another file to S3 with more than one review and test that everything works from start to finish.
Verifying Sentiment Analysis Results:
After the Lambda function processes the input files, the sentiment analysis results will be stored in the specified S3 output folder. To verify the results:
1. Navigate to the S3 output folder in the AWS Management Console.
2. Locate the JSON file corresponding to the processed input file.
3. Download and open the JSON file.
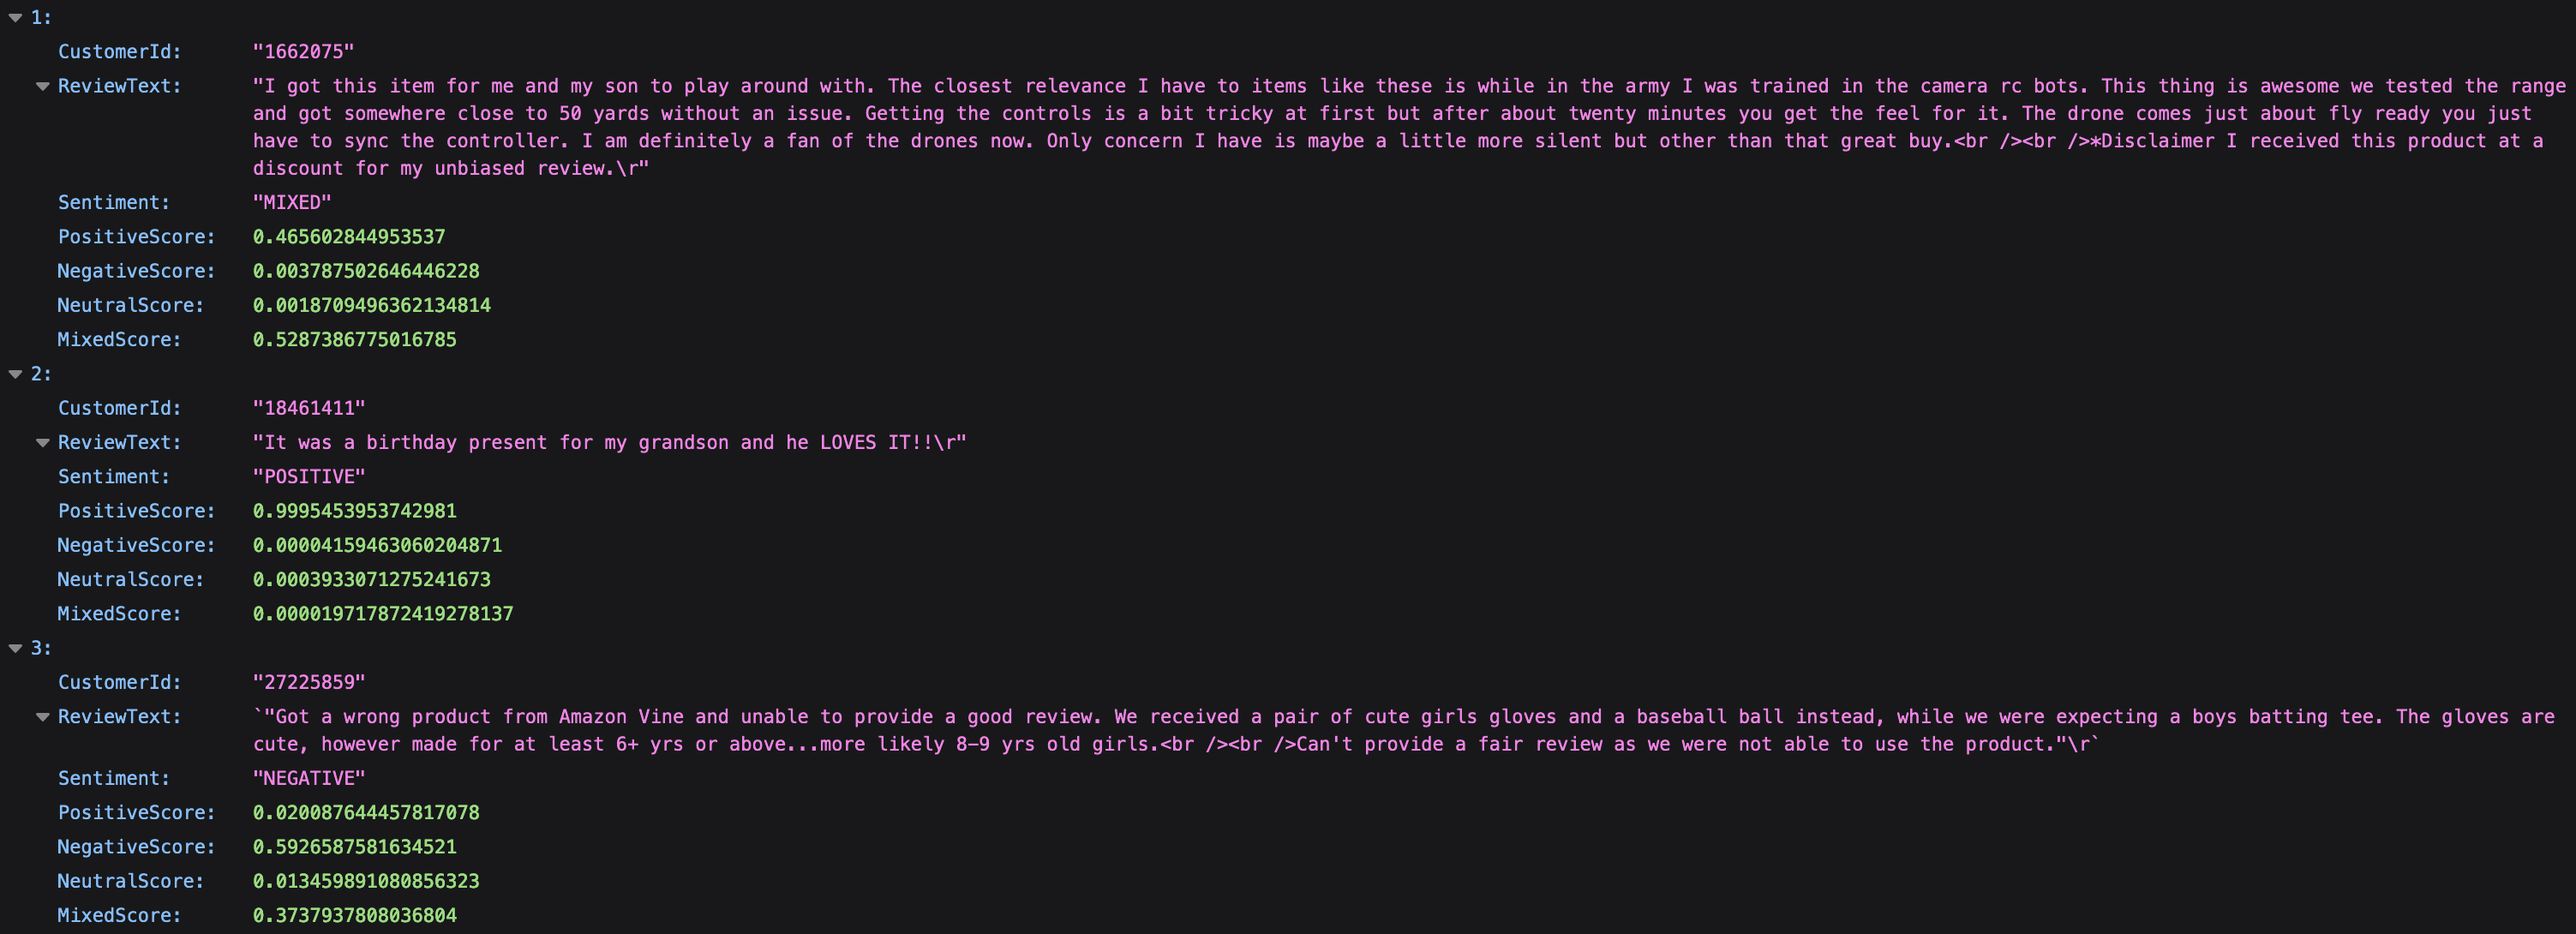
The JSON file will contain an array of sentiment analysis results, with each element representing a single review. Each sentiment result will have the following structure:
```json
{
"CustomerId": "1234",
"ReviewText": "This product exceeded my expectations. The quality is outstanding.",
"Sentiment": "POSITIVE",
"PositiveScore": 0.95,
"NegativeScore": 0.02,
"NeutralScore": 0.03,
"MixedScore": 0.00
}
```
– `CustomerId`: The customer ID associated with the review (if available).
– `ReviewText`: The text content of the review.
– `Sentiment`: The overall sentiment label assigned by Amazon Comprehend (e.g., POSITIVE, NEGATIVE, NEUTRAL, MIXED).
– `PositiveScore`, `NegativeScore`, `NeutralScore`, `MixedScore`: The sentiment scores for each sentiment category, ranging from 0 to 1.
Verify that the sentiment labels and scores accurately reflect the sentiment expressed in each review.
Go to S3 and upload the new file in the input folder.
You should see two files. One was created when we tested the lambda function manually and the second was created automatically when the file was uploaded. S3 triggered our Lambda function.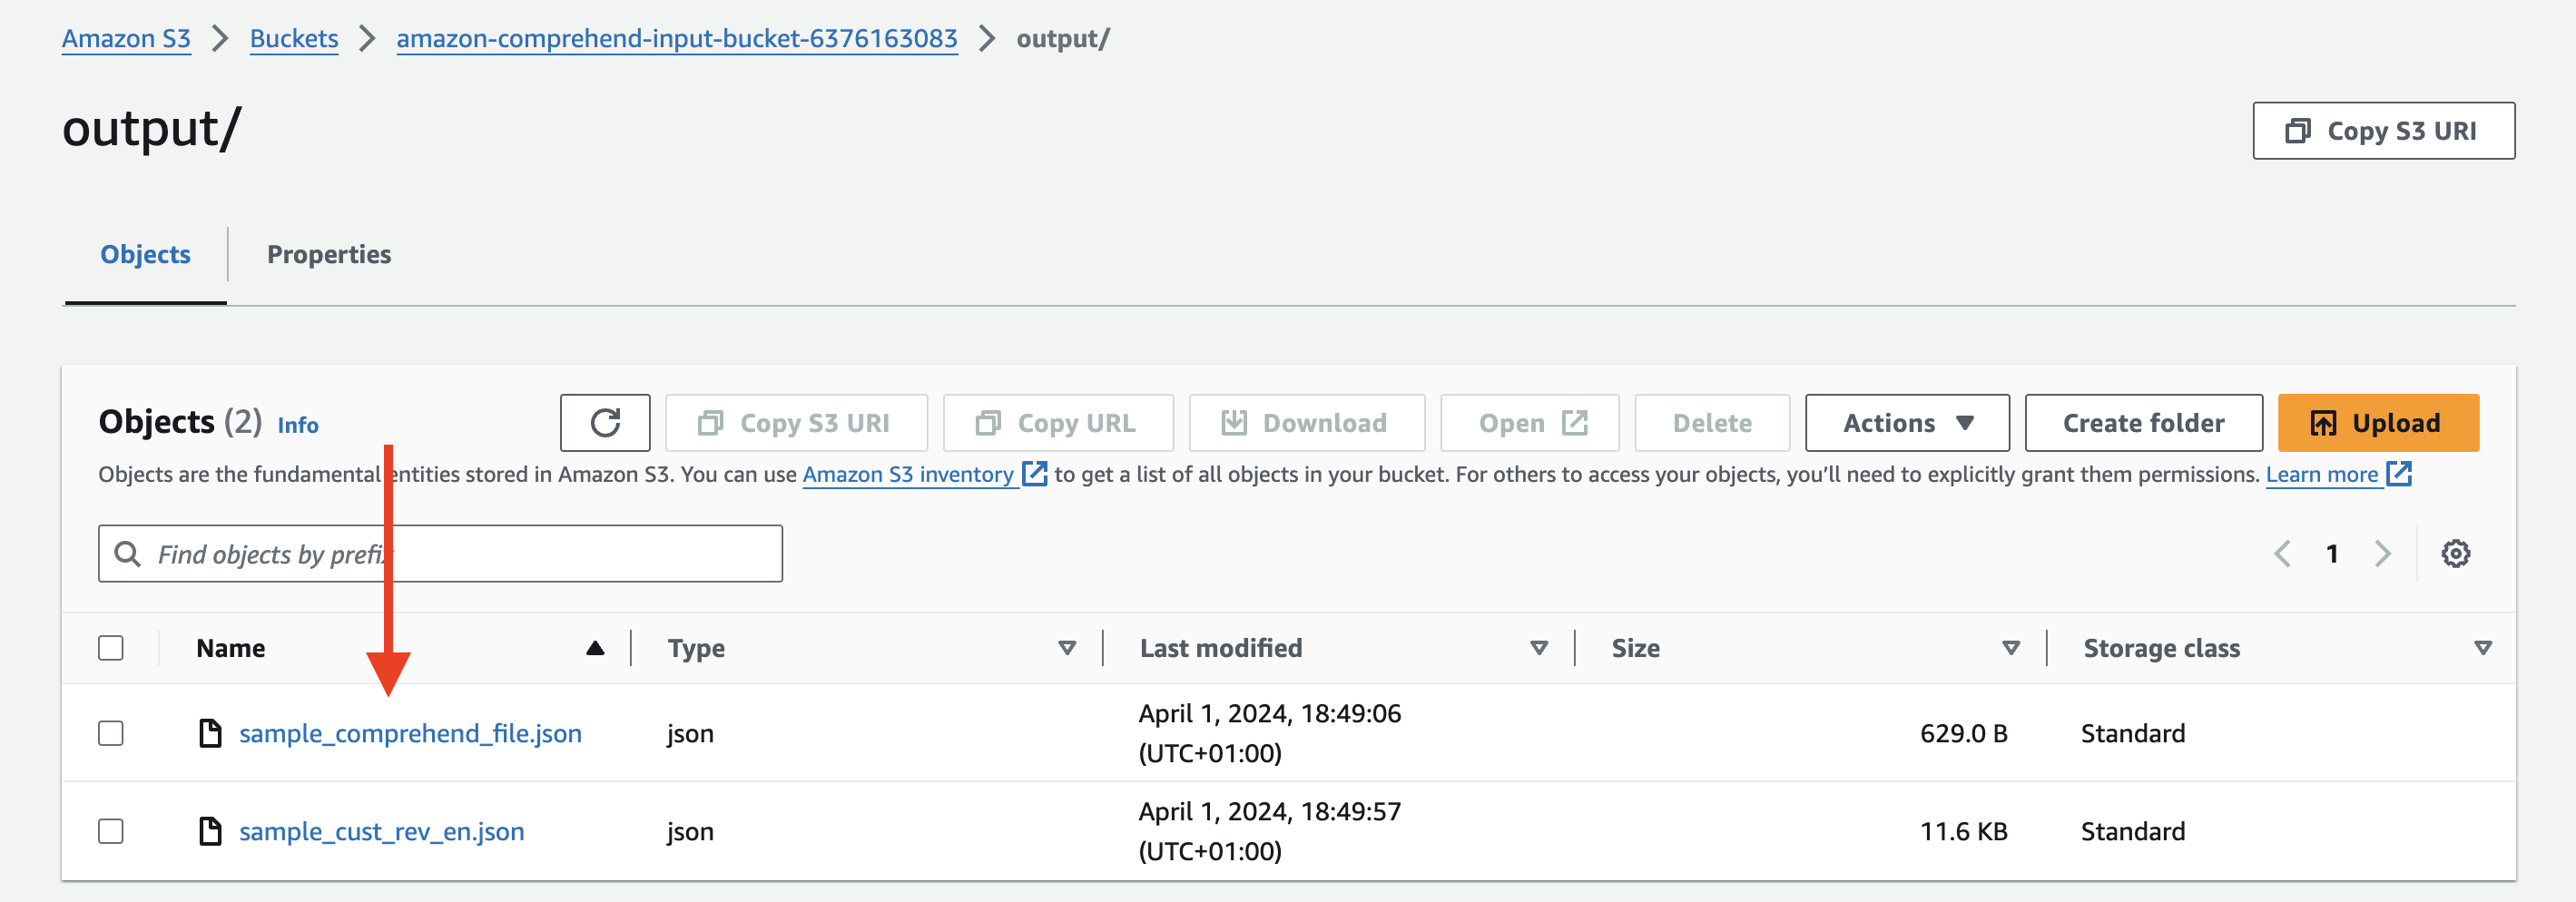
To access the analysis results, please download the JSON file and open it.
Error Handling:
During the testing process, you may encounter errors or exceptions due to various reasons, such as:
– Invalid file formats: Ensure that the input files adhere to the supported formats (plain text or CSV) and have the correct structure.
– S3 trigger configuration issues: Verify that the S3 trigger is properly configured and pointing to the correct S3 bucket and prefix.
– Lambda function errors: Check the Lambda function logs in CloudWatch for any error messages or stack traces. Common issues could include permissions errors, timeouts, or unexpected exceptions.
If you encounter any errors, refer to the CloudWatch logs for detailed information and error messages. Troubleshoot the issues based on the error details and make necessary adjustments to the input files, S3 trigger configuration, or Lambda function code.
Testing with Different Input Files:
To ensure the robustness and scalability of the sentiment analysis pipeline, it’s important to test the workflow with different types of input files and varying numbers of reviews. Consider the following scenarios:
– Test with plain text files containing a single review and multiple reviews.
– Test with CSV files containing a few reviews and a large number of reviews.
– Test with files containing a mix of positive, negative, neutral, and mixed sentiment reviews.
– Test with files containing reviews of different lengths and complexity.
By testing with diverse input files, you can assess how well the sentiment analysis pipeline handles different scenarios and identify any potential limitations or areas for improvement.
Remember to monitor the Lambda function logs, S3 output folder, and any relevant error messages during the testing process. Iterate and refine the workflow based on the testing results to ensure optimal performance and accuracy.
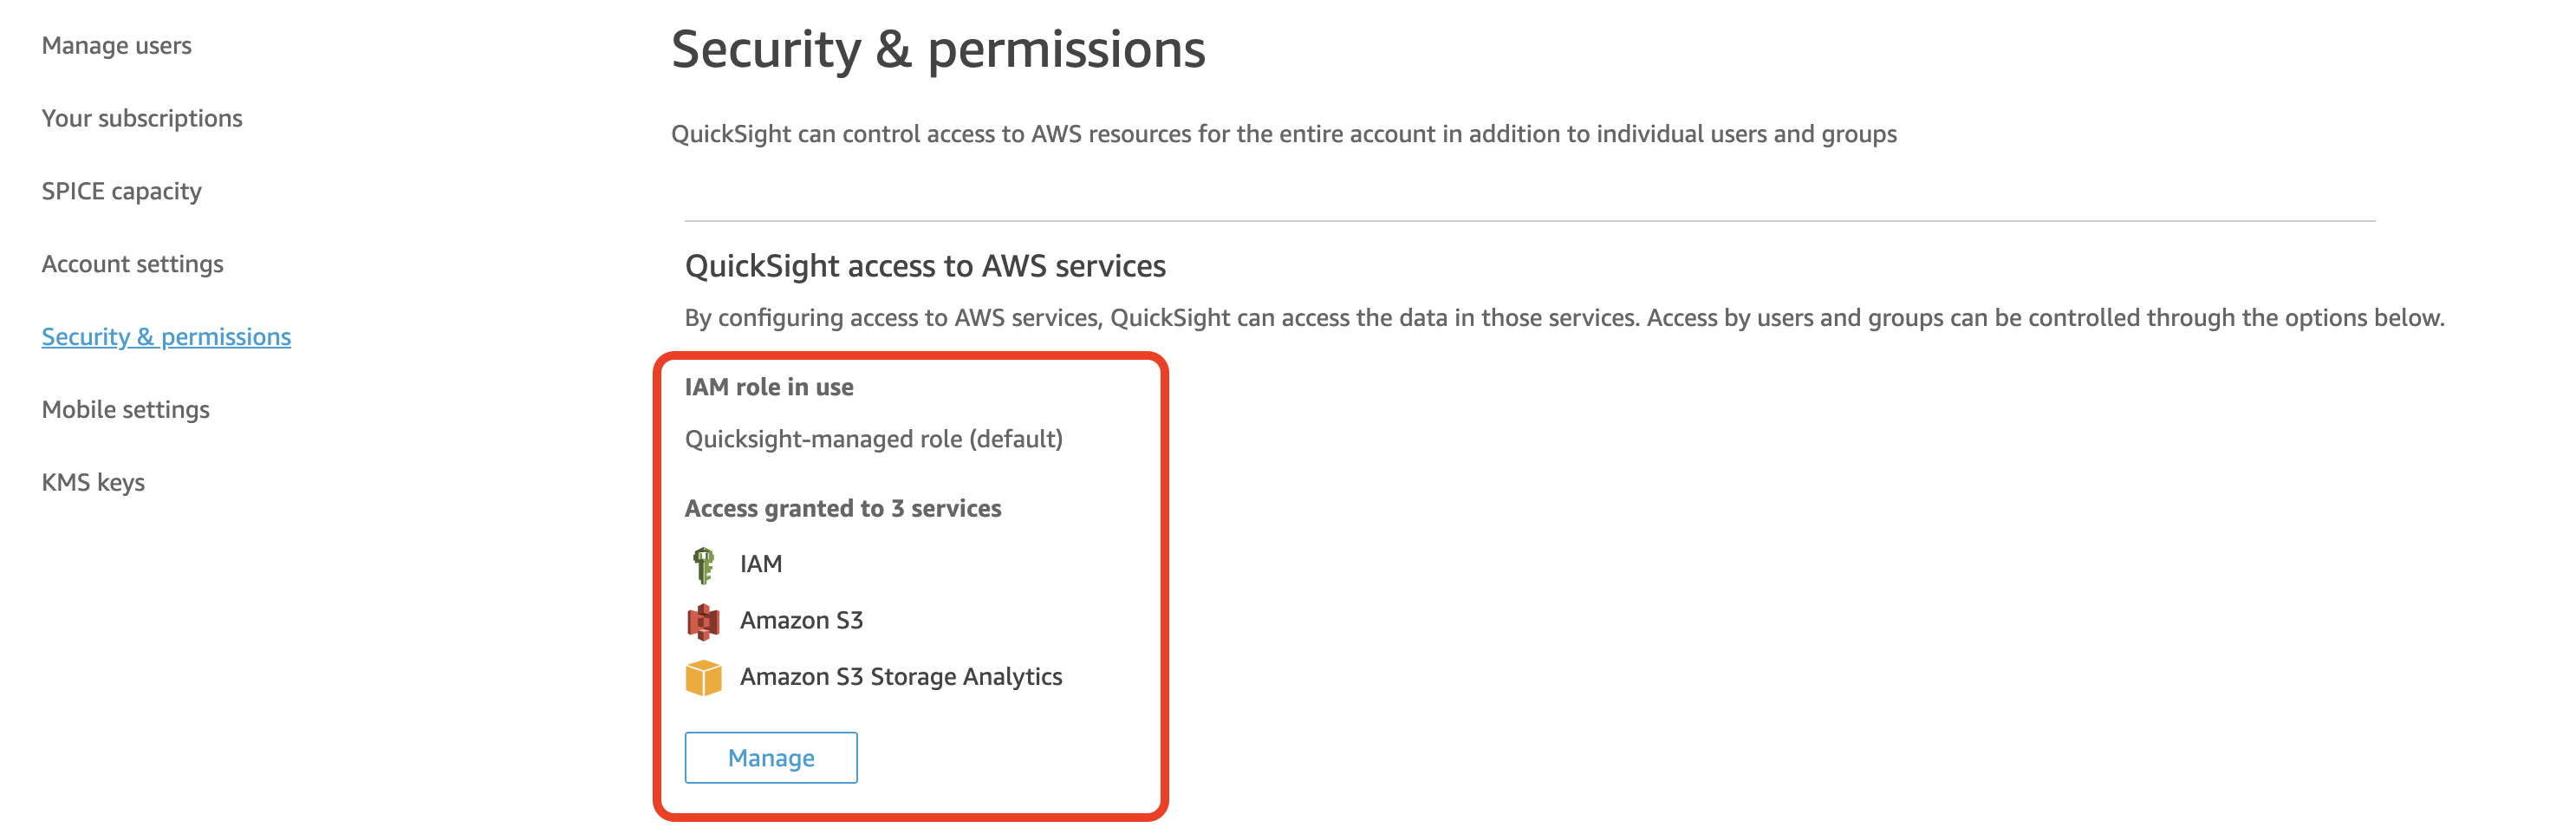
To allow Amazon QuickSight to access data in your S3 bucket, you need to set up the appropriate permissions. Here are the key steps:
- Sign in to Amazon QuickSight at https://quicksight.aws.amazon.com/.
- At the upper right, choose your user name, and then choose Manage QuickSight.
- Choose Security & permissions.
- Under QuickSight access to AWS services, choose Add or remove.A screen appears where you can enable all available AWS services.
Note
If you see a permissions error, and you’re an authorized Amazon QuickSight administrator, contact your system administrator for assistance.
5. Select the check boxes for the services that you want to allow. Clear check boxes for services that you don’t want to allow.
If you have already enabled an AWS service, the check box for that service is already selected. If Amazon QuickSight can’t access a particular AWS service, its check box is not selected.
In some cases, you might see a message like the following.
This policy used by Amazon QuickSight for AWS resource access was modified outside of Amazon QuickSight, so you can no longer edit this policy to provide AWS resource permission to Amazon QuickSight. To edit this policy permissions, go to the IAM console and delete this policy permission with policy arn - arn:aws:iam::111122223333:policy/service-role/AWSQuickSightS3Policy.This type of message means that one of the IAM policies that Amazon QuickSight uses was manually altered. To fix this, the system administrator needs to delete the IAM policy listed in the error message and reload the Security & permissions screen before you try again.
6. Choose Update to confirm, or Cancel to return to the previous screen.
To connect Amazon QuickSight to your S3 bucket and access the sentiment analysis results, you need to create a manifest file that QuickSight can use to locate and interpret the data in S3. The error message you’re encountering indicates that QuickSight cannot parse the manifest file as valid JSON, which is necessary for QuickSight to understand how to read your data from S3.
Here’s how you can create a correct manifest file and resolve the issue:
1. **Create a Manifest File**: A manifest file is a JSON file that specifies the location (S3 paths) of the files that contain your data and how QuickSight should interpret it. Here’s an example of what the manifest file content might look like for your use case:
 {
  "fileLocations": [
    {
      "URIPrefixes": [
        "s3://amazon-comprehend-input-bucket-6376163083/output/"
      ]
    }
  ],
  "globalUploadSettings": {
    "format": "JSON",
    "delimiter": ",",
    "textqualifier": "'",
    "containsHeader": "true"
  }
}
This manifest tells QuickSight to read JSON files located in the specified S3 path. Adjust the `format` to match your data file format (e.g., “CSV” or “JSON”), and ensure other settings like `delimiter` and `textqualifier` are correctly specified for your data.
2. **Upload the Manifest File to S3**: Save the manifest file with a `.json` extension and upload it to a location in your S3 bucket, such as `s3://amazon-comprehend-input-bucket-6376163083/manifest.json`.
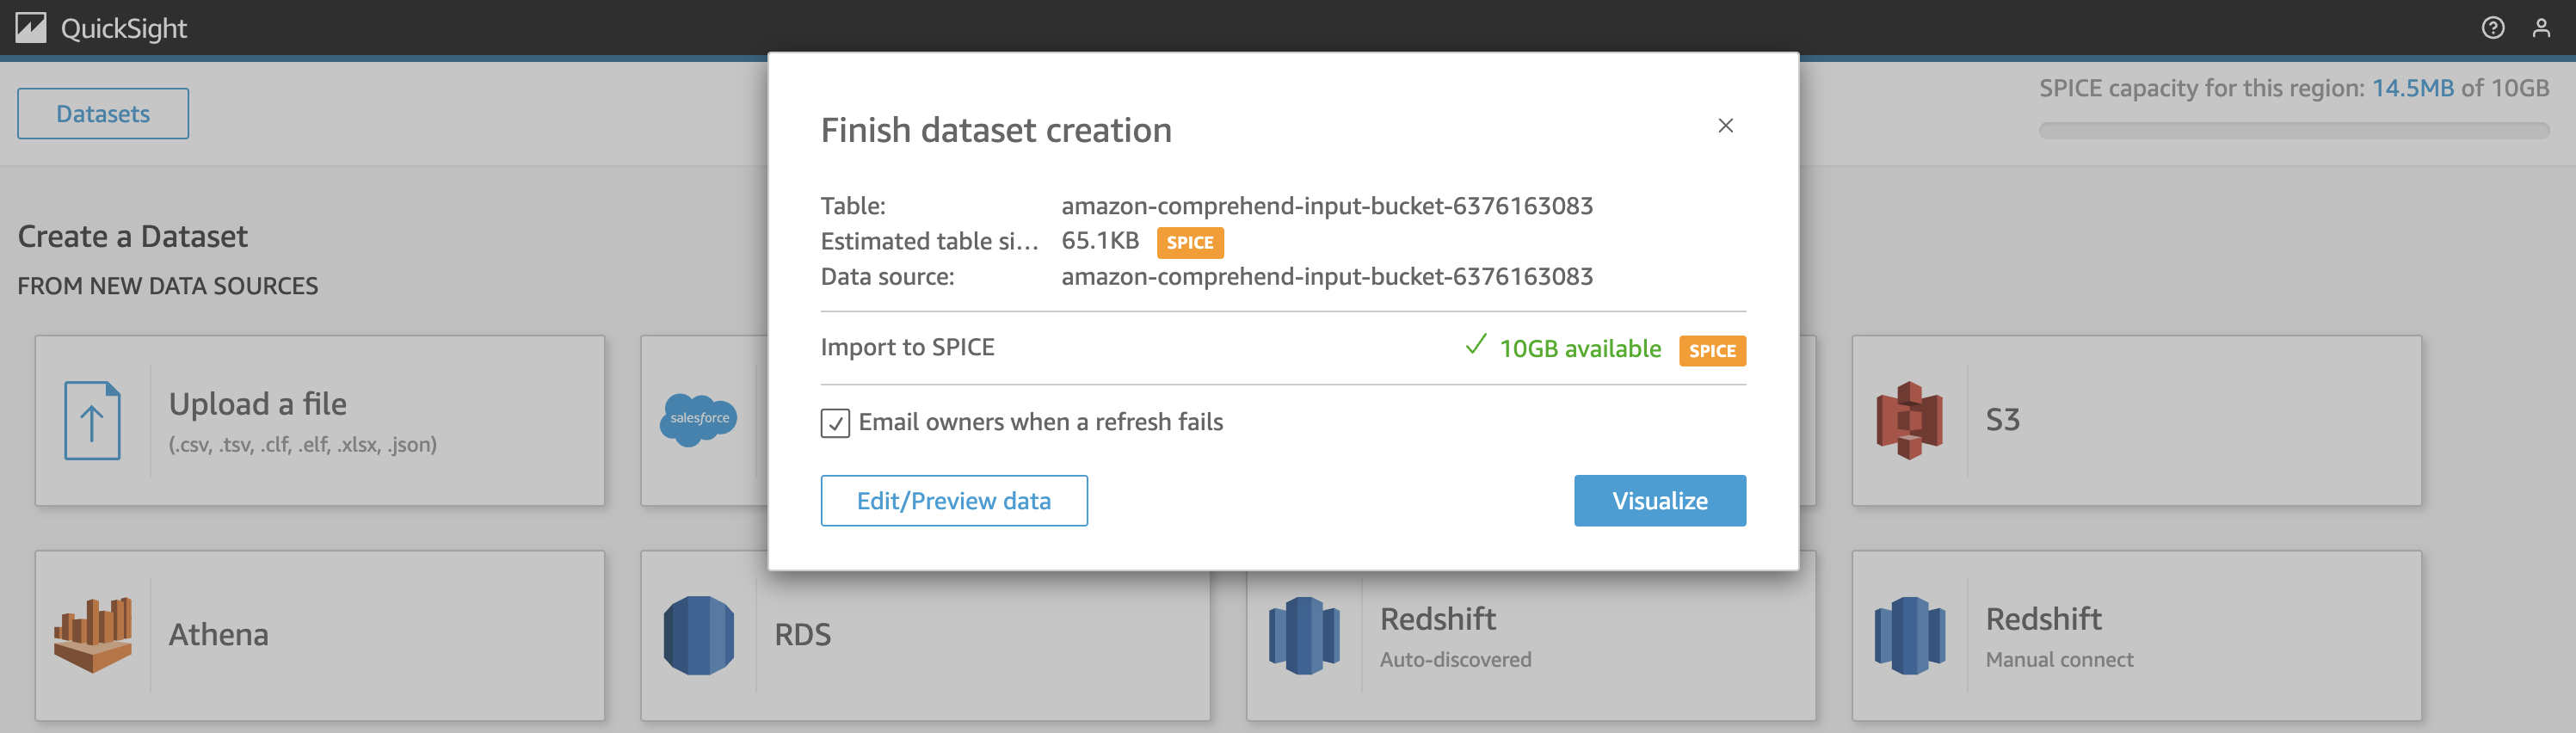
3. **Connect QuickSight to S3 Using the Manifest File**:
– In QuickSight, when creating a new S3 data source, select “Upload a manifest file” and provide the URL to your manifest file in S3, like `s3://amazon-comprehend-input-bucket-6376163083/manifest.json`.
– Proceed with the data source creation process.
4. **Verify JSON Format**: Ensure that your manifest file is correctly formatted as valid JSON. You can use online JSON validators to check for syntax errors. Common issues include missing commas, extra commas, unquoted strings, or mismatched brackets.
5. **Check Permissions**: Ensure that the IAM role associated with your QuickSight account has permission to access the S3 bucket and the manifest file. You might need to adjust your S3 bucket policy or the IAM policy attached to the QuickSight role to include permissions for the manifest file.
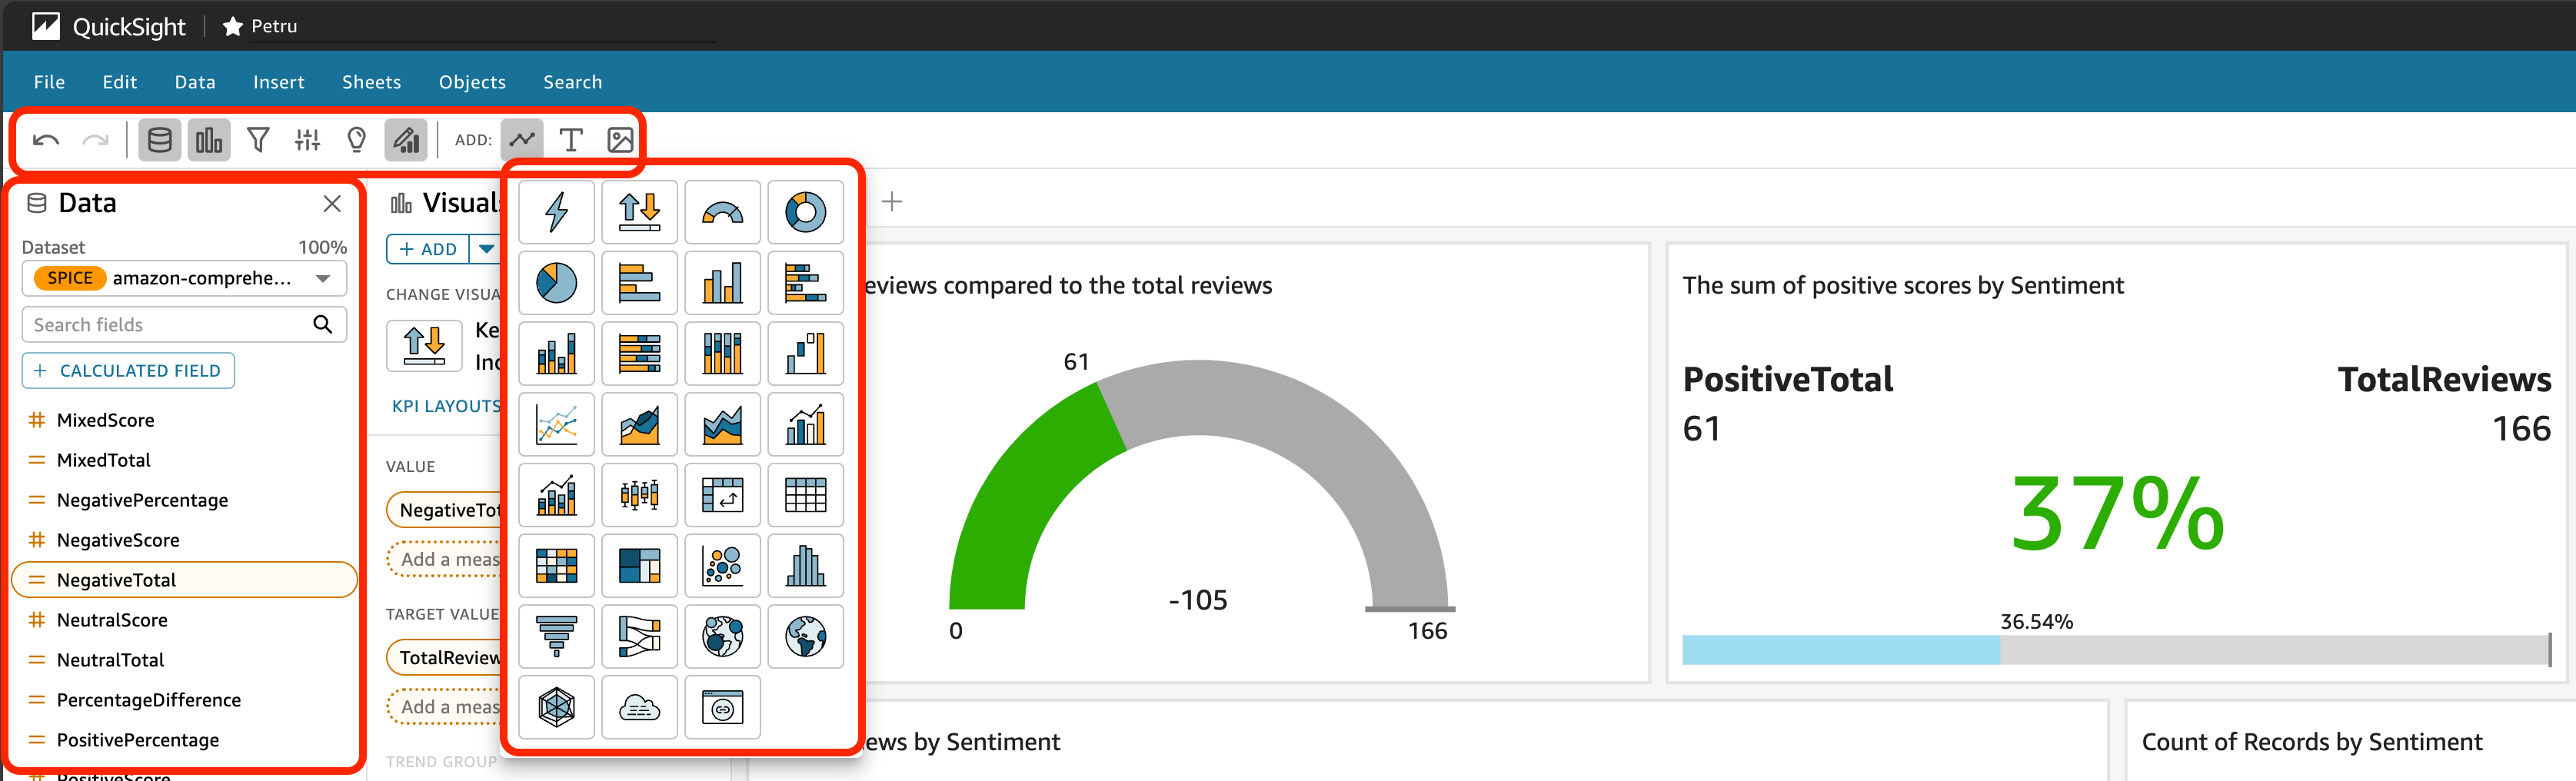
3. Create visualizations to analyze sentiment trends and distributions:
– Sentiment Distribution:
– Drag the “Sentiment” field to the “Group/Color” field well.
– Drag the “ReviewText” field to the “Value” field well.
– Select “Pie chart” as the visual type to display the sentiment distribution.
– Sentiment Scores:
– Drag the “Sentiment” field to the “X axis” field well.
– Drag the “PositiveScore”, “NegativeScore”, “NeutralScore”, and “MixedScore” fields to the “Value” field well.
– Select “Horizontal bar chart” as the visual type to compare the sentiment scores.
– Sentiment Trend:
– Create a new calculated field for the review date (e.g., “ReviewDate”) by extracting the date from the “Timestamp” field.
– Drag the “ReviewDate” field to the “X axis” field well.
– Drag the “Sentiment” field to the “Color” field well.
– Drag the “ReviewText” field to the “Value” field well.
– Select “Line chart” as the visual type to visualise the sentiment trend over time.
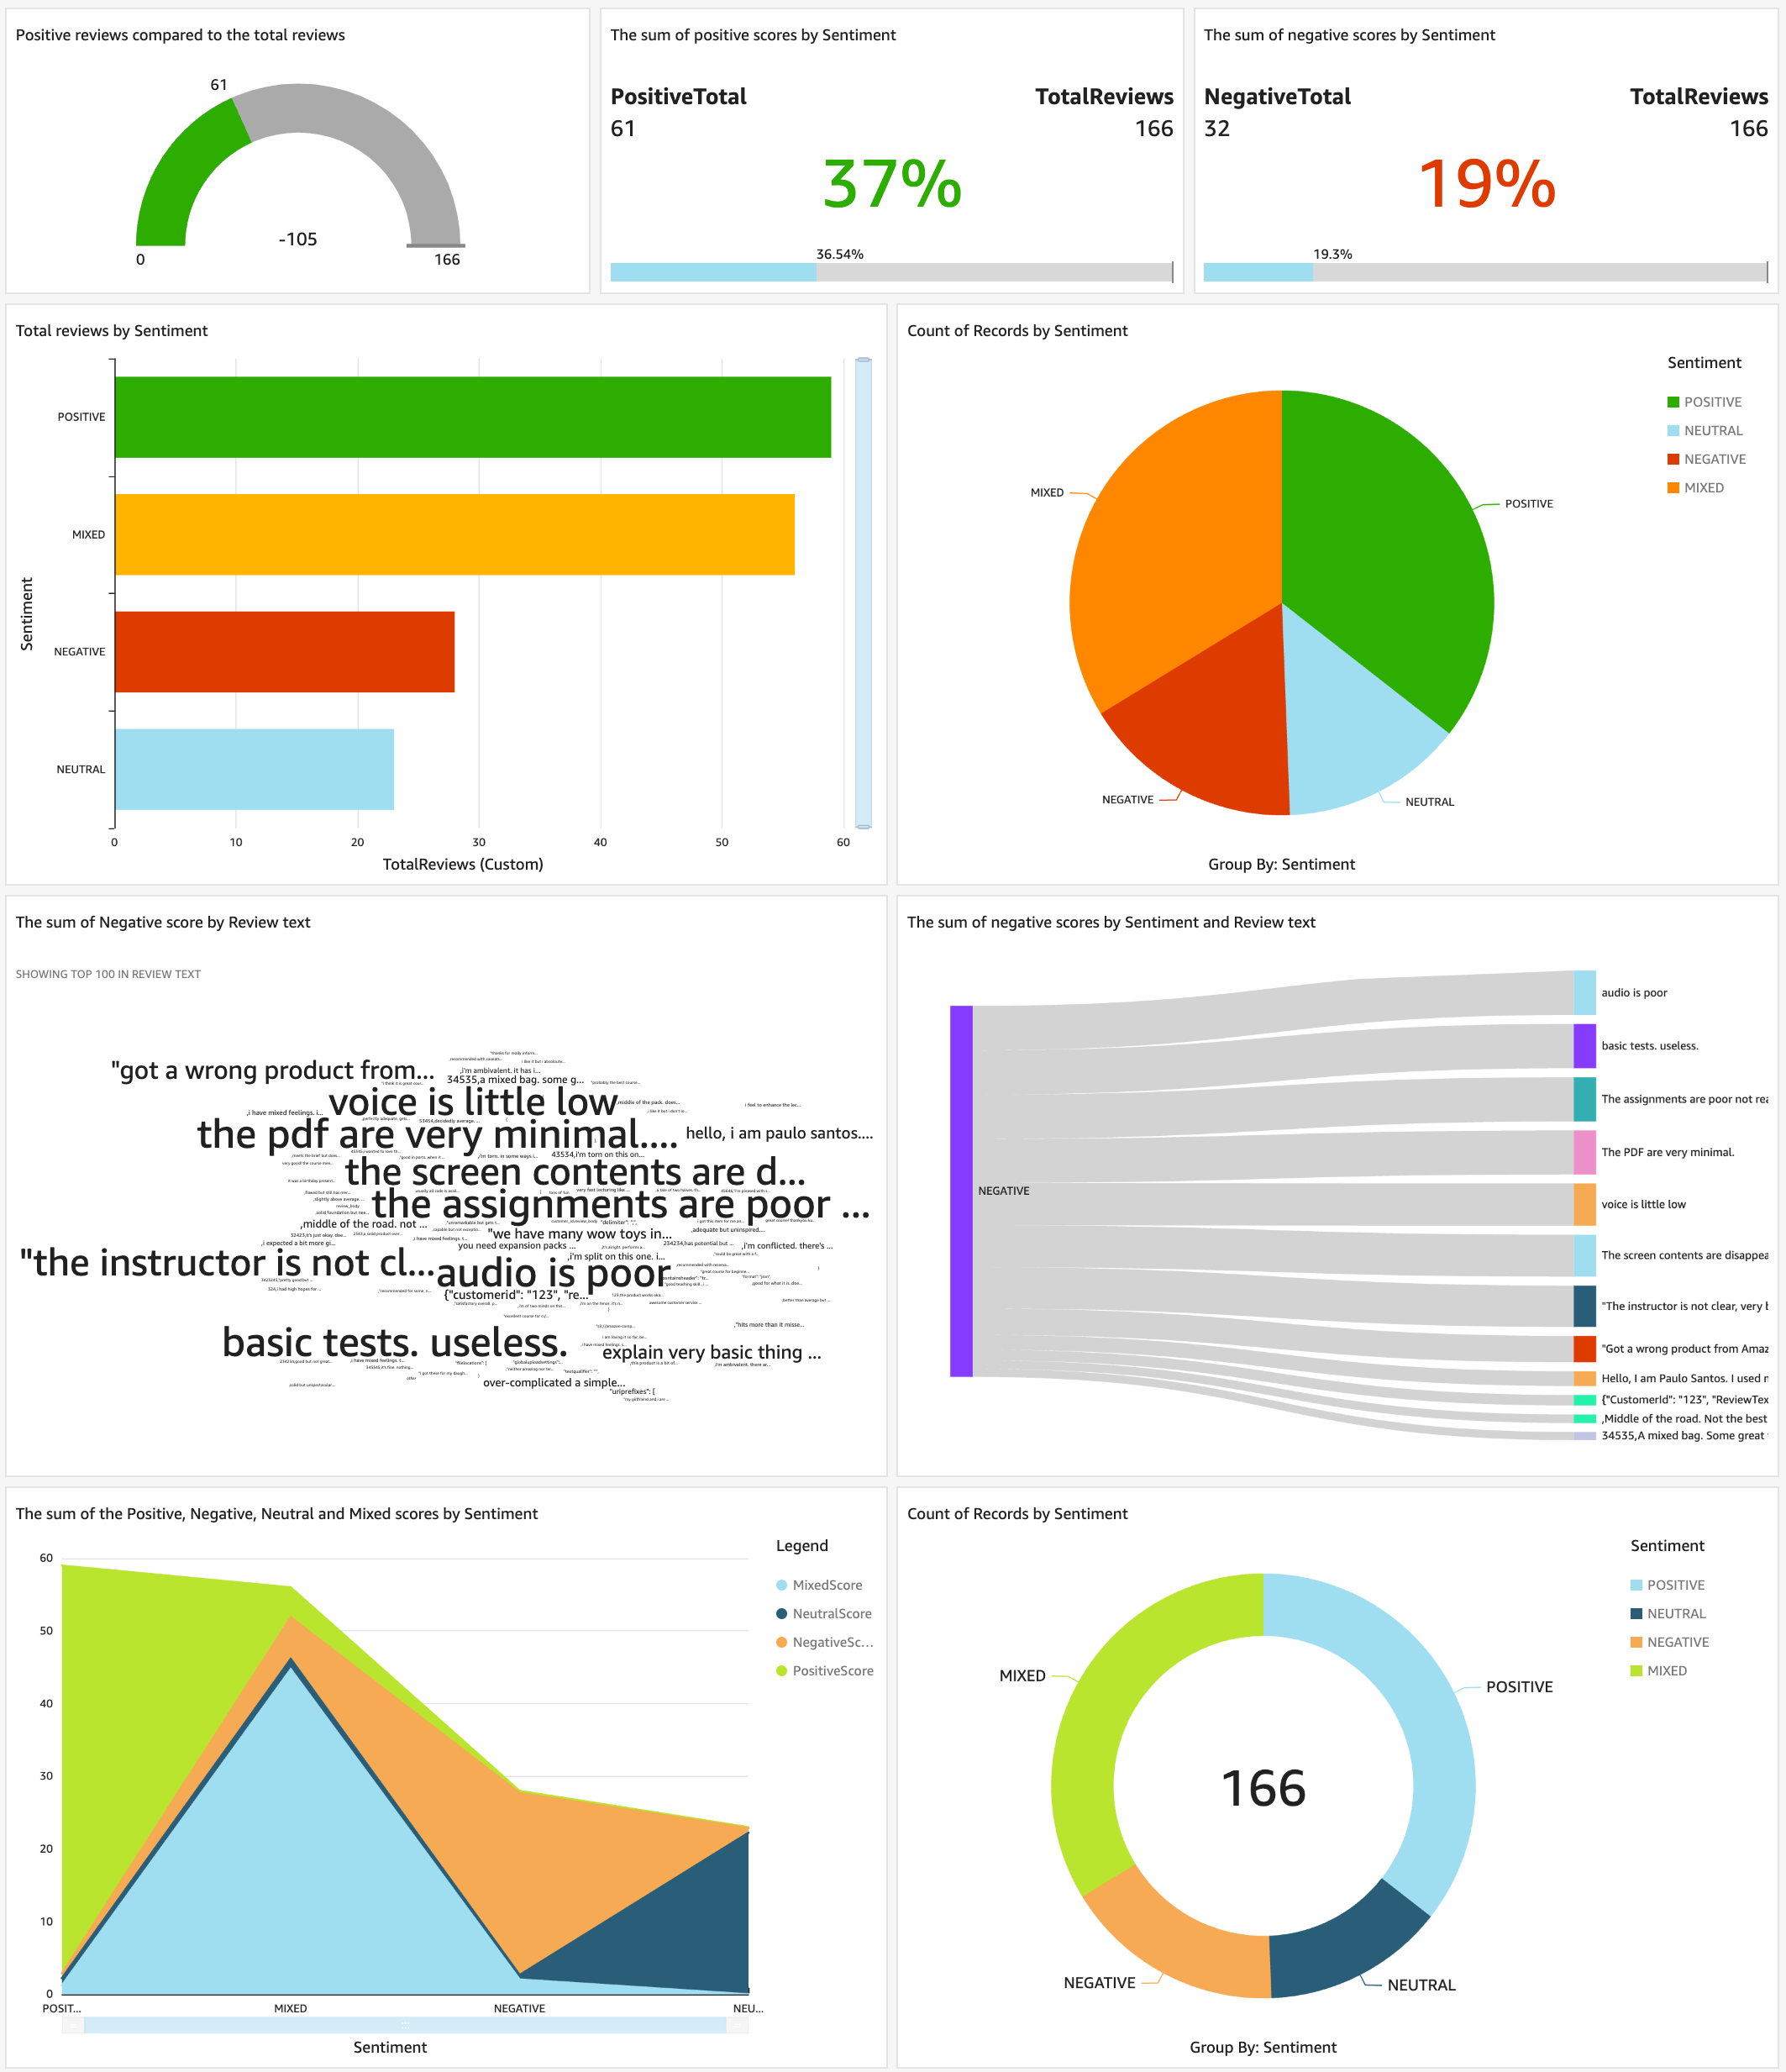
4. Customise and format your visuals:
– Adjust the chart titles, labels, and legends to make them more informative.
– Apply appropriate colours and styles to enhance the visual appeal and readability.
– Add filters or sliders to allow interactive exploration of the data.
5. Create a dashboard:
– Click “Add” and select “Add dashboard”.
– Give your dashboard a name and choose a theme.
– Resize and arrange the visuals on the dashboard canvas to create a cohesive and informative layout.
– Add text boxes, images, or other elements to provide context and insights.
6. Publish and share the dashboard:
– Click “Share” on the top right corner of the dashboard.
– Select “Publish dashboard” and choose the desired access permissions.
– Copy the generated link or embed code to share the dashboard with others.
Here’s a step-by-step guide on how to set up an Amazon SNS email notification based on a high percentage of negative reviews using AWS services:
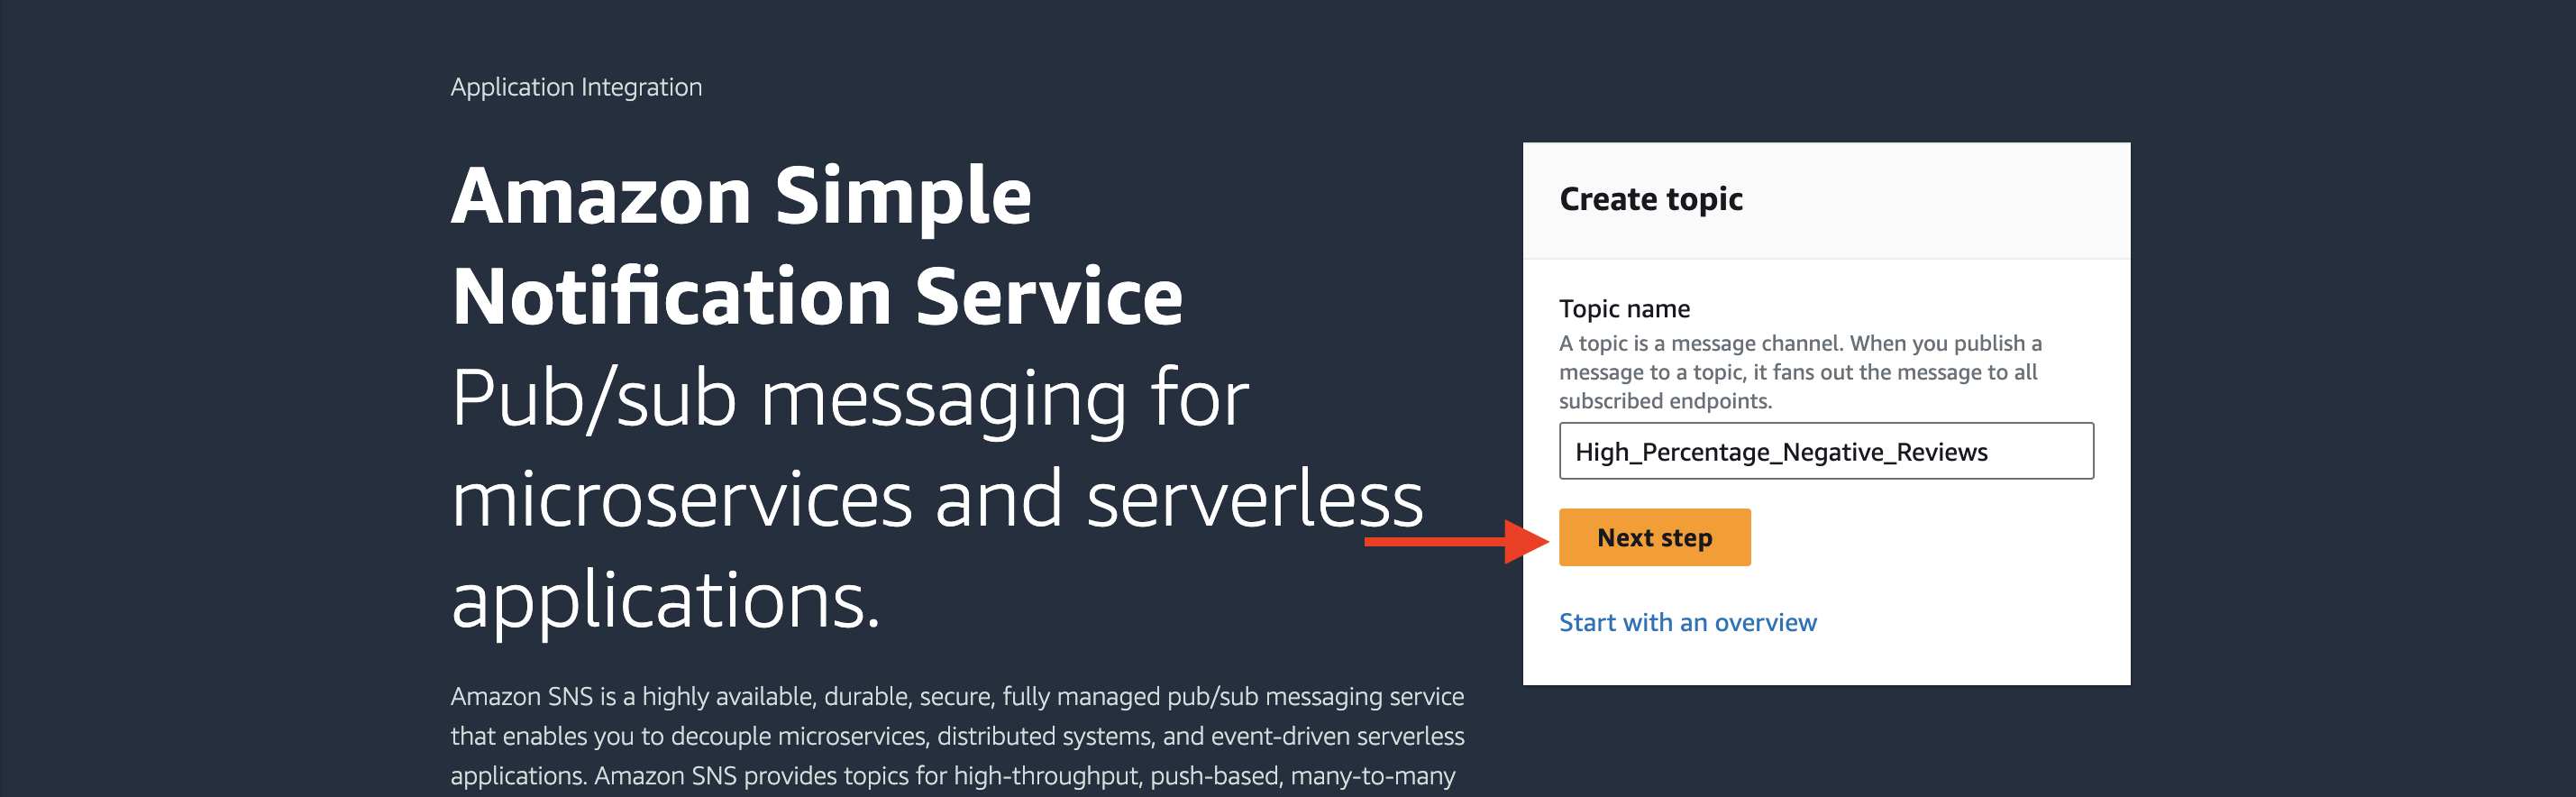
Step 1: Set up an Amazon SNS topic
1. Open the Amazon SNS console.
2. Click on “Create topic”.
3. Enter a name for your topic and click “Create topic”.
4. Note down the “Topic ARN” as you will need it later.
Step 2: Subscribe to the SNS topic
1. In the SNS console, click on the topic you just created.
2. Click on “Create subscription”.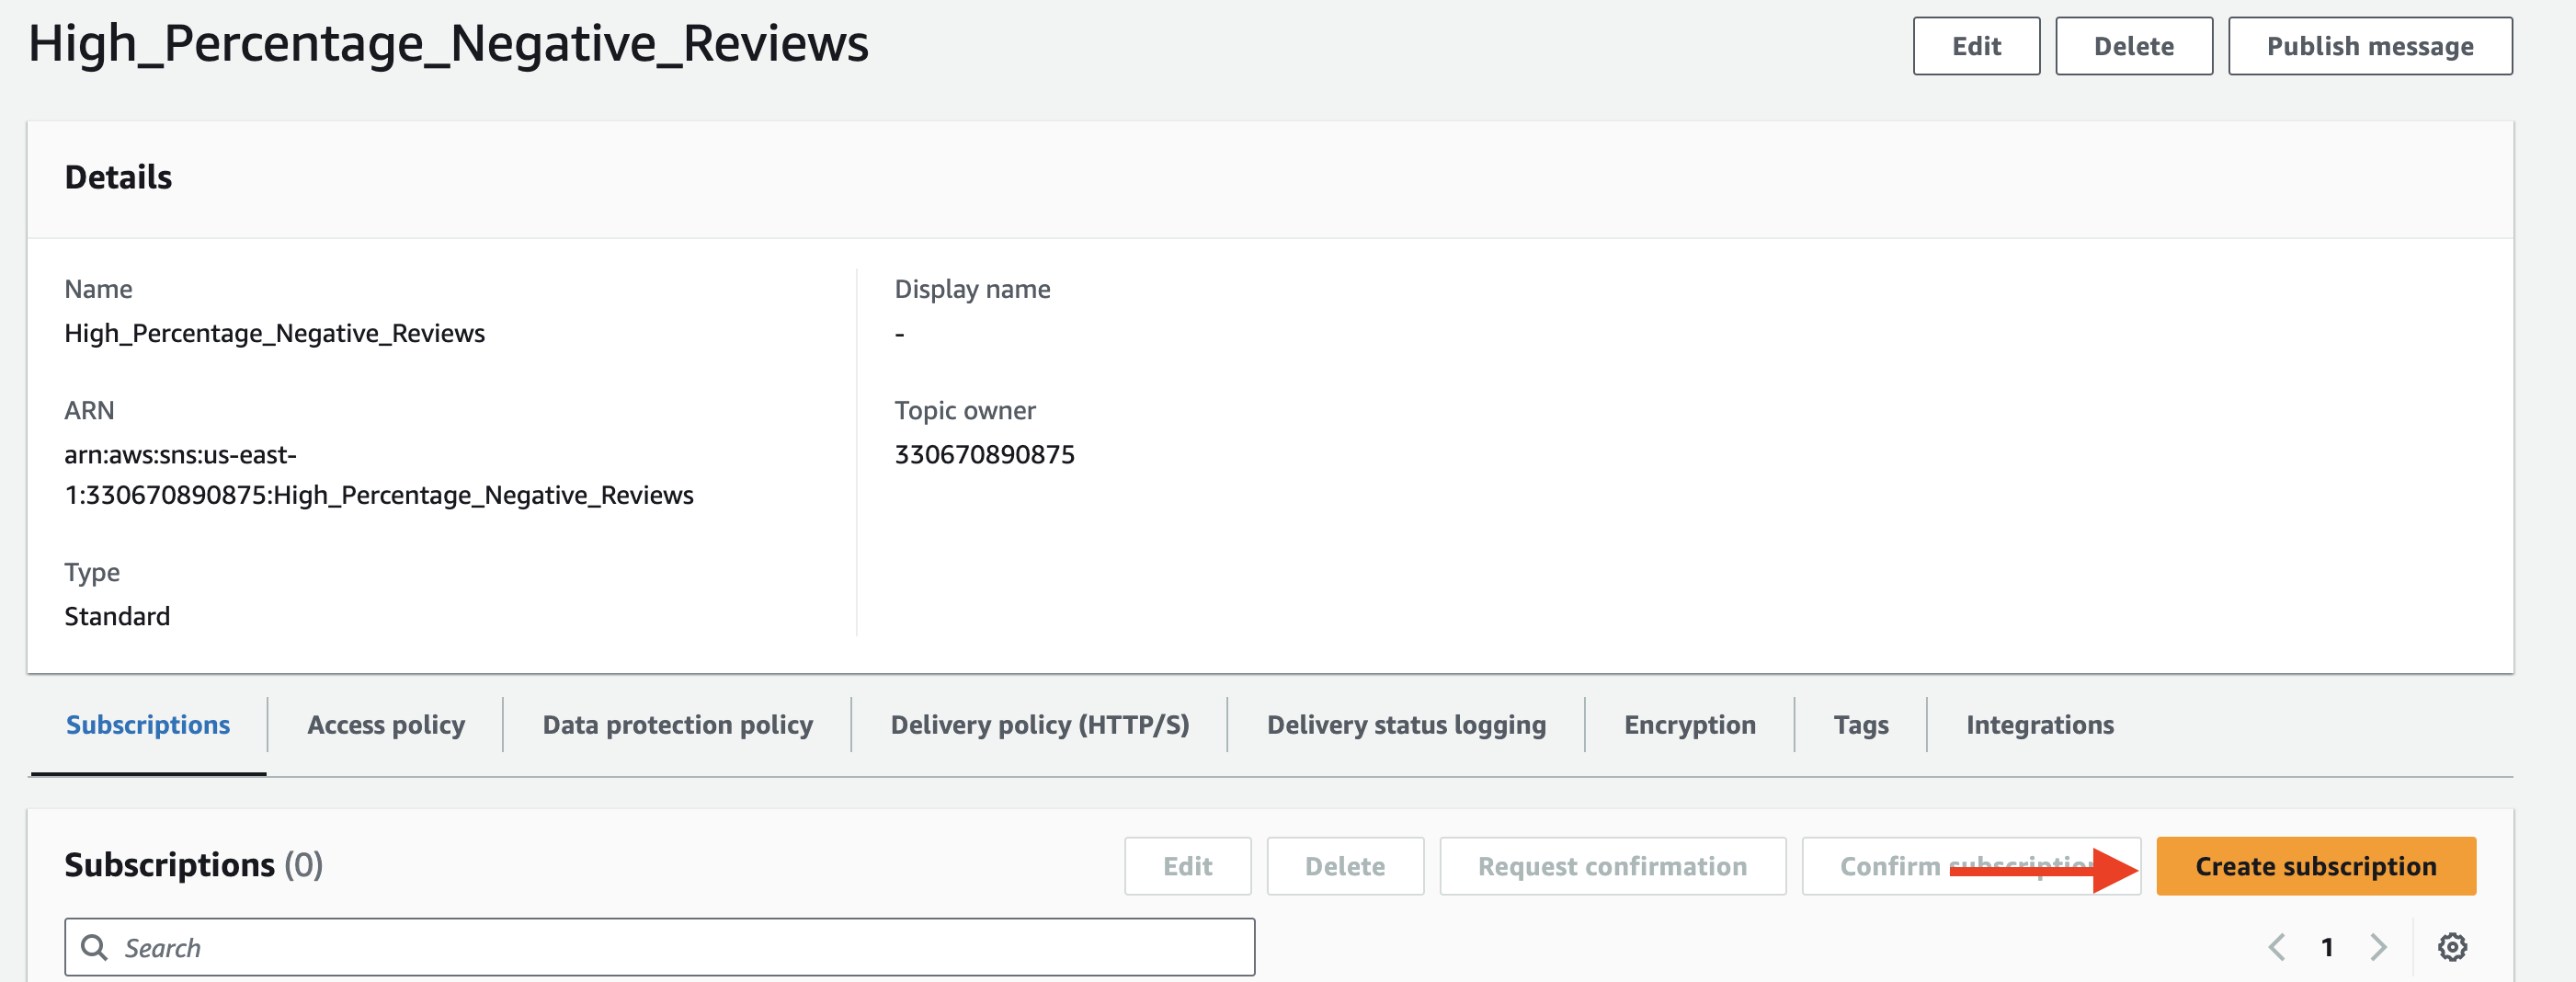
3. Choose “Email” as the protocol.
4. Enter the email address where you want to receive notifications.
5. Click “Create subscription”.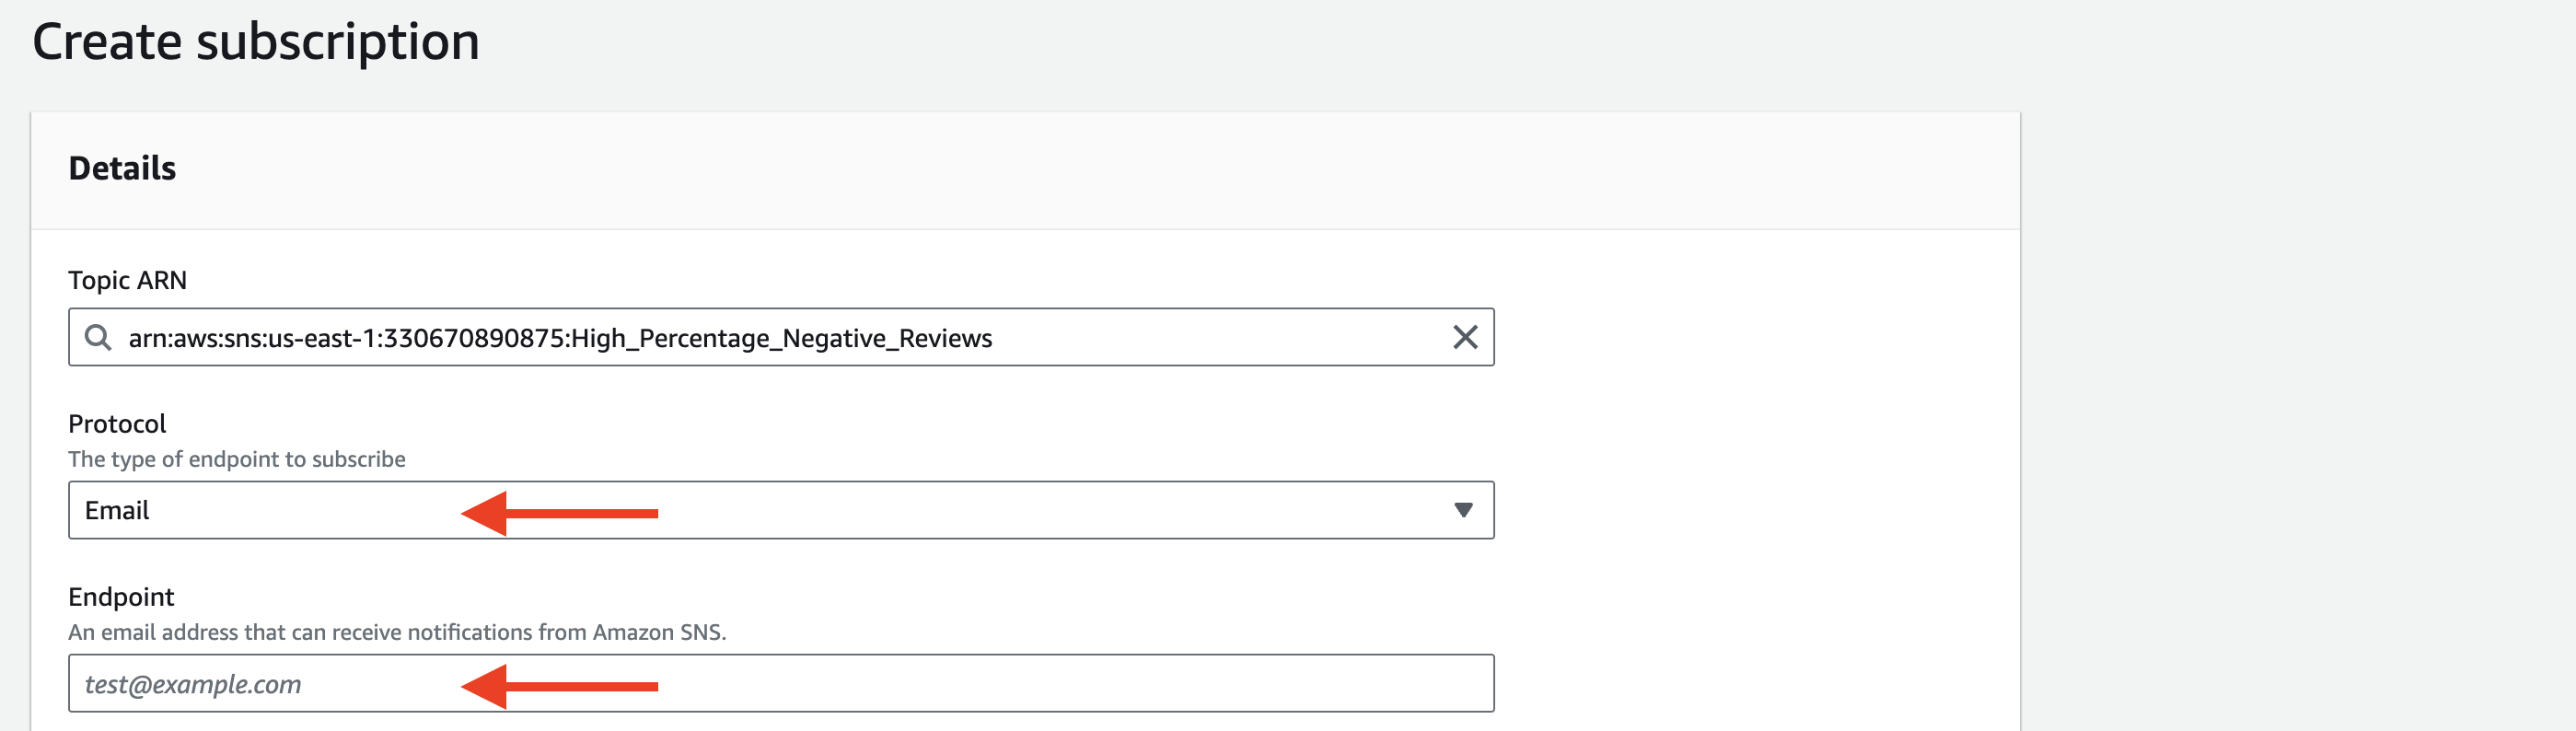
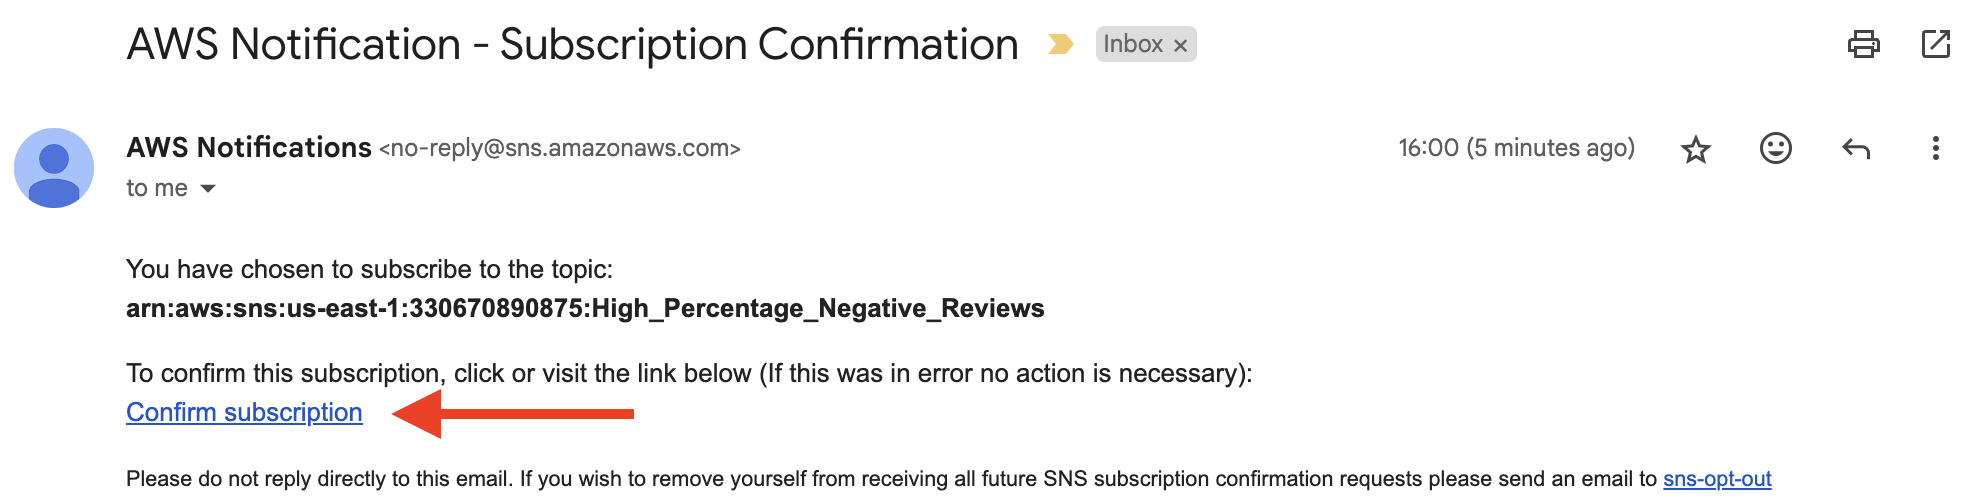
6. Confirm the subscription by clicking on the confirmation link sent to your email.
Step 3: Create an IAM role for AWS Lambda
1. Open the IAM console.
2. Click on “Roles” and then “Create role”.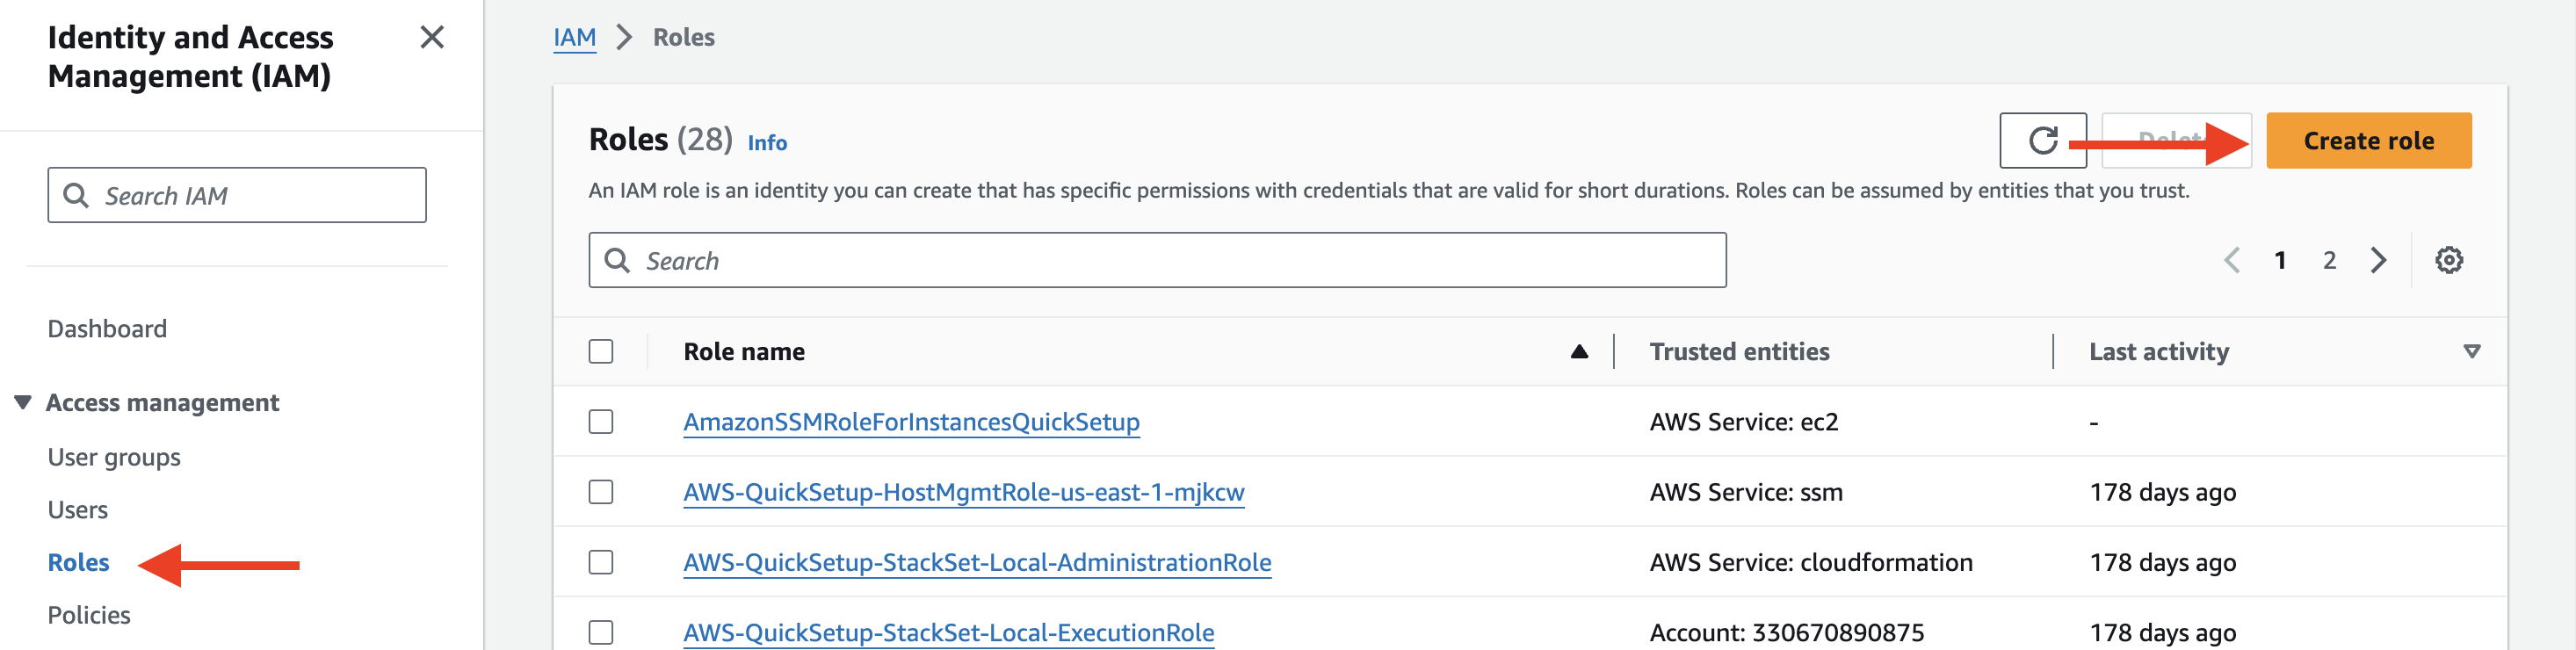
3. Select “AWS service” and choose “Lambda”.
4. Click “Next: Permissions”.
5. Search for and attach the “AmazonSNSFullAccess” and “AmazonS3FullAccess” policies.
6. Click “Next: Tags” and then “Next: Review”.
7. Give your role a name and click “Create role”.
Step 4: Create a Lambda function
1. Open the AWS Lambda console.
2. Click on “Create function”.
3. Choose “Author from scratch”.
4. Enter a name for your function.
5. Select “Python 3.12” as the runtime.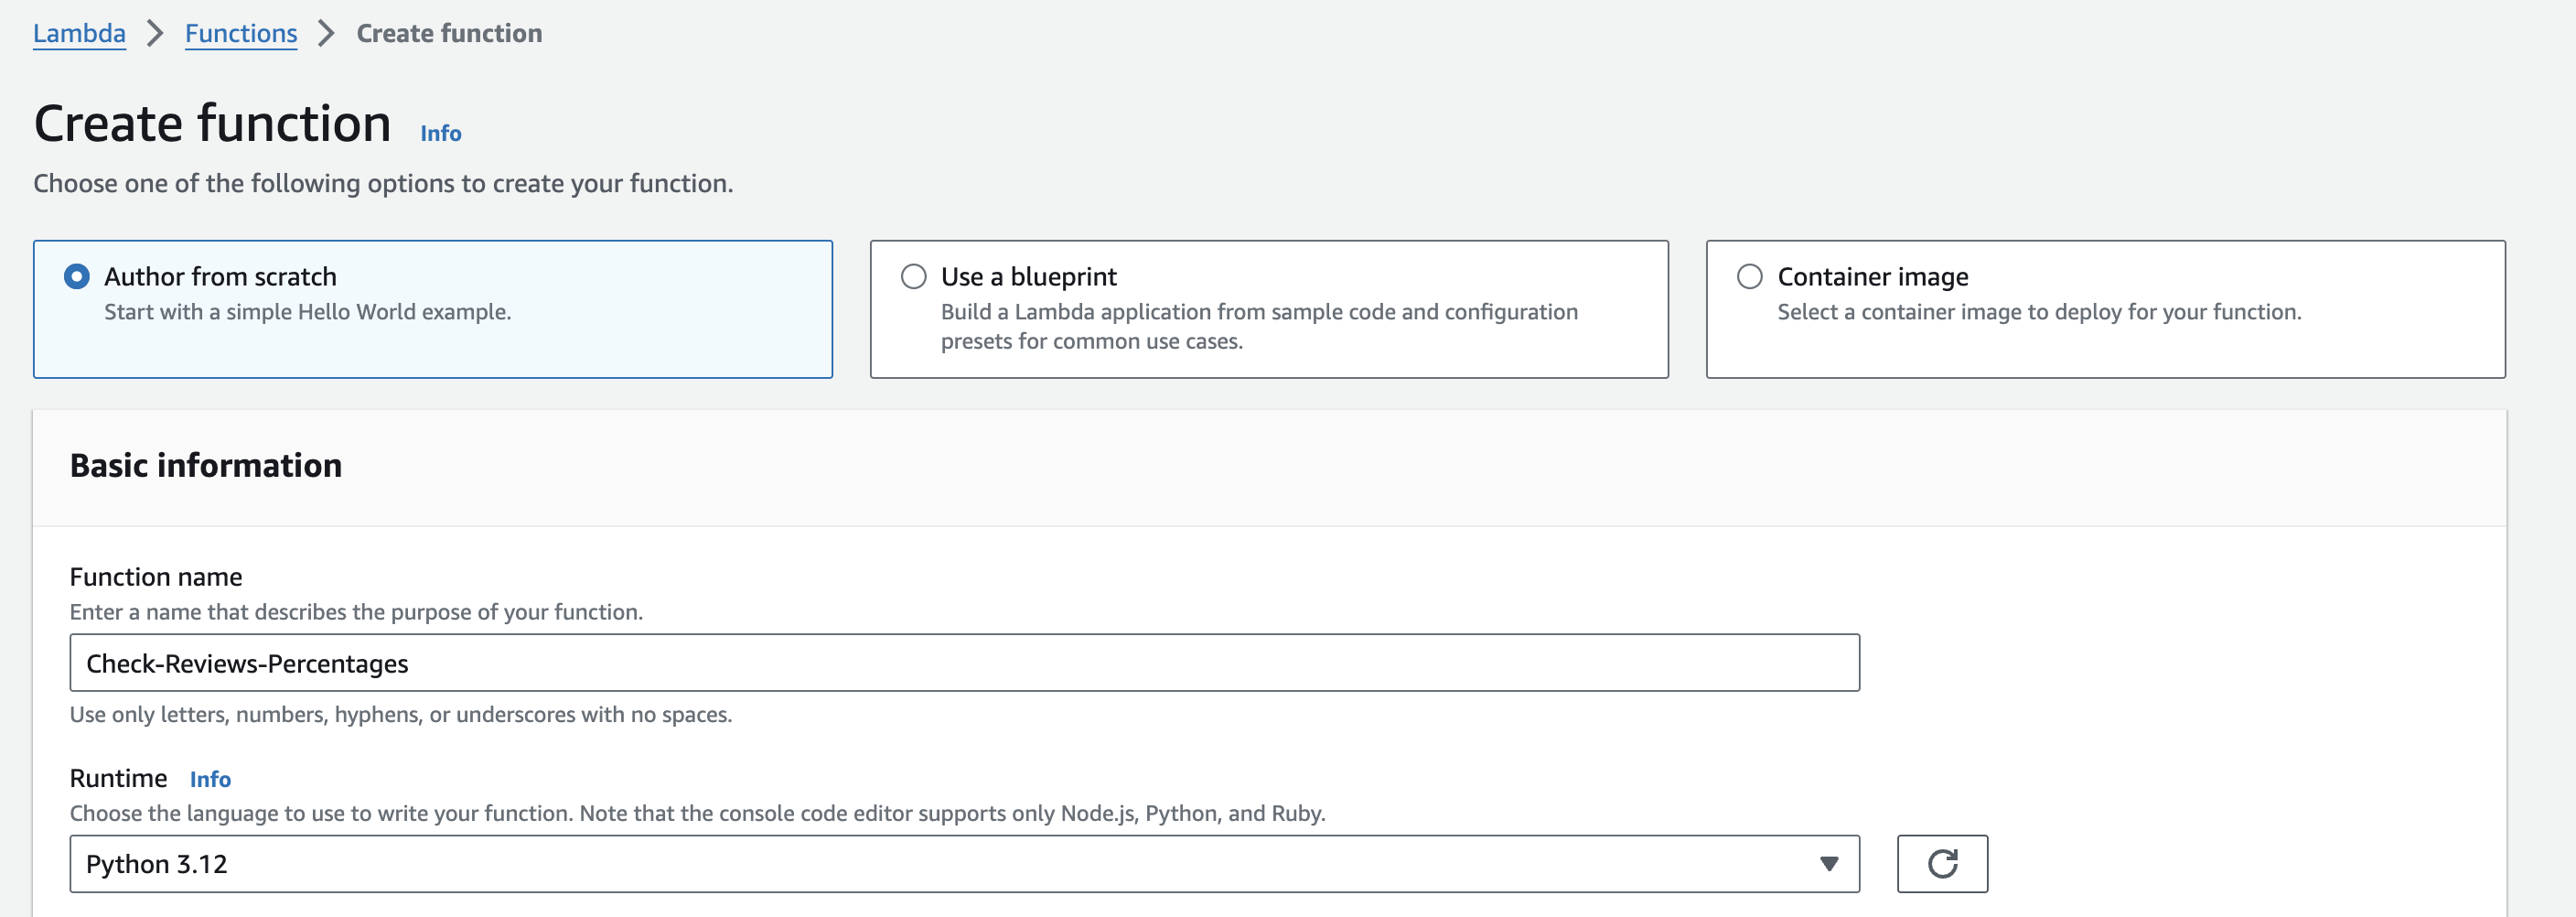
6. Under “Permissions”, select “Use an existing role” and choose the IAM role you created in Step 3.
7. Click “Create function”.
Step 5: Write the Lambda function code
1. In the Lambda function editor, replace the default code with the following:
import boto3
import os
import json
def lambda_handler(event, context):
s3 = boto3.client('s3')
sns = boto3.client('sns')
# Parameters
output_bucket = 'YOUR_OUTPUT_BUCKET'
output_folder = 'output/'
negative_review_threshold = 20 # Adjust this value as needed
try:
# List JSON files in the S3 output folder
response = s3.list_objects_v2(Bucket=output_bucket, Prefix=output_folder)
total_reviews = 0
negative_reviews = 0
for obj in response['Contents']:
if obj['Key'].endswith('.json'):
# Read the JSON file content
file_content = s3.get_object(Bucket=output_bucket, Key=obj['Key'])['Body'].read().decode('utf-8')
sentiment_results = json.loads(file_content)
# Count total reviews and negative reviews
total_reviews += len(sentiment_results)
negative_reviews += sum(1 for result in sentiment_results if result['Sentiment'] == 'NEGATIVE')
# Calculate the percentage of negative reviews
negative_review_percentage = (negative_reviews / total_reviews) * 100
if negative_review_percentage > negative_review_threshold:
sns.publish(
TopicArn=os.environ['SNS_TOPIC_ARN'],
Subject='High Negative Reviews Alert',
Message=f'The percentage of negative reviews ({negative_review_percentage:.2f}%) exceeds the threshold of {negative_review_threshold}%.'
)
except Exception as e:
print(f"An error occurred: {str(e)}")
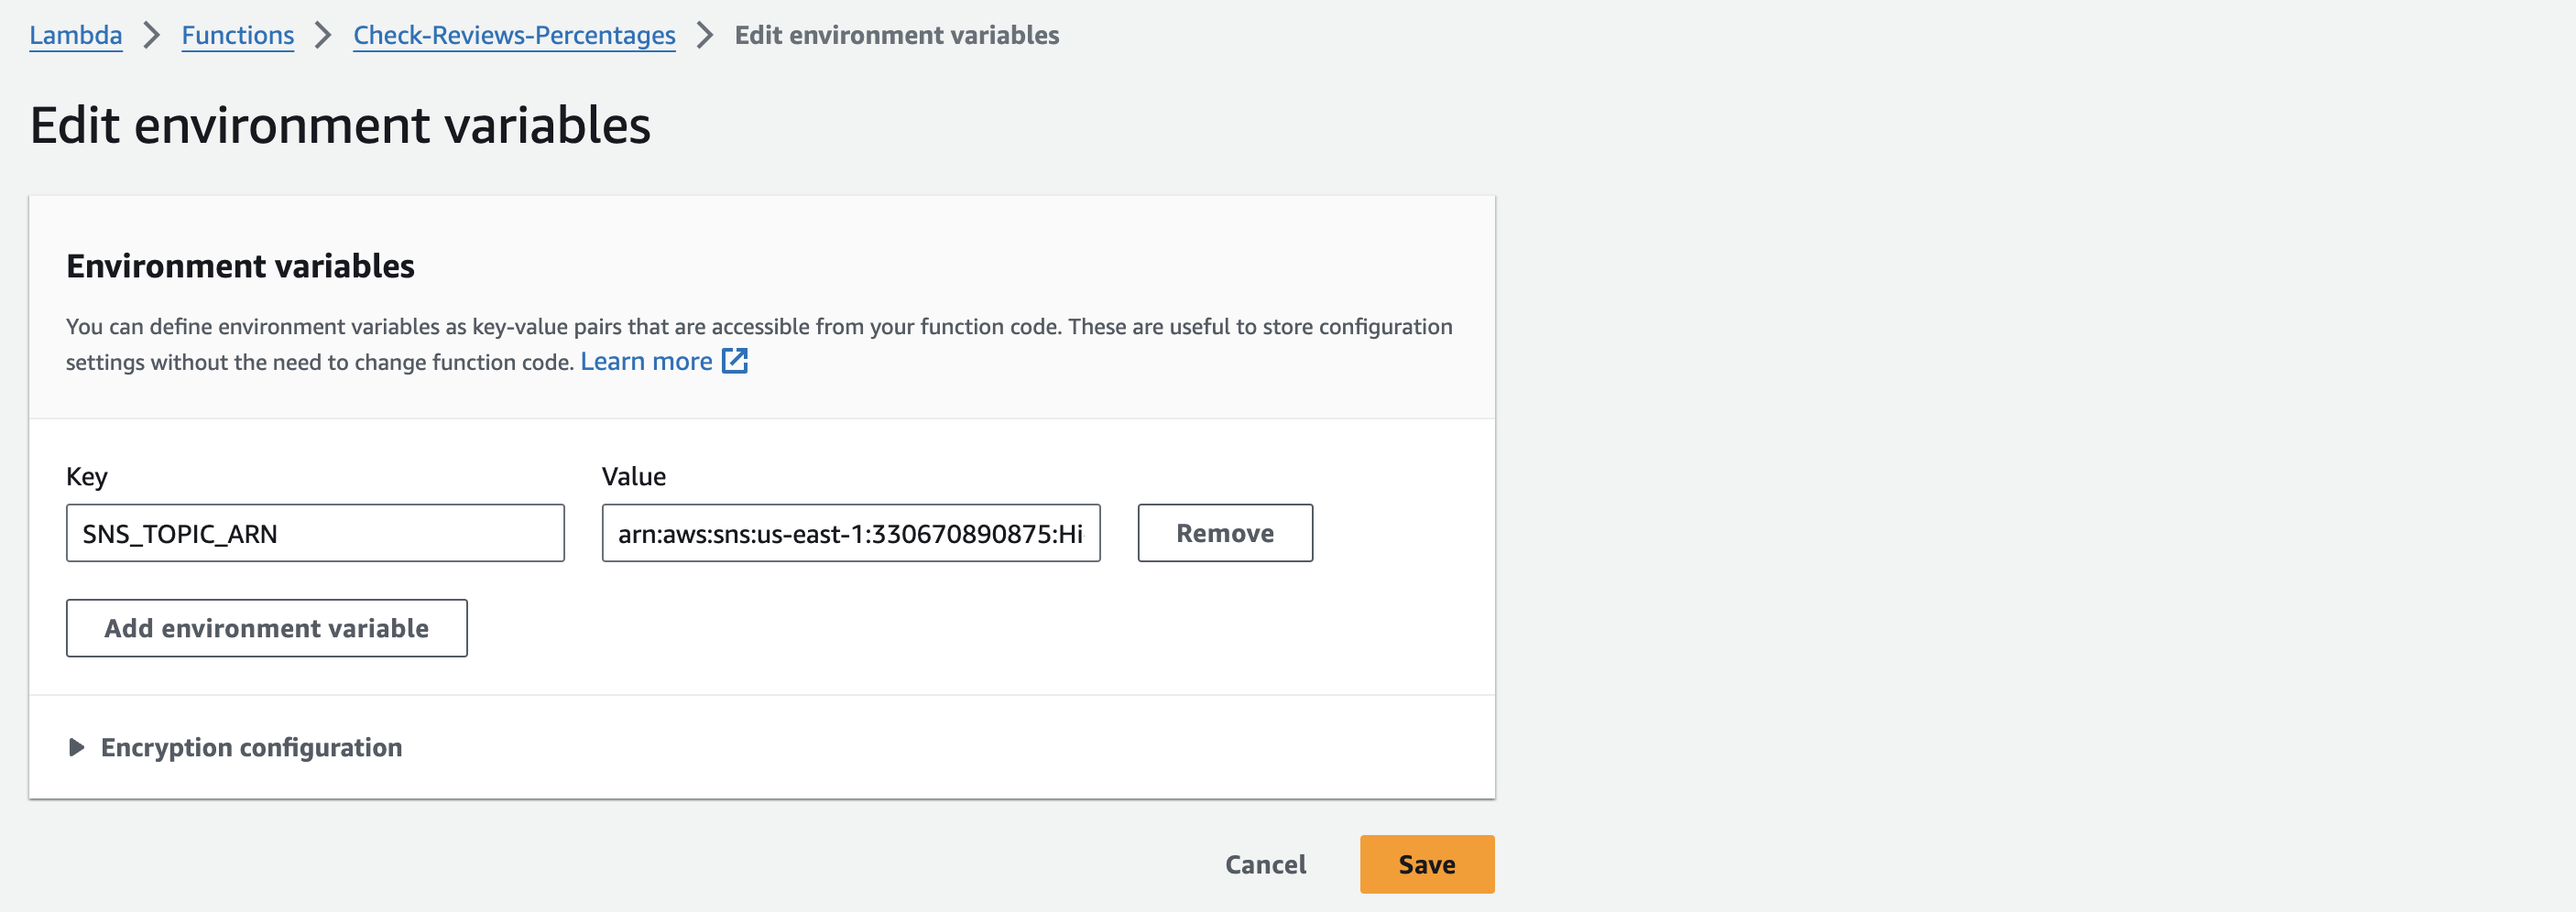
raise eStep 6: Set up environment variables for the Lambda function
SNS_TOPIC_ARN: This variable should contain the Amazon Resource Name (ARN) of the SNS topic you created in Step 1. The Lambda function uses this ARN to publish notifications when the percentage of negative reviews exceeds the specified threshold.
To set up the SNS_TOPIC_ARN environment variable:
- Open the AWS Lambda console.
- Select your Lambda function.
- In the “Configuration” tab, scroll down to the “Environment variables” section.
- Click on “Edit”.
- Add a new environment variable with the key
SNS_TOPIC_ARNand the value of your SNS topic ARN. The ARN should be in the formatarn:aws:sns:region:account-id:topic-name. - Click “Save”.
Make sure to replace 'YOUR_OUTPUT_BUCKET' it with the name of your S3 bucket where the sentiment analysis results are stored.
Step 7: Configure the Lambda function trigger
1: Open the AWS Lambda console.
2: Select your Lambda function.
3: In the “Designer” section, click on “Add trigger”.
4: In the “Trigger configuration” dropdown, select “EventBridge (CloudWatch Events)”.
5: Under “Rule”, select “Create a new rule”.
6: Provide a name for your rule, such as “DailyNegativeReviewsNotificationRule”.
7: In the “Rule type” section, select “Schedule expression”.
8: In the “Schedule expression” field, enter the following cron expression:cron(0 0 * * ? *)This cron expression represents running the Lambda function every day at midnight UTC (00:00).
Here’s a breakdown of the cron expression:
0: Minute (0-59)0: Hour (0-23)*: Day of the month (1-31)*: Month (1-12)?: Day of the week (1-7 or SUN-SAT)*: Year (optional)
Step 9: Click on “Add” to create the rule and associate it with your Lambda function.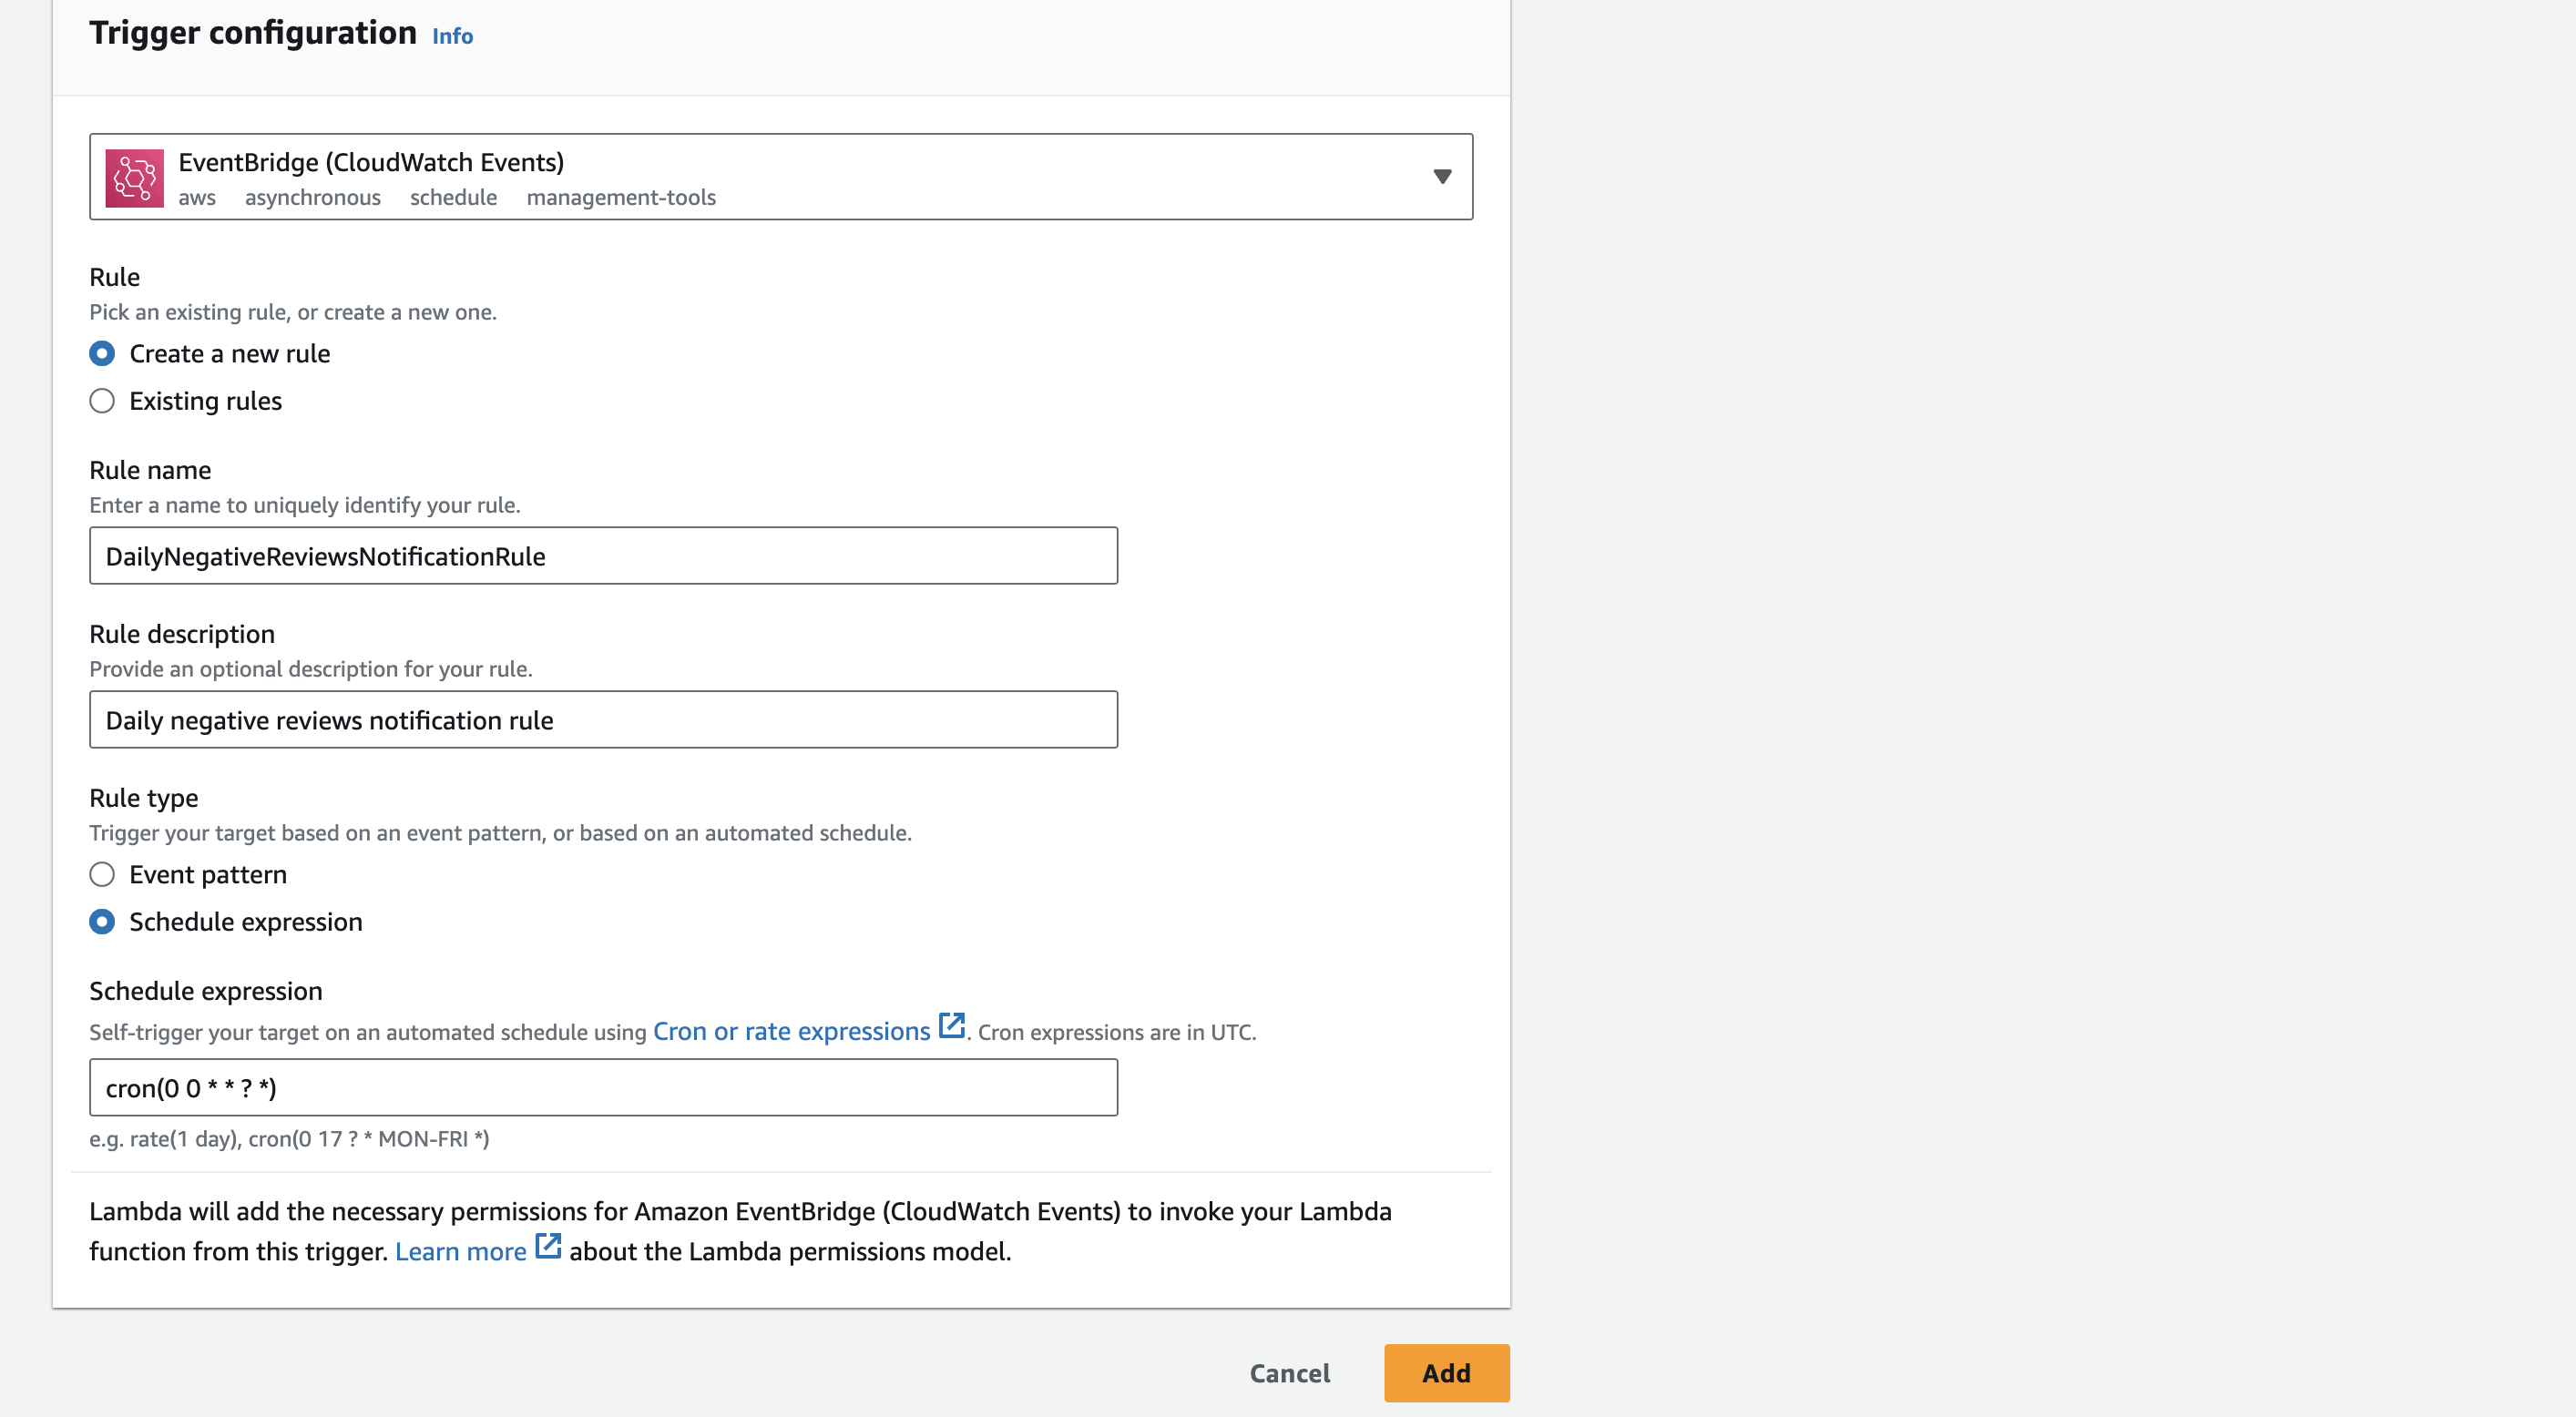
Now our Lambda function will be triggered once a day at midnight UTC based on the specified cron expression.
Step 8: Test and monitor
1. Save your Lambda function.
2. Test the function by manually invoking it or waiting for the scheduled trigger.
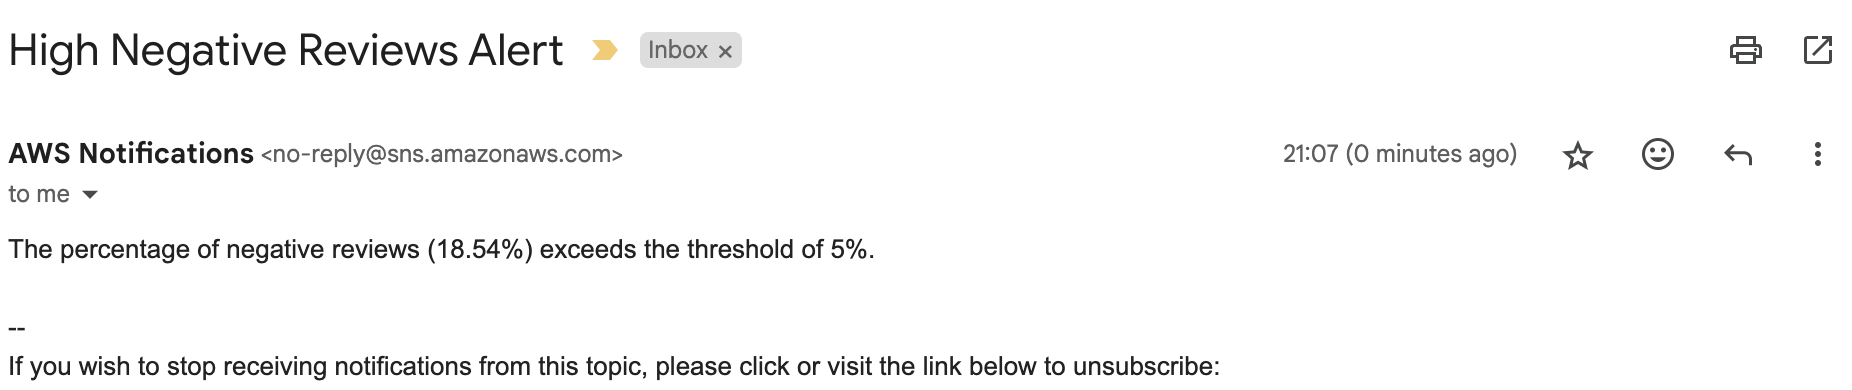
3. Let’s test it manually, I will set the “negative_review_threshold = 5” to make sure the SNS will be triggered and we will receive the email notification: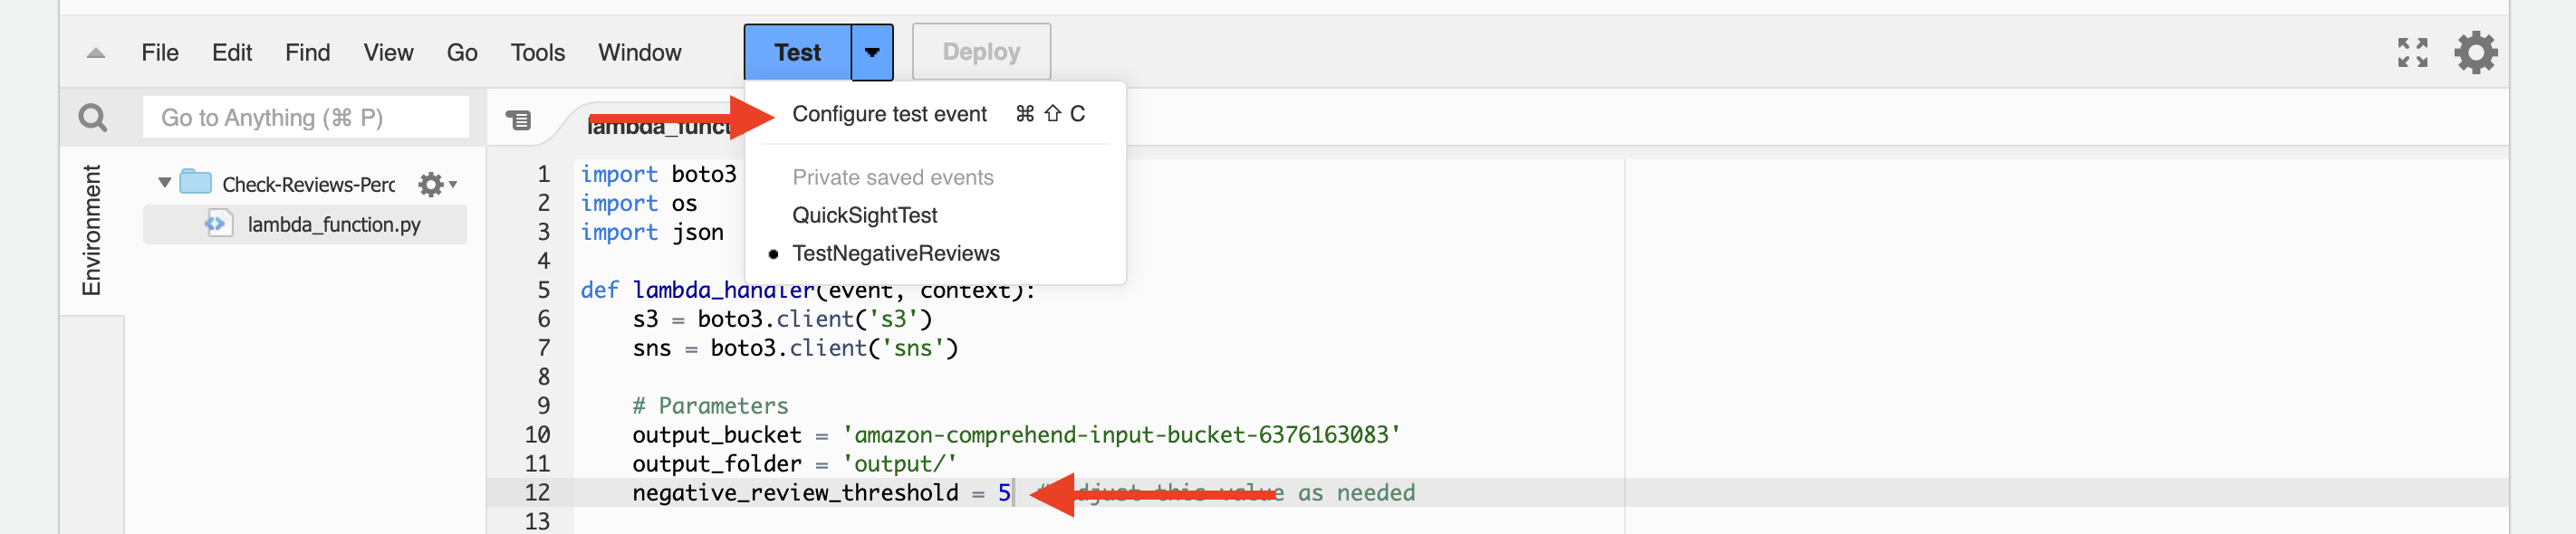
- In the Lambda function editor, click on the “Test” button.
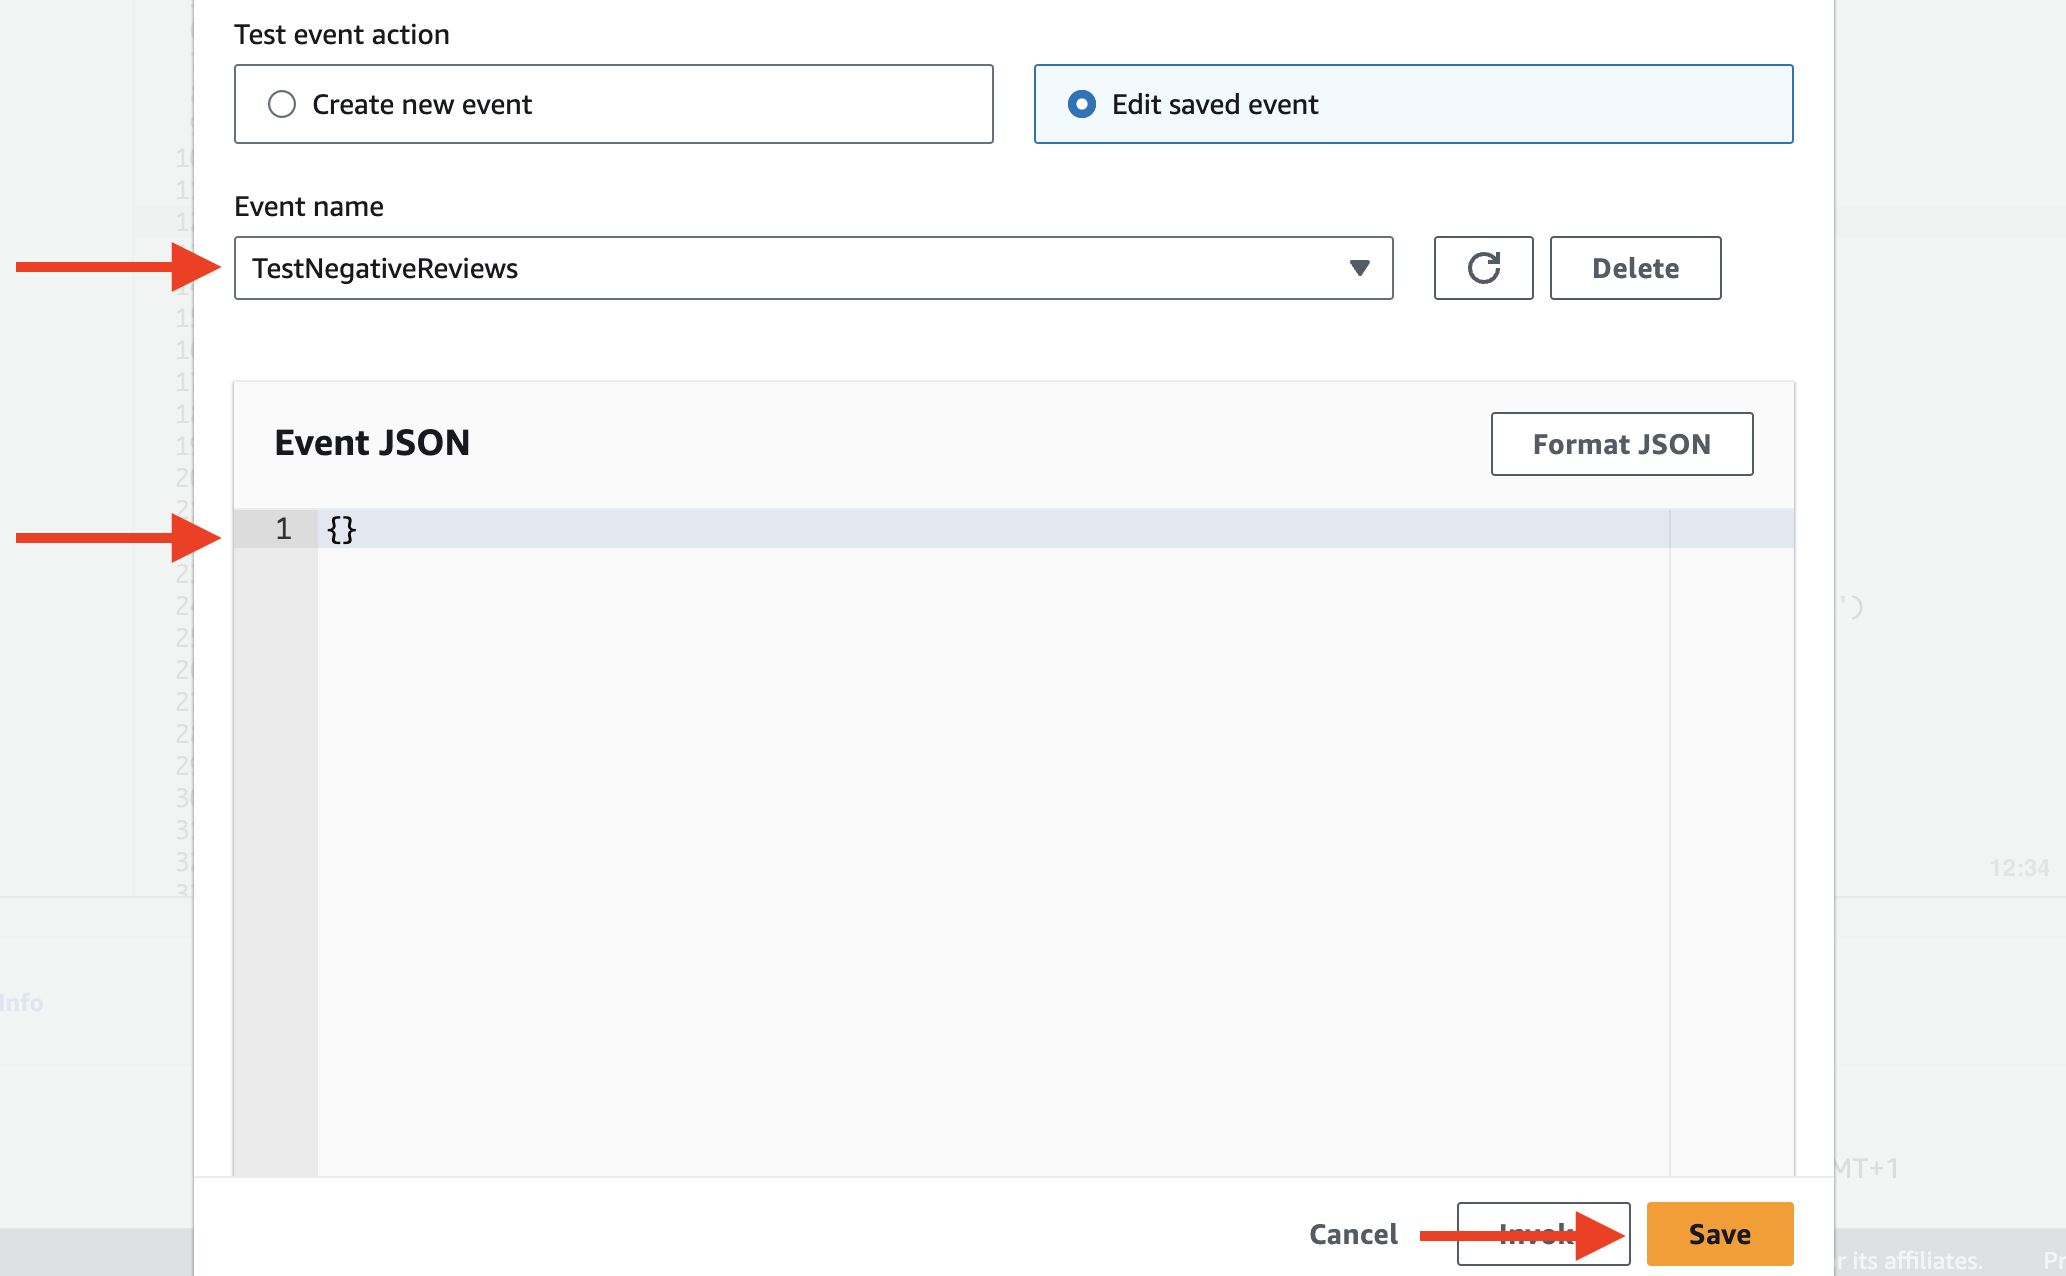
- Configure a test event by selecting “Create new test event” from the dropdown.
- Choose the “Hello World” template and give your test event a name (e.g., “TestNegativeReviewsNotification”).
- Replace the event data with an empty object
{}since the Lambda function doesn’t require any input event data. - Click “Create” to save the test event.
- With the test event selected, click on the “Test” button to manually invoke the Lambda function.

4. Verify email notifications:
- If the percentage of negative reviews exceeds the specified threshold (
negative_review_threshold), your Lambda function should publish a message to the SNS topic. - Check your email inbox associated with the email address you subscribed to the SNS topic.
- Look for an email with the subject “High Negative Reviews Alert” (or the subject you specified in the Lambda function code).
- Verify that the email contains the expected message, including the percentage of negative reviews that exceeded the threshold.
5. Monitor the CloudWatch Logs for your Lambda function to check for any errors or exceptions.